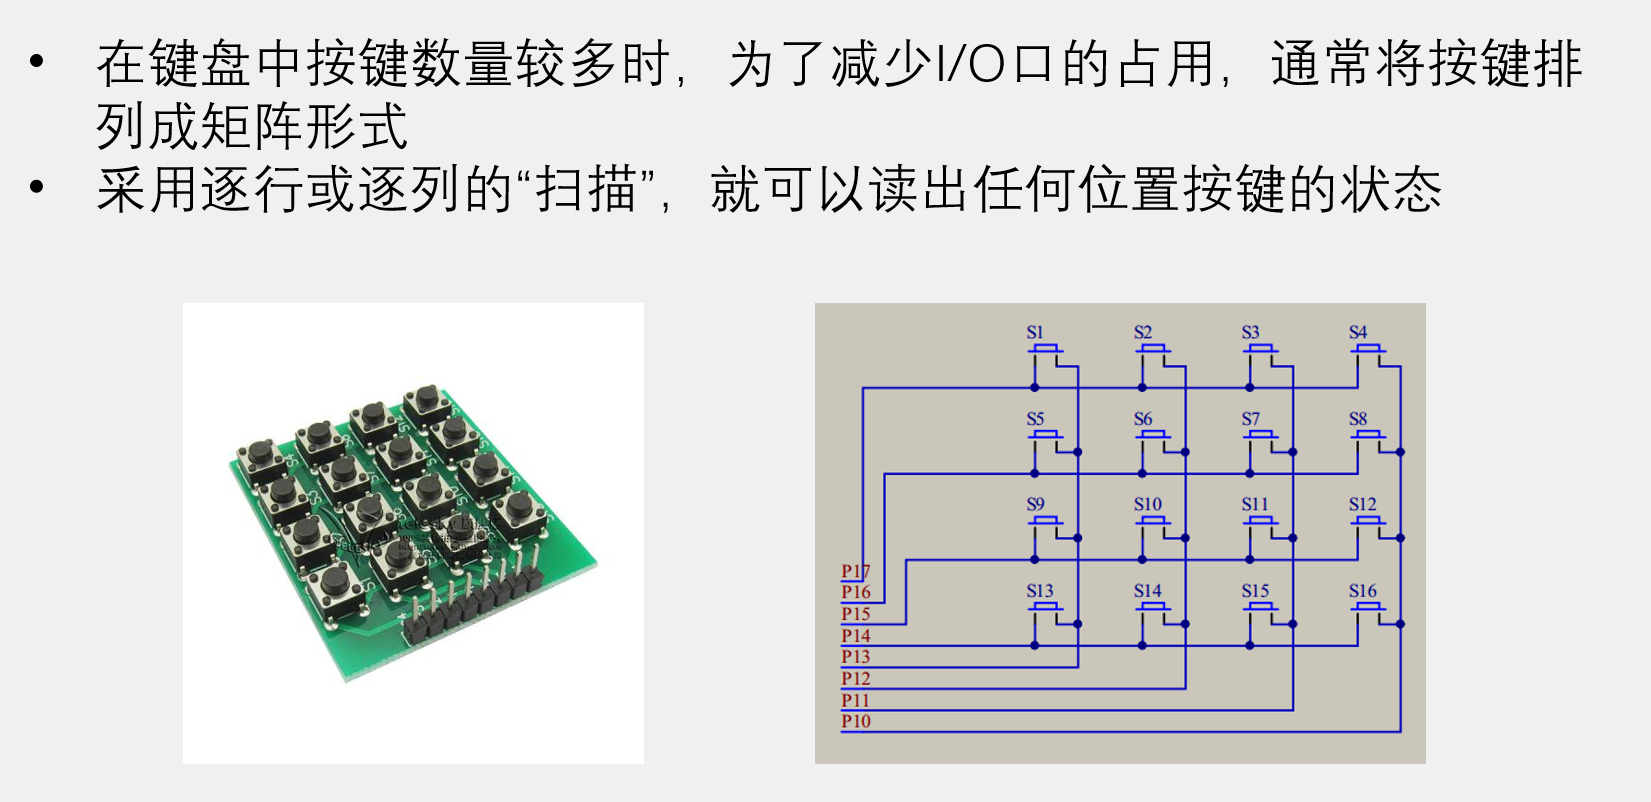
51C学习历程
新建工程
【keil5】project -> 新建文件夹目录 ->
Atmel->AT89C52-> 选择否
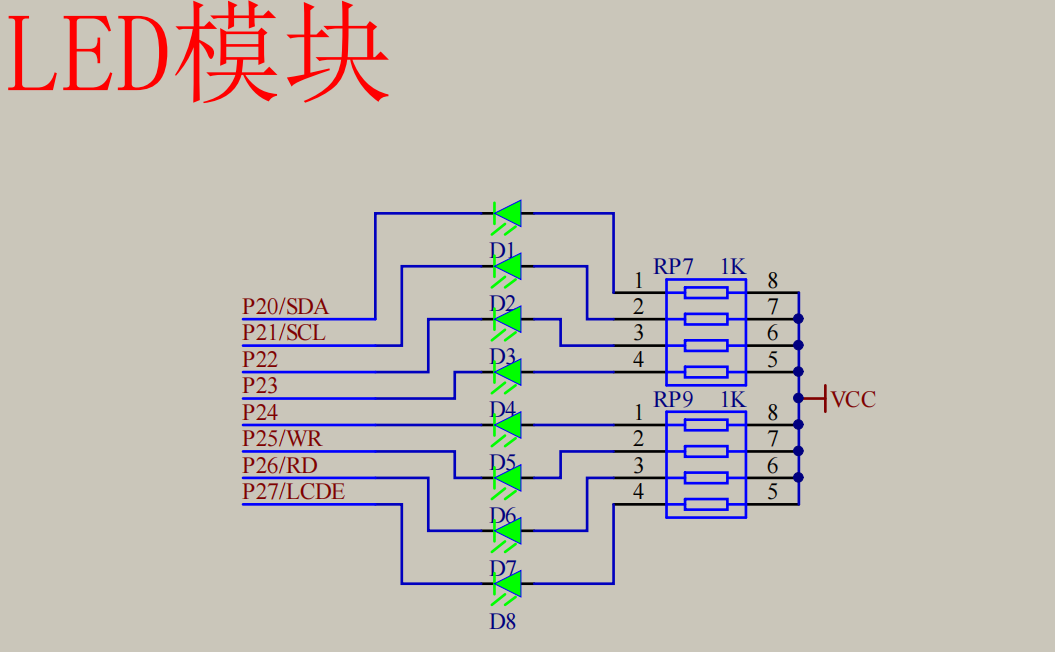
点亮一个LED
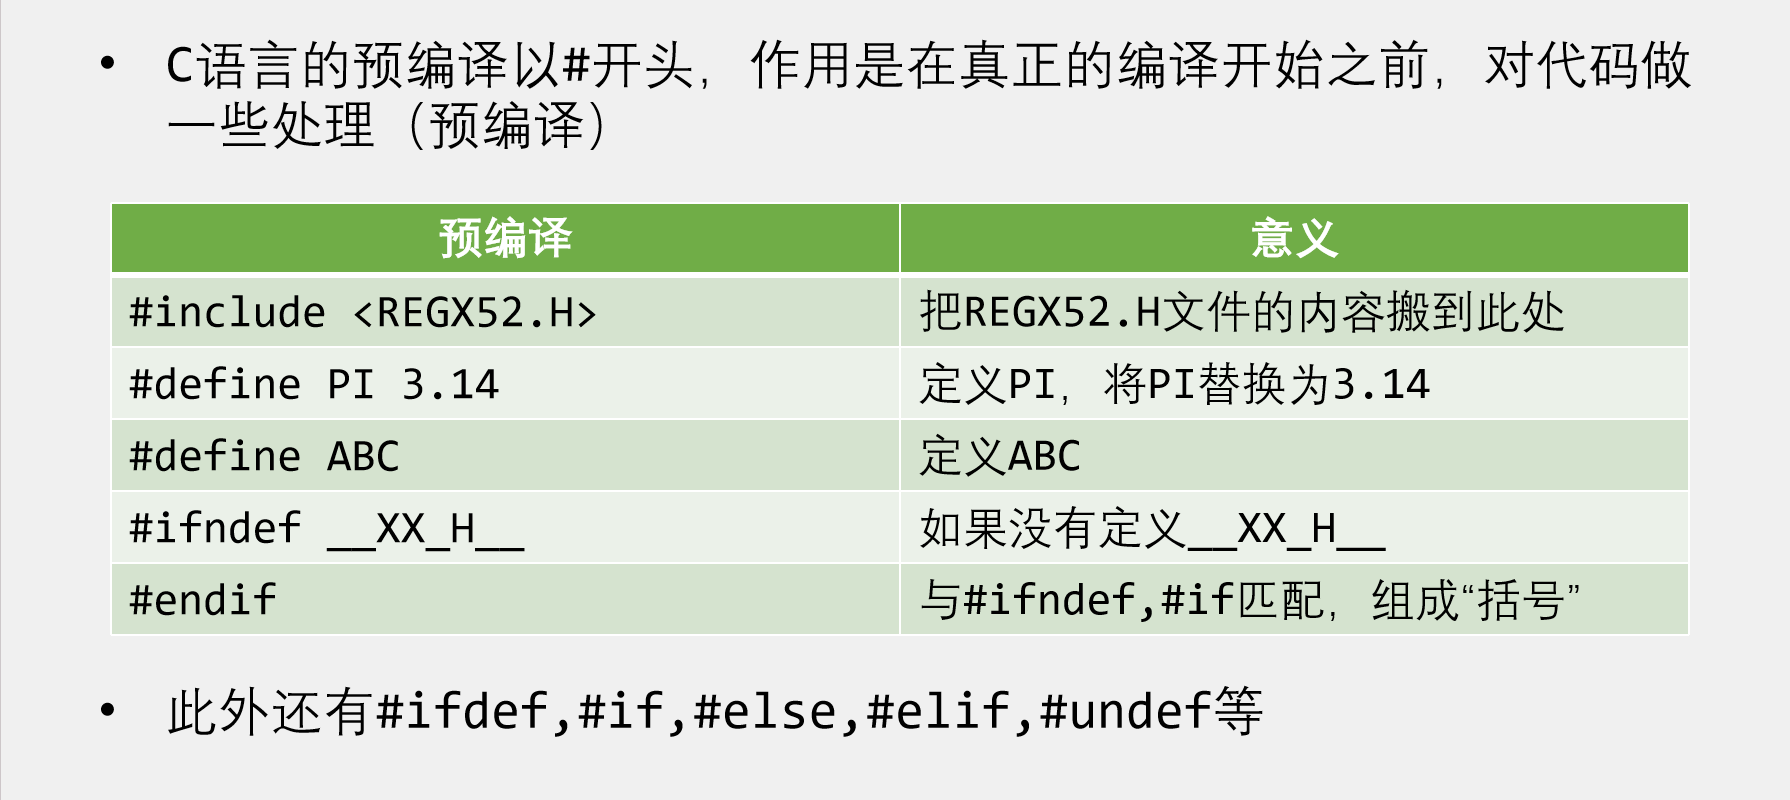
#include <REGX52.H>

void main()
{
    P2=0xFE;    //1111 1110
    while(1)
    {

    }
}
【STC-ISP】烧录到单片机
- 设置单片机型号
- 串口号
- 下载/编程
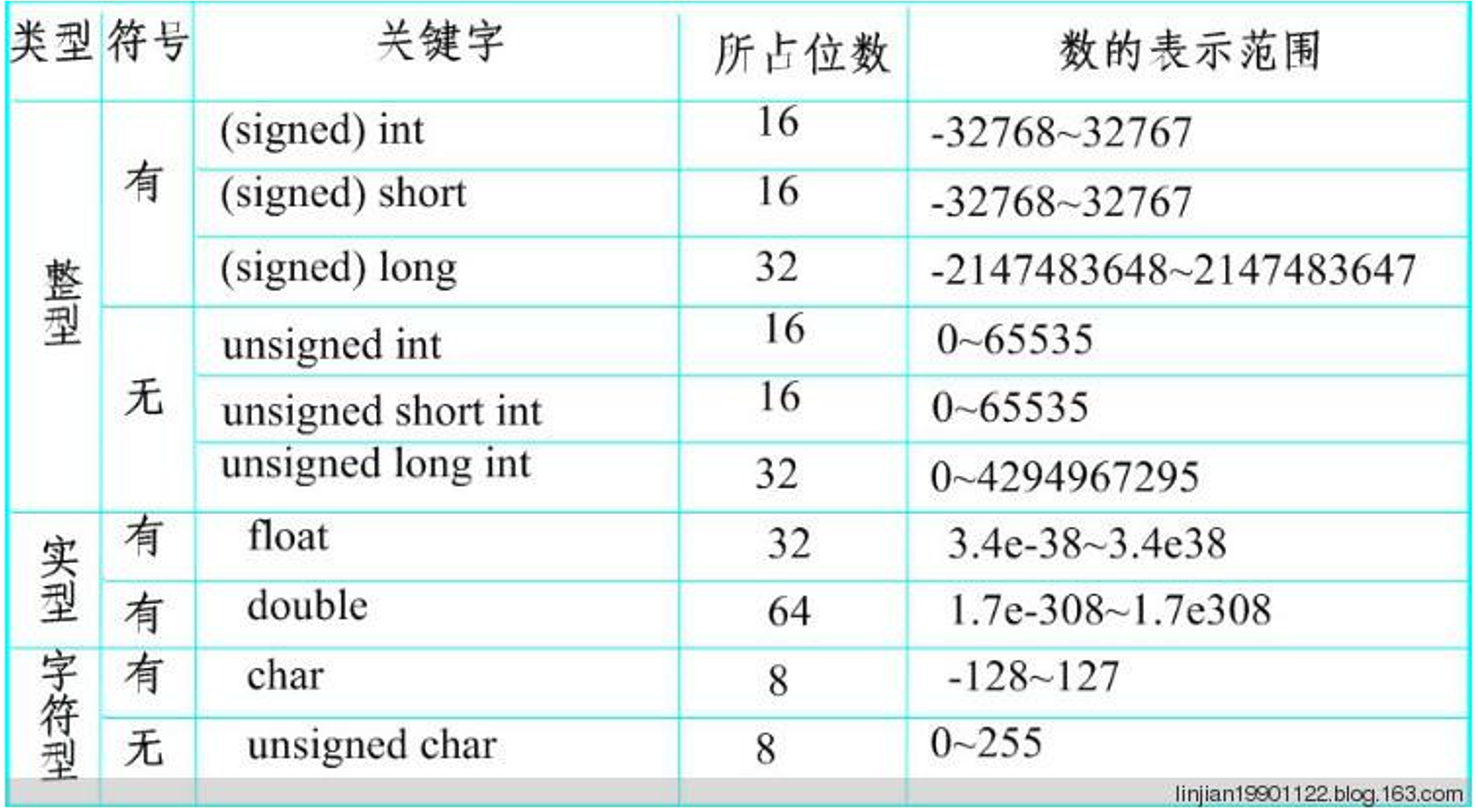
数据类型
- 整数:int, short, long
- 小数:float, double
- 字符:char
STC89C52
点亮一个LED灯
#include <REGX52.H>

void main()
{
    P2=0xFE;    //1111 1110 : turn on
}
LED闪烁
#include <REGX52.H>
#include <INTRINS.H>

void Delay500ms()        //@12.000MHz
{
    unsigned char i, j, k;

    _nop_();
    i = 4;
    j = 205;
    k = 187;
    do
    {
        do
        {
            while (--k);
        } while (--j);
    } while (--i);
}


void main()
{
    while(1)
    {
        P2=0xFE;    //1111 1110
        Delay500ms();
        P2=0xFF;    //1111 1111
        Delay500ms();
    }
}
LED流水灯
#include <REGX52.H>
#include <INTRINS.H>

void Delay500ms()        //@12.000MHz
{
    unsigned char i, j, k;

    _nop_();
    i = 4;
    j = 205;
    k = 187;
    do
    {
        do
        {
            while (--k);
        } while (--j);
    } while (--i);
}


void main()
{
    while(1)
    {
        P2=0xFE;//1111 1110
        Delay500ms();
        P2=0xFD;//1111 1101
        Delay500ms();
        P2=0xFB;//1111 1011
        Delay500ms();
        P2=0xF7;//1111 0111
        Delay500ms();
        P2=0xEF;//1110 1111
        Delay500ms();
        P2=0xDF;//1101 1111
        Delay500ms();
        P2=0xBF;//1011 1111
        Delay500ms();
        P2=0x7F;//0111 1111
        Delay500ms();
    }
}
流水灯优化:
#include <REGX52.H>

void Delay1ms(unsigned int xms);        //@12.000MHz

void main()
{
    while(1)
    {
        P2=0xFE;//1111 1110
        Delay1ms(1000);
        P2=0xFD;//1111 1101
        Delay1ms(1000);
        P2=0xFB;//1111 1011
        Delay1ms(100);
        P2=0xF7;//1111 0111
        Delay1ms(100);
        P2=0xEF;//1110 1111
        Delay1ms(100);
        P2=0xDF;//1101 1111
        Delay1ms(100);
        P2=0xBF;//1011 1111
        Delay1ms(100);
        P2=0x7F;//0111 1111
        Delay1ms(100);
    }
}

void Delay1ms(unsigned int xms)        //@12.000MHz
{
    unsigned char i, j;
    while(xms)
    {
        i = 2;
        j = 239;
        do
        {
            while (--j);
        } while (--i);
        xms--;
    }
}
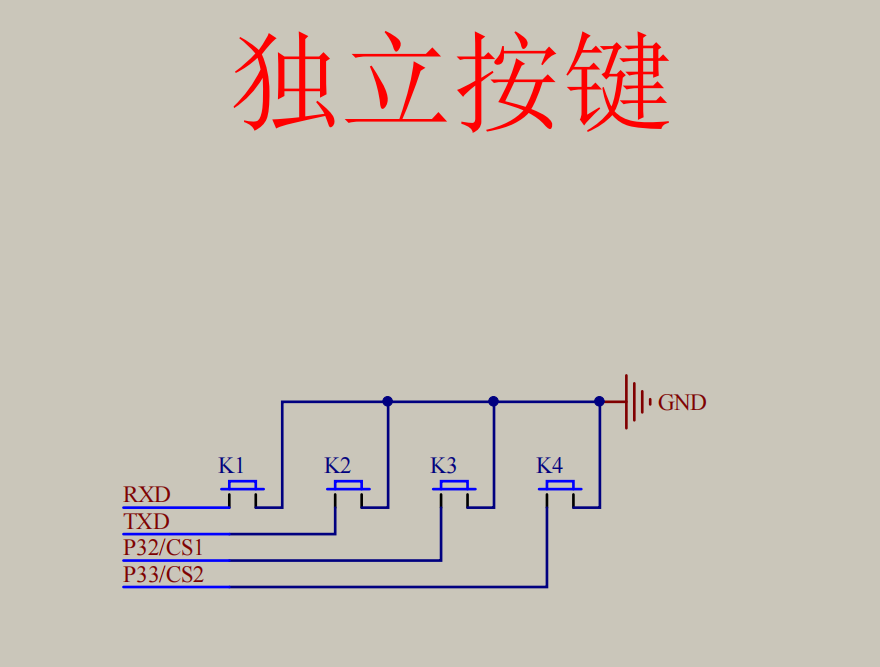
独立按键
控制LED亮灭
K1: P3_1 | K2: P3_0 | K3: P3_2 | K4: P3_3
#include <REGX52.H>

void main()
{
    while(1)
    {
        if(P3_1==0 || P3_0==0)    //如果K1按键或K2按键按下
        {
            P2_0=0;        //LED1输出0,点亮
        }
        else
        {
            P2_0=1;        //LED1输出1,熄灭
        }
    }
}
控制LED状态
#include <REGX52.H>

void Delay(unsigned int xms)
{
    unsigned char i, j;
    while(xms)
    {
        i = 2;
        j = 239;
        do
        {
            while (--j);
        } while (--i);
        xms--;
    }
}

void main()
{
    while(1)
    {
        if(P3_1==0)            //如果K1按键按下
        {
            Delay(20);        //延时消抖
            while(P3_1==0);    //松手检测
            Delay(20);        //延时消抖

            P2_0=~P2_0;        //LED1取反
        }
    }
}
LED灯显示二进制
#include <REGX52.H>

void Delay(unsigned int xms)
{
    unsigned char i, j;
    while(xms--)
    {
        i = 2;
        j = 239;
        do
        {
            while (--j);
        } while (--i);
    }
}

void main()
{
    unsigned char LEDNum=0;
    while(1)
    {
        if(P3_1==0)            //如果K1按键按下
        {
            Delay(20);        //延时消抖
            while(P3_1==0);    //松手检测
            Delay(20);        //延时消抖

            LEDNum++;        //变量自增
            P2=~LEDNum;        //变量取反输出给LED
        }
    }
}
控制LED移位
#include <REGX52.H>
void Delay(unsigned int xms);

unsigned char LEDNum;

void main()
{
    P2=~0x01;                //上电默认LED1点亮
    while(1)
    {
        if(P3_1==0)            //如果K1按键按下
        {
            Delay(20);
            while(P3_1==0);
            Delay(20);

            LEDNum++;        //LEDNum自增
            if(LEDNum>=8)    //限制LEDNum自增范围
                LEDNum=0;
            P2=~(0x01<<LEDNum);    //LED的第LEDNum位点亮
        }
        if(P3_0==0)            //如果K2按键按下
        {
            Delay(20);
            while(P3_0==0);
            Delay(20);

            if(LEDNum==0)    //LEDNum减到0后变为7
                LEDNum=7;
            else            //LEDNum未减到0,自减
                LEDNum--;
            P2=~(0x01<<LEDNum);    //LED的第LEDNum位点亮
        }
    }
}

void Delay(unsigned int xms)
{
    unsigned char i, j;
    while(xms--)
    {
        i = 2;
        j = 239;
        do
        {
            while (--j);
        } while (--i);
    }
}
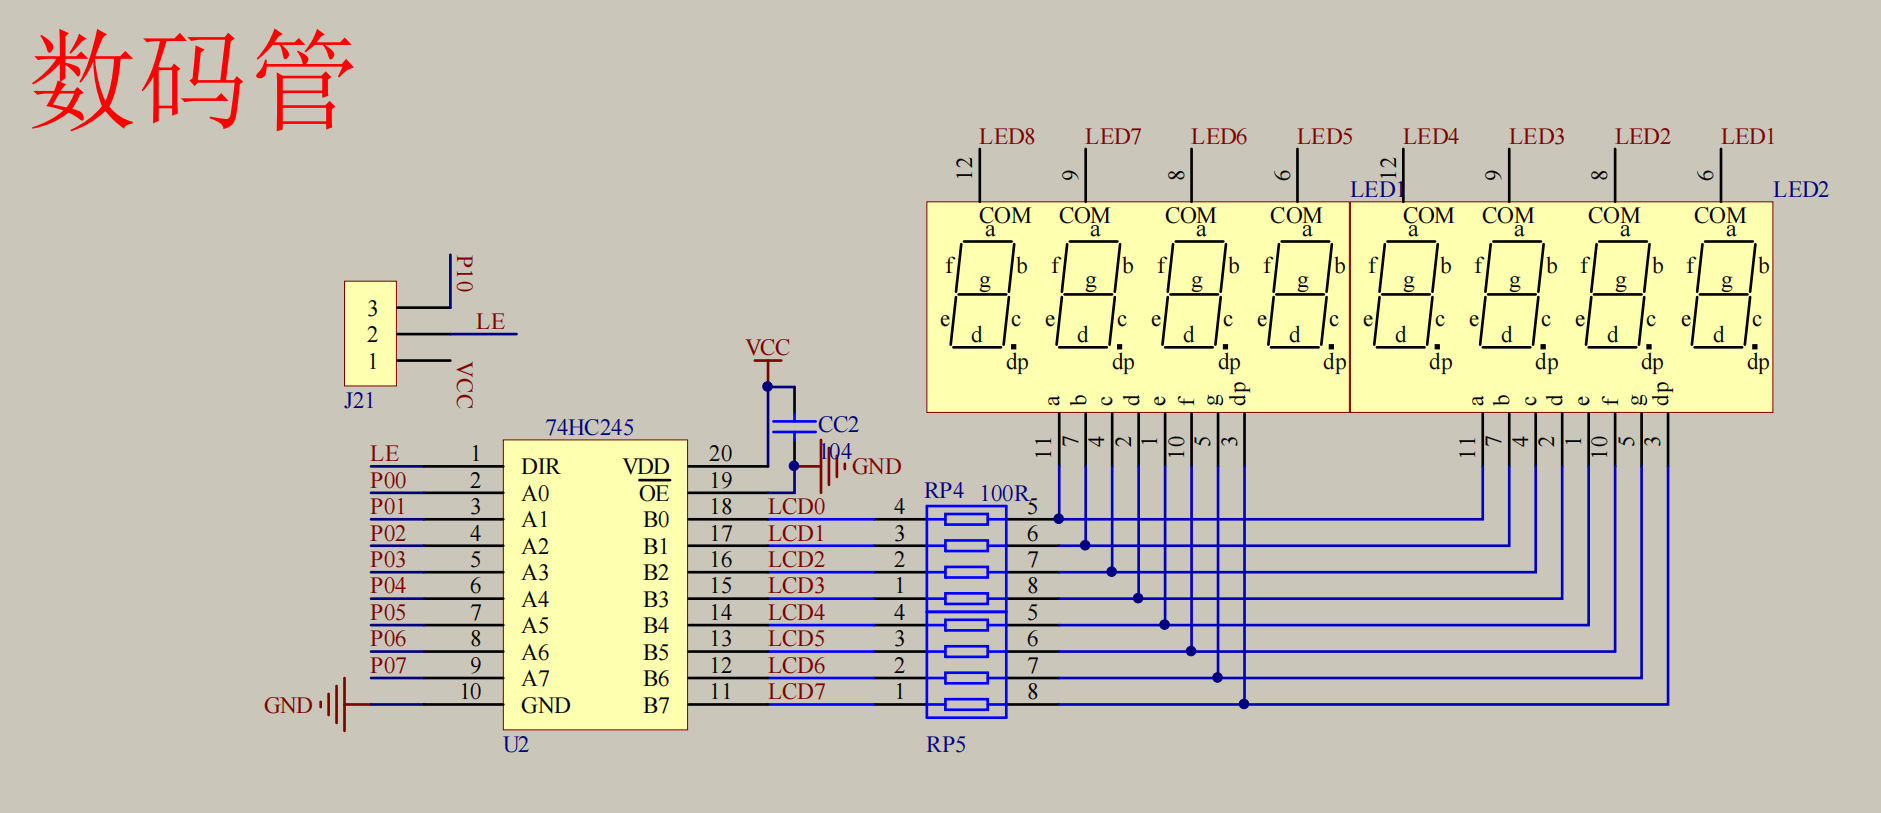
静态数码管显示
位码:P2_4 | P2_3 | P2_2 【低电平】
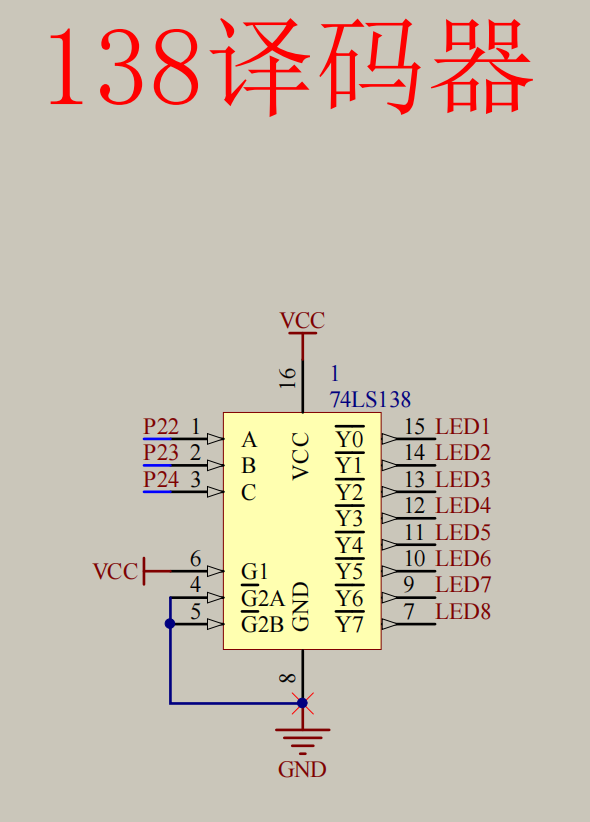
数码:【高电平】
#include <REGX52.H>

//数码管段码表
unsigned char NixieTable[]={0x3F,0x06,0x5B,0x4F,0x66,0x6D,0x7D,0x07,0x7F,0x6F};

//数码管显示子函数
void Nixie(unsigned char Location,Number)
{
    switch(Location)        //位码输出
    {
        case 1:P2_4=1;P2_3=1;P2_2=1;break;
        case 2:P2_4=1;P2_3=1;P2_2=0;break;
        case 3:P2_4=1;P2_3=0;P2_2=1;break;
        case 4:P2_4=1;P2_3=0;P2_2=0;break;
        case 5:P2_4=0;P2_3=1;P2_2=1;break;
        case 6:P2_4=0;P2_3=1;P2_2=0;break;
        case 7:P2_4=0;P2_3=0;P2_2=1;break;
        case 8:P2_4=0;P2_3=0;P2_2=0;break;
    }
    P0=NixieTable[Number];    //段码输出
}

void main()
{
    Nixie(2,3);    //在数码管的第2位置显示3
    while(1)
    {

    }
}
动态数码管
#include <REGX52.H>

//数码管段码表
unsigned char NixieTable[]={0x3F,0x06,0x5B,0x4F,0x66,0x6D,0x7D,0x07,0x7F,0x6F};

//延时子函数
void Delay(unsigned int xms)
{
    unsigned char i, j;
    while(xms--)
    {
        i = 2;
        j = 239;
        do
        {
            while (--j);
        } while (--i);
    }
}

//数码管显示子函数
void Nixie(unsigned char Location,Number)
{
    switch(Location)        //位码输出
    {
        case 1:P2_4=1;P2_3=1;P2_2=1;break;
        case 2:P2_4=1;P2_3=1;P2_2=0;break;
        case 3:P2_4=1;P2_3=0;P2_2=1;break;
        case 4:P2_4=1;P2_3=0;P2_2=0;break;
        case 5:P2_4=0;P2_3=1;P2_2=1;break;
        case 6:P2_4=0;P2_3=1;P2_2=0;break;
        case 7:P2_4=0;P2_3=0;P2_2=1;break;
        case 8:P2_4=0;P2_3=0;P2_2=0;break;
    }
    P0=NixieTable[Number];    //段码输出
    Delay(1000);                //显示一段时间
    P0=0x00;                //段码清0,消影
}

void main()
{
    while(1)
    {
//        Nixie(1,1);        //在数码管的第1位置显示1
//        Delay(20);
//        Nixie(2,2);        //在数码管的第2位置显示2
//        Delay(20);
//        Nixie(3,3);        //在数码管的第3位置显示3
//        Delay(20);
        unsigned char i;
        for(i=1;i<=8;i++)
        {
            Nixie(i,i);
            Delay(1000);
        }
    }
}
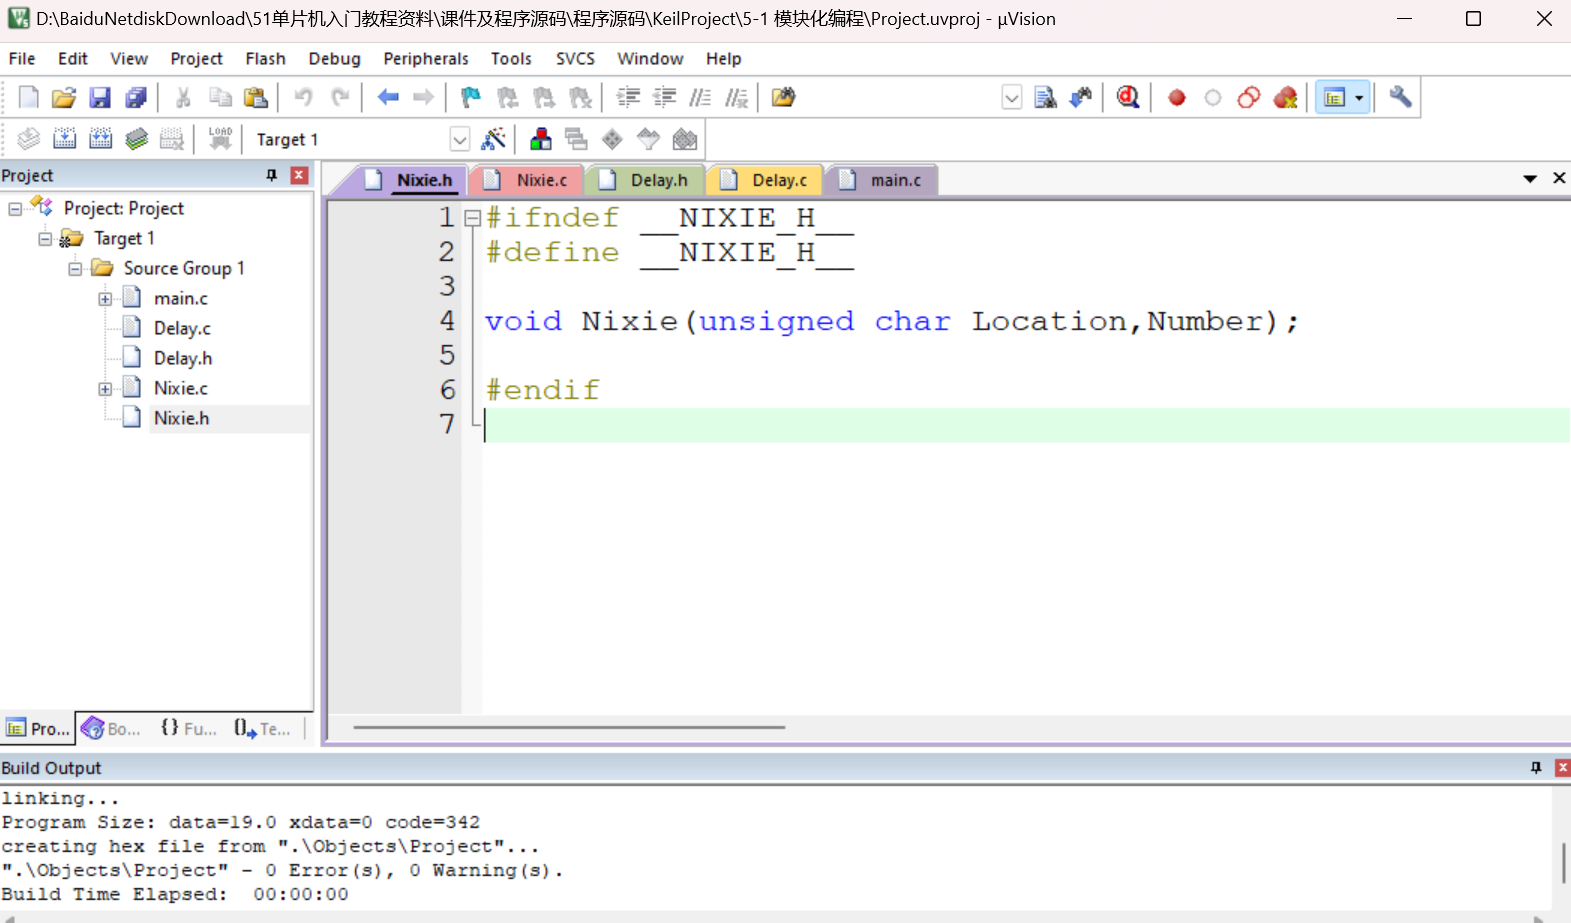
模块化编程
简介
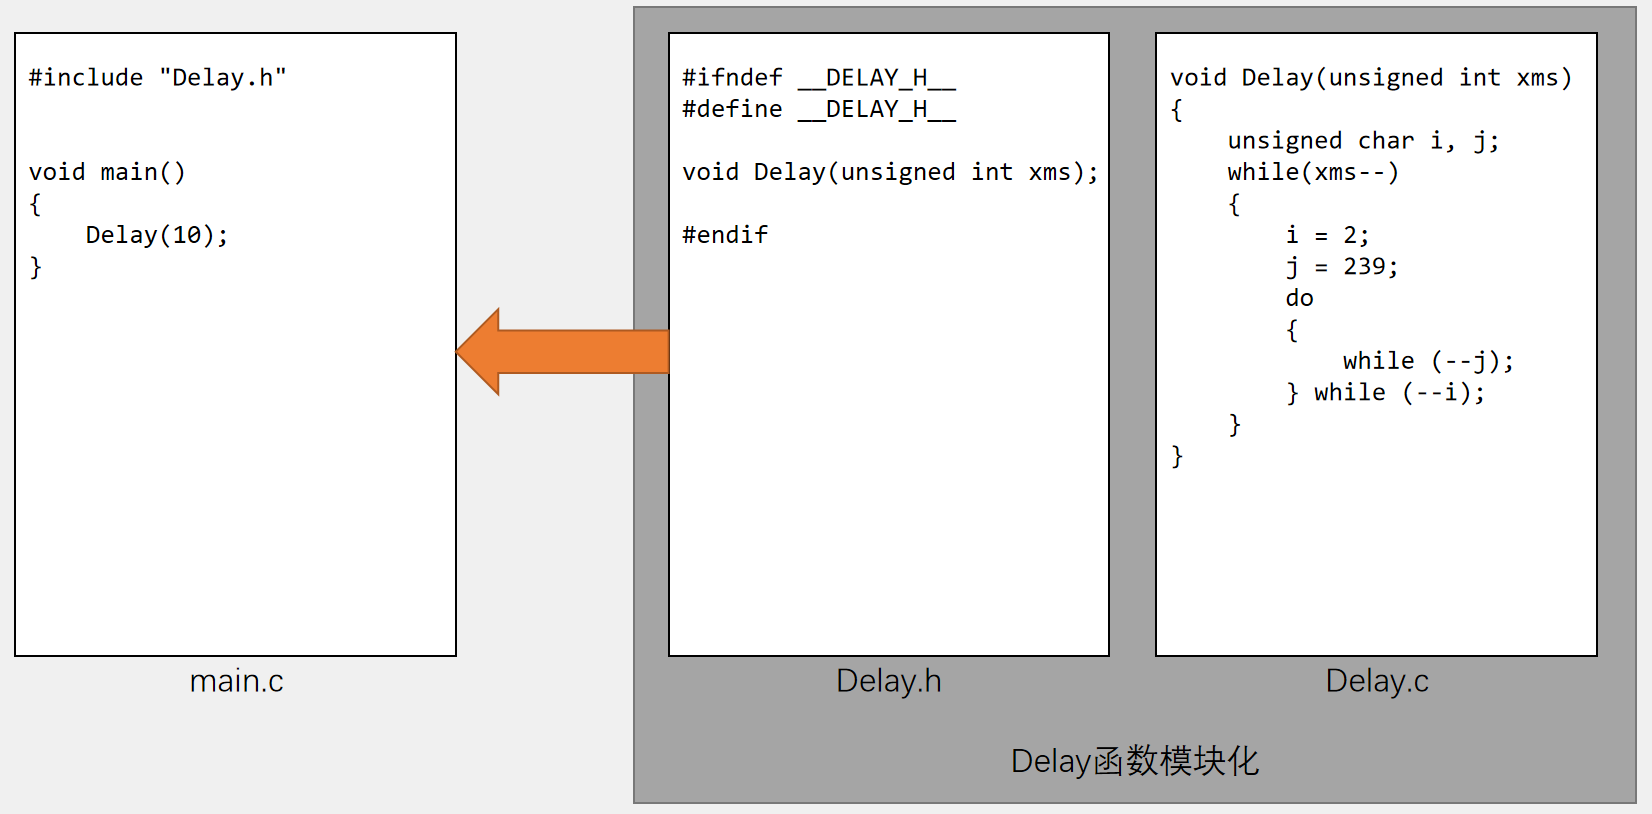
注意事项:
- .c文件:函数、变量的定义
- .h文件:可被外部调用的函数、变量的声明
- 任何自定义的变量、函数在调用前必须有定义或声明(同一个.c)
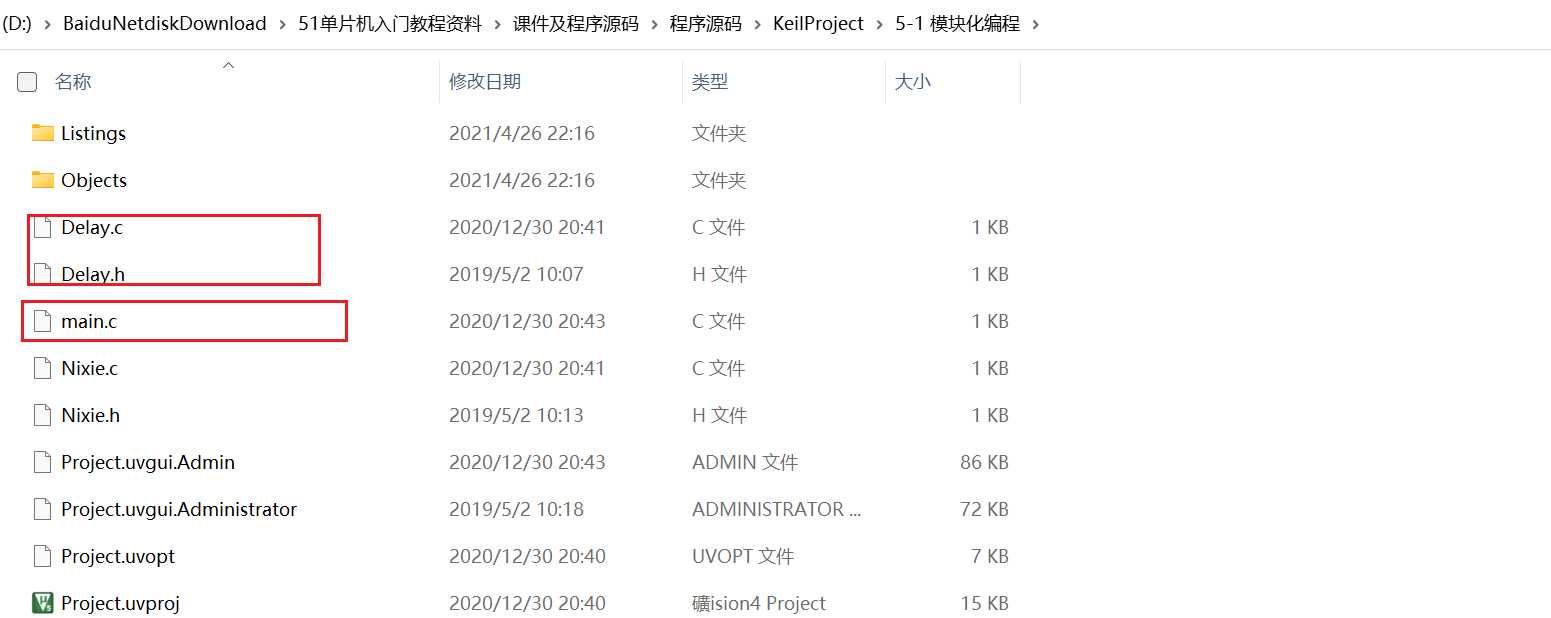
- 使用到的自定义函数的.c文件必须添加到工程参与编译
- 使用到的.h文件必须要放在编译器可寻找到的地方(工程文件夹根目录、安装目录、自定义)
预编译:
代码
main.c
#include <REGX52.H>
#include "Delay.h"    //包含Delay头文件
#include "Nixie.h"    //包含数码管头文件

void main()
{
    while(1)
    {
        Nixie(1,1);    //在数码管的第1位置显示1
        Nixie(2,2);    //在数码管的第2位置显示2
        Nixie(3,3);    //在数码管的第3位置显示3
        Nixie(4,4);    //在数码管的第4位置显示4
        Nixie(5,5);    //在数码管的第5位置显示5
        Nixie(6,6);    //在数码管的第6位置显示6
    }
}
Delay.c
//延时子函数
void Delay(unsigned int xms)
{
    unsigned char i, j;
    while(xms--)
    {
        i = 2;
        j = 239;
        do
        {
            while (--j);
        } while (--i);
    }
}
Delay.h
#ifndef __DELAY_H__
#define __DELAY_H__

void Delay(unsigned int xms);

#endif
Nixie.c
#include <REGX52.H>
#include "Delay.h"    //包含Delay头文件

//数码管段码表
unsigned char NixieTable[]={0x3F,0x06,0x5B,0x4F,0x66,0x6D,0x7D,0x07,0x7F,0x6F};

//数码管显示子函数
void Nixie(unsigned char Location,Number)
{
    switch(Location)        //位码输出
    {
        case 1:P2_4=1;P2_3=1;P2_2=1;break;
        case 2:P2_4=1;P2_3=1;P2_2=0;break;
        case 3:P2_4=1;P2_3=0;P2_2=1;break;
        case 4:P2_4=1;P2_3=0;P2_2=0;break;
        case 5:P2_4=0;P2_3=1;P2_2=1;break;
        case 6:P2_4=0;P2_3=1;P2_2=0;break;
        case 7:P2_4=0;P2_3=0;P2_2=1;break;
        case 8:P2_4=0;P2_3=0;P2_2=0;break;
    }
    P0=NixieTable[Number];    //段码输出
    Delay(1);                //显示一段时间
    P0=0x00;                //段码清0,消影
}
Nixie.h
#ifndef __NIXIE_H__
#define __NIXIE_H__

void Nixie(unsigned char Location,Number);

#endif
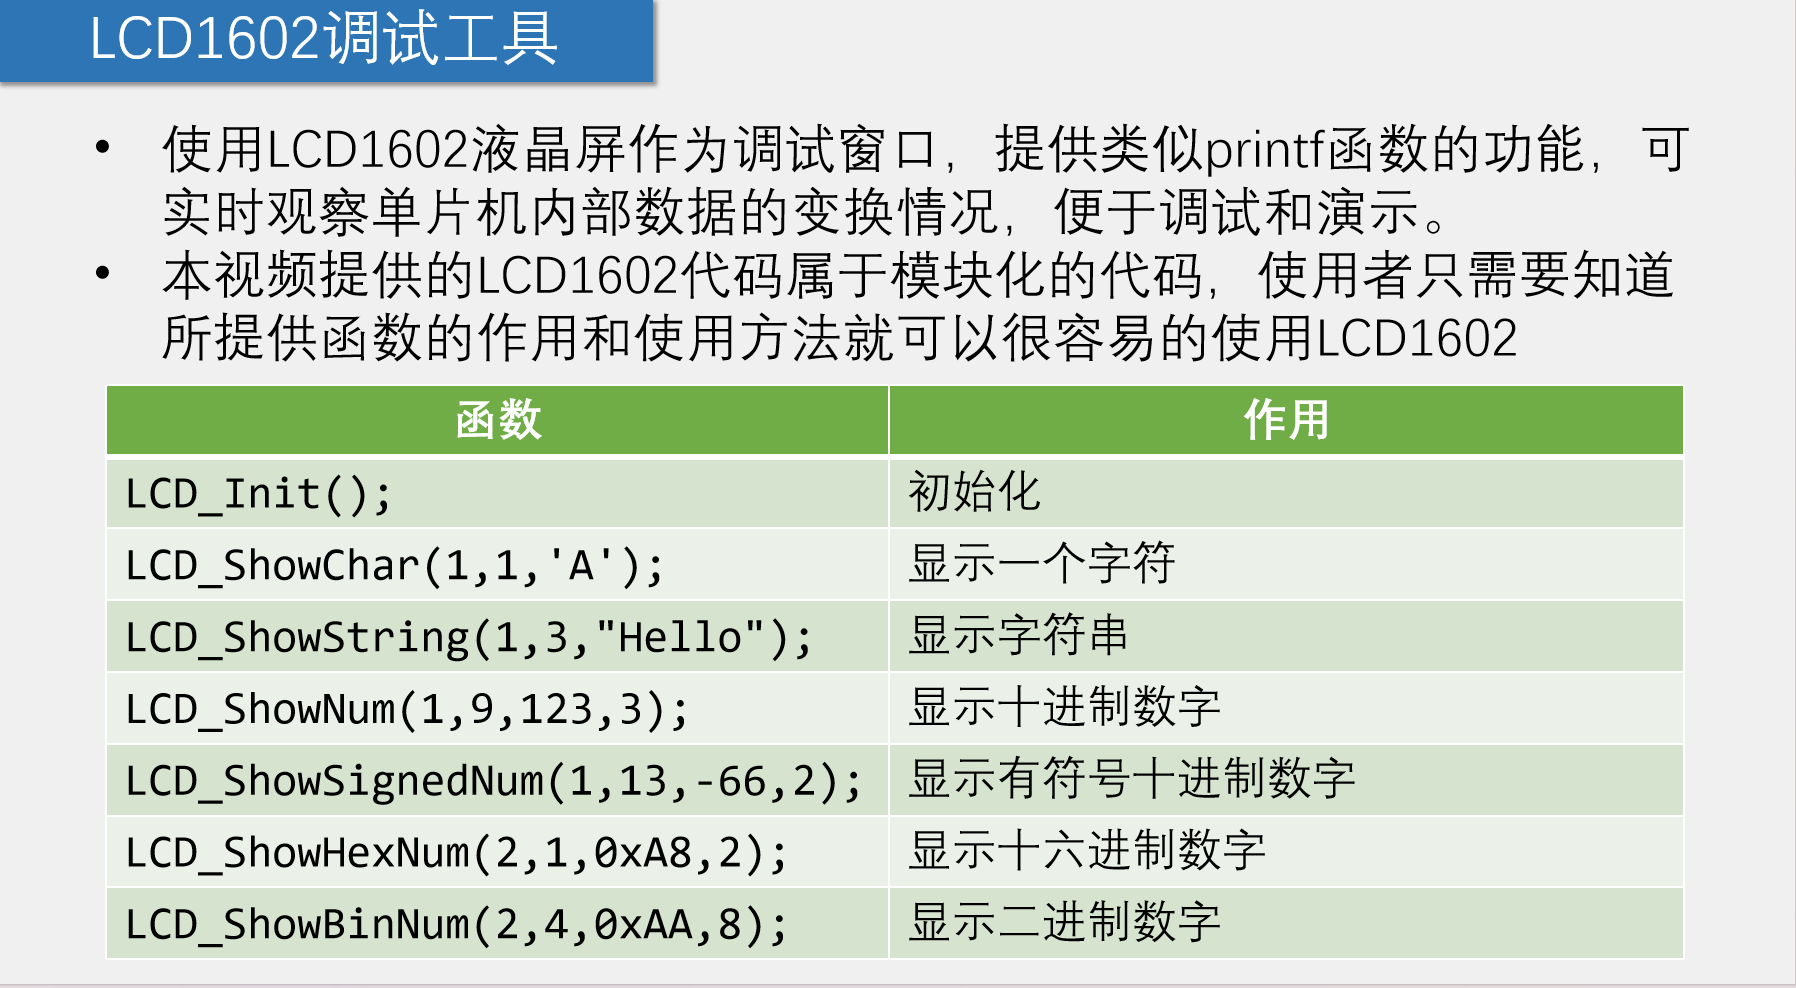
LCD调试工具
代码
main.c
#include <REGX52.H>
#include "LCD1602.h"    //包含LCD1602头文件
#include "Delay.h"        //包含Delay头文件

int Result=0;

void main()
{
    LCD_Init();
    while(1)
    {
        Result++;                    //Result自增
        Delay(1000);                //延时1秒
        LCD_ShowNum(1,1,Result,3);    //在LCD的1行1列显示Result,长度为3位
    }
}
LCD1602.c
#include <REGX52.H>
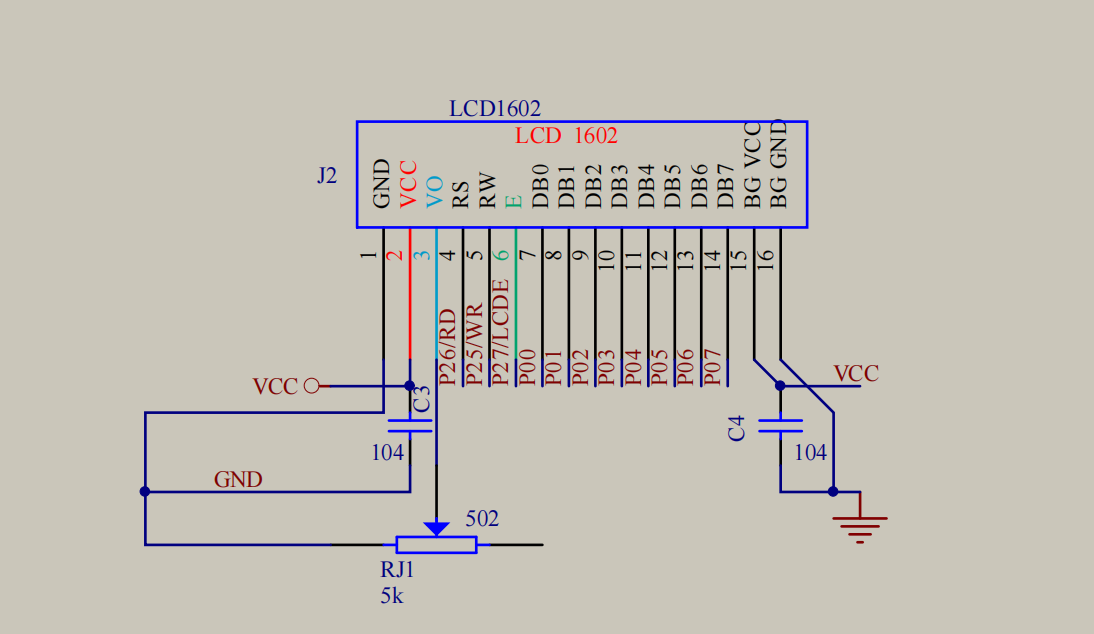
//引脚配置:
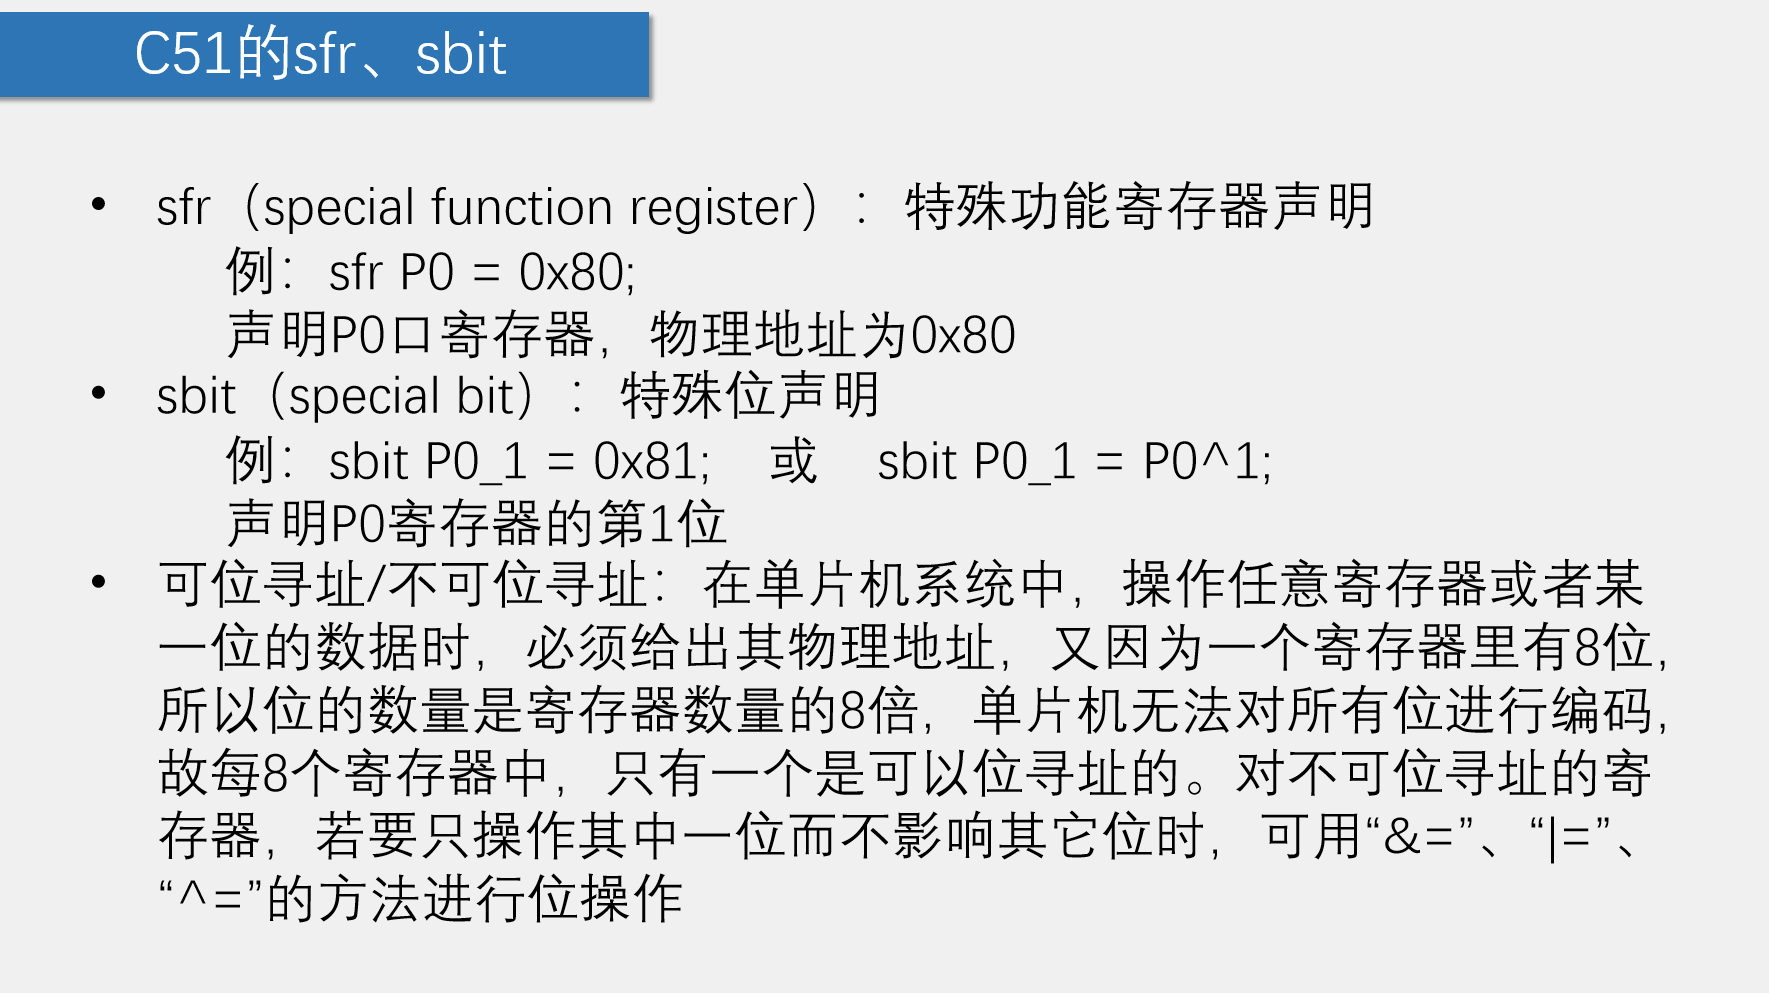
sbit LCD_RS=P2^6;
sbit LCD_RW=P2^5;
sbit LCD_EN=P2^7;
#define LCD_DataPort P0
//函数定义:
/**
* @brief LCD1602延时函数,12MHz调用可延时1ms
* @param 无
* @retval 无
*/
void LCD_Delay()
{
unsigned char i, j;
i = 2;
j = 239;
do
{
while (--j);
} while (--i);
}
/**
* @brief LCD1602写命令
* @param Command 要写入的命令
* @retval 无
*/
void LCD_WriteCommand(unsigned char Command)
{
LCD_RS=0;
LCD_RW=0;
LCD_DataPort=Command;
LCD_EN=1;
LCD_Delay();
LCD_EN=0;
LCD_Delay();
}
/**
* @brief LCD1602写数据
* @param Data 要写入的数据
* @retval 无
*/
void LCD_WriteData(unsigned char Data)
{
LCD_RS=1;
LCD_RW=0;
LCD_DataPort=Data;
LCD_EN=1;
LCD_Delay();
LCD_EN=0;
LCD_Delay();
}
/**
* @brief LCD1602设置光标位置
* @param Line 行位置,范围:1~2
* @param Column 列位置,范围:1~16
* @retval 无
*/
void LCD_SetCursor(unsigned char Line,unsigned char Column)
{
if(Line==1)
{
LCD_WriteCommand(0x80|(Column-1));
}
else if(Line==2)
{
LCD_WriteCommand(0x80|(Column-1+0x40));
}
}
/**
* @brief LCD1602初始化函数
* @param 无
* @retval 无
*/
void LCD_Init()
{
LCD_WriteCommand(0x38);//八位数据接口,两行显示,5*7点阵
LCD_WriteCommand(0x0c);//显示开,光标关,闪烁关
LCD_WriteCommand(0x06);//数据读写操作后,光标自动加一,画面不动
LCD_WriteCommand(0x01);//光标复位,清屏
}
/**
* @brief 在LCD1602指定位置上显示一个字符
* @param Line 行位置,范围:1~2
* @param Column 列位置,范围:1~16
* @param Char 要显示的字符
* @retval 无
*/
void LCD_ShowChar(unsigned char Line,unsigned char Column,char Char)
{
LCD_SetCursor(Line,Column);
LCD_WriteData(Char);
}
/**
* @brief 在LCD1602指定位置开始显示所给字符串
* @param Line 起始行位置,范围:1~2
* @param Column 起始列位置,范围:1~16
* @param String 要显示的字符串
* @retval 无
*/
void LCD_ShowString(unsigned char Line,unsigned char Column,char *String)
{
unsigned char i;
LCD_SetCursor(Line,Column);
for(i=0;String[i]!='\0';i++)
{
LCD_WriteData(String[i]);
}
}
/**
* @brief 返回值=X的Y次方
*/
int LCD_Pow(int X,int Y)
{
unsigned char i;
int Result=1;
for(i=0;i<Y;i++)
{
Result*=X;
}
return Result;
}
/**
* @brief 在LCD1602指定位置开始显示所给数字
* @param Line 起始行位置,范围:1~2
* @param Column 起始列位置,范围:1~16
* @param Number 要显示的数字,范围:0~65535
* @param Length 要显示数字的长度,范围:1~5
* @retval 无
*/
void LCD_ShowNum(unsigned char Line,unsigned char Column,unsigned int Number,unsigned char Length)
{
unsigned char i;
LCD_SetCursor(Line,Column);
for(i=Length;i>0;i--)
{
LCD_WriteData(Number/LCD_Pow(10,i-1)%10+'0');
}
}
/**
* @brief 在LCD1602指定位置开始以有符号十进制显示所给数字
* @param Line 起始行位置,范围:1~2
* @param Column 起始列位置,范围:1~16
* @param Number 要显示的数字,范围:-32768~32767
* @param Length 要显示数字的长度,范围:1~5
* @retval 无
*/
void LCD_ShowSignedNum(unsigned char Line,unsigned char Column,int Number,unsigned char Length)
{
unsigned char i;
unsigned int Number1;
LCD_SetCursor(Line,Column);
if(Number>=0)
{
LCD_WriteData('+');
Number1=Number;
}
else
{
LCD_WriteData('-');
Number1=-Number;
}
for(i=Length;i>0;i--)
{
LCD_WriteData(Number1/LCD_Pow(10,i-1)%10+'0');
}
}
/**
* @brief 在LCD1602指定位置开始以十六进制显示所给数字
* @param Line 起始行位置,范围:1~2
* @param Column 起始列位置,范围:1~16
* @param Number 要显示的数字,范围:0~0xFFFF
* @param Length 要显示数字的长度,范围:1~4
* @retval 无
*/
void LCD_ShowHexNum(unsigned char Line,unsigned char Column,unsigned int Number,unsigned char Length)
{
unsigned char i,SingleNumber;
LCD_SetCursor(Line,Column);
for(i=Length;i>0;i--)
{
SingleNumber=Number/LCD_Pow(16,i-1)%16;
if(SingleNumber<10)
{
LCD_WriteData(SingleNumber+'0');
}
else
{
LCD_WriteData(SingleNumber-10+'A');
}
}
}
/**
* @brief 在LCD1602指定位置开始以二进制显示所给数字
* @param Line 起始行位置,范围:1~2
* @param Column 起始列位置,范围:1~16
* @param Number 要显示的数字,范围:0~1111 1111 1111 1111
* @param Length 要显示数字的长度,范围:1~16
* @retval 无
*/
void LCD_ShowBinNum(unsigned char Line,unsigned char Column,unsigned int Number,unsigned char Length)
{
unsigned char i;
LCD_SetCursor(Line,Column);
for(i=Length;i>0;i--)
{
LCD_WriteData(Number/LCD_Pow(2,i-1)%2+'0');
}
}
LCD1602.h
#ifndef __LCD1602_H__
#define __LCD1602_H__

//用户调用函数:
void LCD_Init();
void LCD_ShowChar(unsigned char Line,unsigned char Column,char Char);
void LCD_ShowString(unsigned char Line,unsigned char Column,char *String);
void LCD_ShowNum(unsigned char Line,unsigned char Column,unsigned int Number,unsigned char Length);
void LCD_ShowSignedNum(unsigned char Line,unsigned char Column,int Number,unsigned char Length);
void LCD_ShowHexNum(unsigned char Line,unsigned char Column,unsigned int Number,unsigned char Length);
void LCD_ShowBinNum(unsigned char Line,unsigned char Column,unsigned int Number,unsigned char Length);

#endif
矩阵键盘
main.c
#include <REGX52.H>
#include "Delay.h"        //包含Delay头文件
#include "LCD1602.h"    //包含LCD1602头文件
#include "MatrixKey.h"    //包含矩阵键盘头文件

unsigned char KeyNum;

void main()
{
    LCD_Init();                            //LCD初始化
    LCD_ShowString(1,1,"MatrixKey:");    //LCD显示字符串
    while(1)
    {
        KeyNum=MatrixKey();                //获取矩阵键盘键码
        if(KeyNum)                        //如果有按键按下
        {
            LCD_ShowNum(2,1,KeyNum,2);    //LCD显示键码
        }
    }
}
MatrixKey.h
#ifndef __MATRIXKEY_H__
#define __MATRIXKEY_H__

unsigned char MatrixKey();

#endif
MatrixKey.c
#include <REGX52.H>
#include "Delay.h"

/** 先列后行
  * @brief  矩阵键盘读取按键键码
  * @param  无
  * @retval KeyNumber 按下按键的键码值
            如果按键按下不放,程序会停留在此函数,松手的一瞬间,返回按键键码,没有按键按下时,返回0
  */
unsigned char MatrixKey()
{
    unsigned char KeyNumber=0;

    P1=0xFF;
    P1_3=0; //第一列
    if(P1_7==0){Delay(20);while(P1_7==0);Delay(20);KeyNumber=1;}
    if(P1_6==0){Delay(20);while(P1_6==0);Delay(20);KeyNumber=5;}
    if(P1_5==0){Delay(20);while(P1_5==0);Delay(20);KeyNumber=9;}
    if(P1_4==0){Delay(20);while(P1_4==0);Delay(20);KeyNumber=13;}

    P1=0xFF;
    P1_2=0; //第二列
    if(P1_7==0){Delay(20);while(P1_7==0);Delay(20);KeyNumber=2;}
    if(P1_6==0){Delay(20);while(P1_6==0);Delay(20);KeyNumber=6;}
    if(P1_5==0){Delay(20);while(P1_5==0);Delay(20);KeyNumber=10;}
    if(P1_4==0){Delay(20);while(P1_4==0);Delay(20);KeyNumber=14;}

    P1=0xFF;
    P1_1=0; //第三列
    if(P1_7==0){Delay(20);while(P1_7==0);Delay(20);KeyNumber=3;}
    if(P1_6==0){Delay(20);while(P1_6==0);Delay(20);KeyNumber=7;}
    if(P1_5==0){Delay(20);while(P1_5==0);Delay(20);KeyNumber=11;}
    if(P1_4==0){Delay(20);while(P1_4==0);Delay(20);KeyNumber=15;}

    P1=0xFF;
    P1_0=0; //第四列
    if(P1_7==0){Delay(20);while(P1_7==0);Delay(20);KeyNumber=4;}
    if(P1_6==0){Delay(20);while(P1_6==0);Delay(20);KeyNumber=8;}
    if(P1_5==0){Delay(20);while(P1_5==0);Delay(20);KeyNumber=12;}
    if(P1_4==0){Delay(20);while(P1_4==0);Delay(20);KeyNumber=16;}

    return KeyNumber;
}
矩阵键盘密码锁
密码可以自定义,此处定义为 : “2345”
#include <REGX52.H>
#include "Delay.h"
#include "LCD1602.h"
#include "MatrixKey.h"

unsigned char KeyNum;
unsigned int Password,Count;

void main()
{
    LCD_Init();
    LCD_ShowString(1,1,"Password:");
    while(1)
    {
        KeyNum=MatrixKey();
        if(KeyNum)
        {
            if(KeyNum<=10)    //如果S1~S10按键按下,输入密码
            {
                if(Count<4)    //如果输入次数小于4
                {
                    Password*=10;                //密码左移一位
                    Password+=KeyNum%10;        //获取一位密码
                    Count++;    //计次加一
                }
                LCD_ShowNum(2,1,Password,4);    //更新显示
            }
            if(KeyNum==11)    //如果S11按键按下,确认
            {
                if(Password==2345)    //如果密码等于正确密码
                {
                    LCD_ShowString(1,14,"OK ");    //显示OK
                    Password=0;        //密码清零
                    Count=0;        //计次清零
                    LCD_ShowNum(2,1,Password,4);    //更新显示
                }
                else                //否则
                {
                    LCD_ShowString(1,14,"ERR");    //显示ERR
                    Password=0;        //密码清零
                    Count=0;        //计次清零
                    LCD_ShowNum(2,1,Password,4);    //更新显示
                }
            }
            if(KeyNum==12)    //如果S12按键按下,取消
            {
                Password=0;        //密码清零
                Count=0;        //计次清零
                LCD_ShowNum(2,1,Password,4);    //更新显示
            }
        }
    }
}
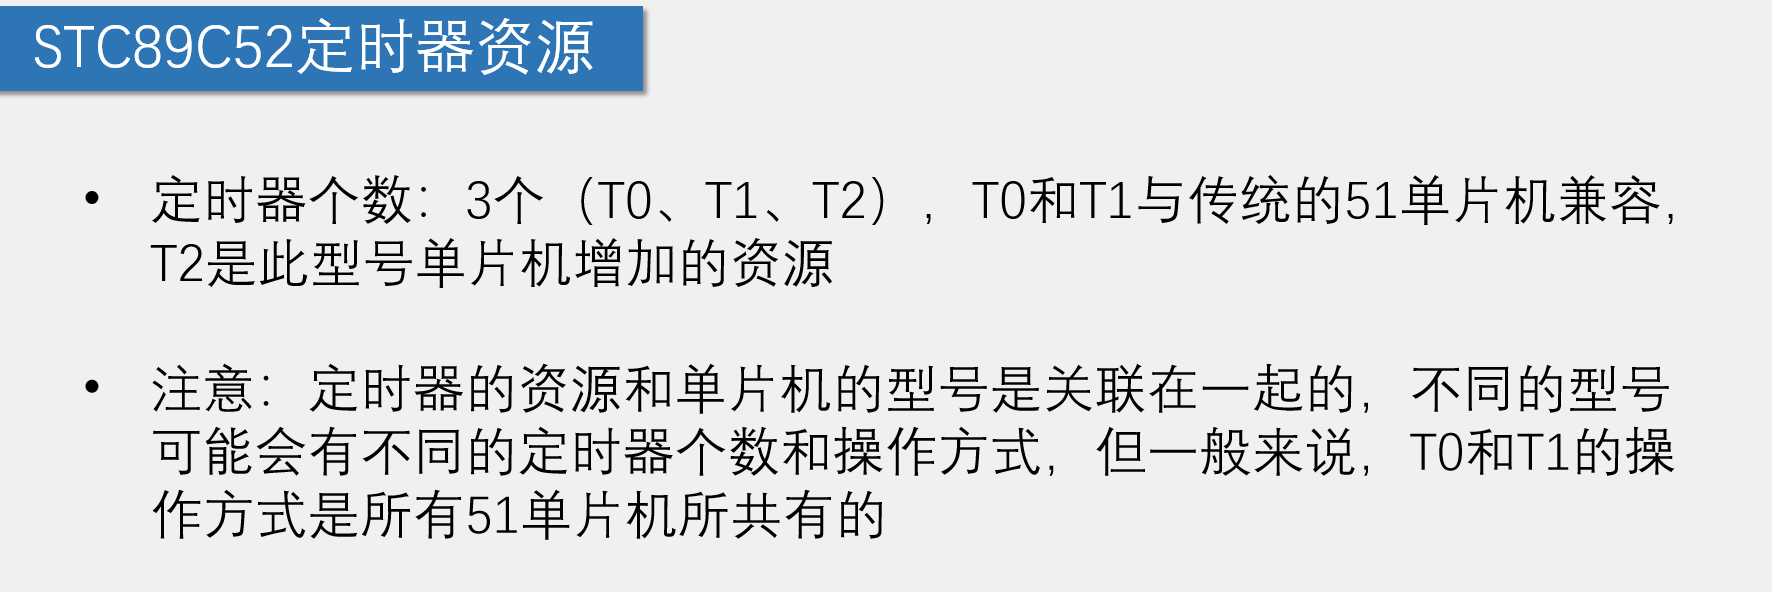
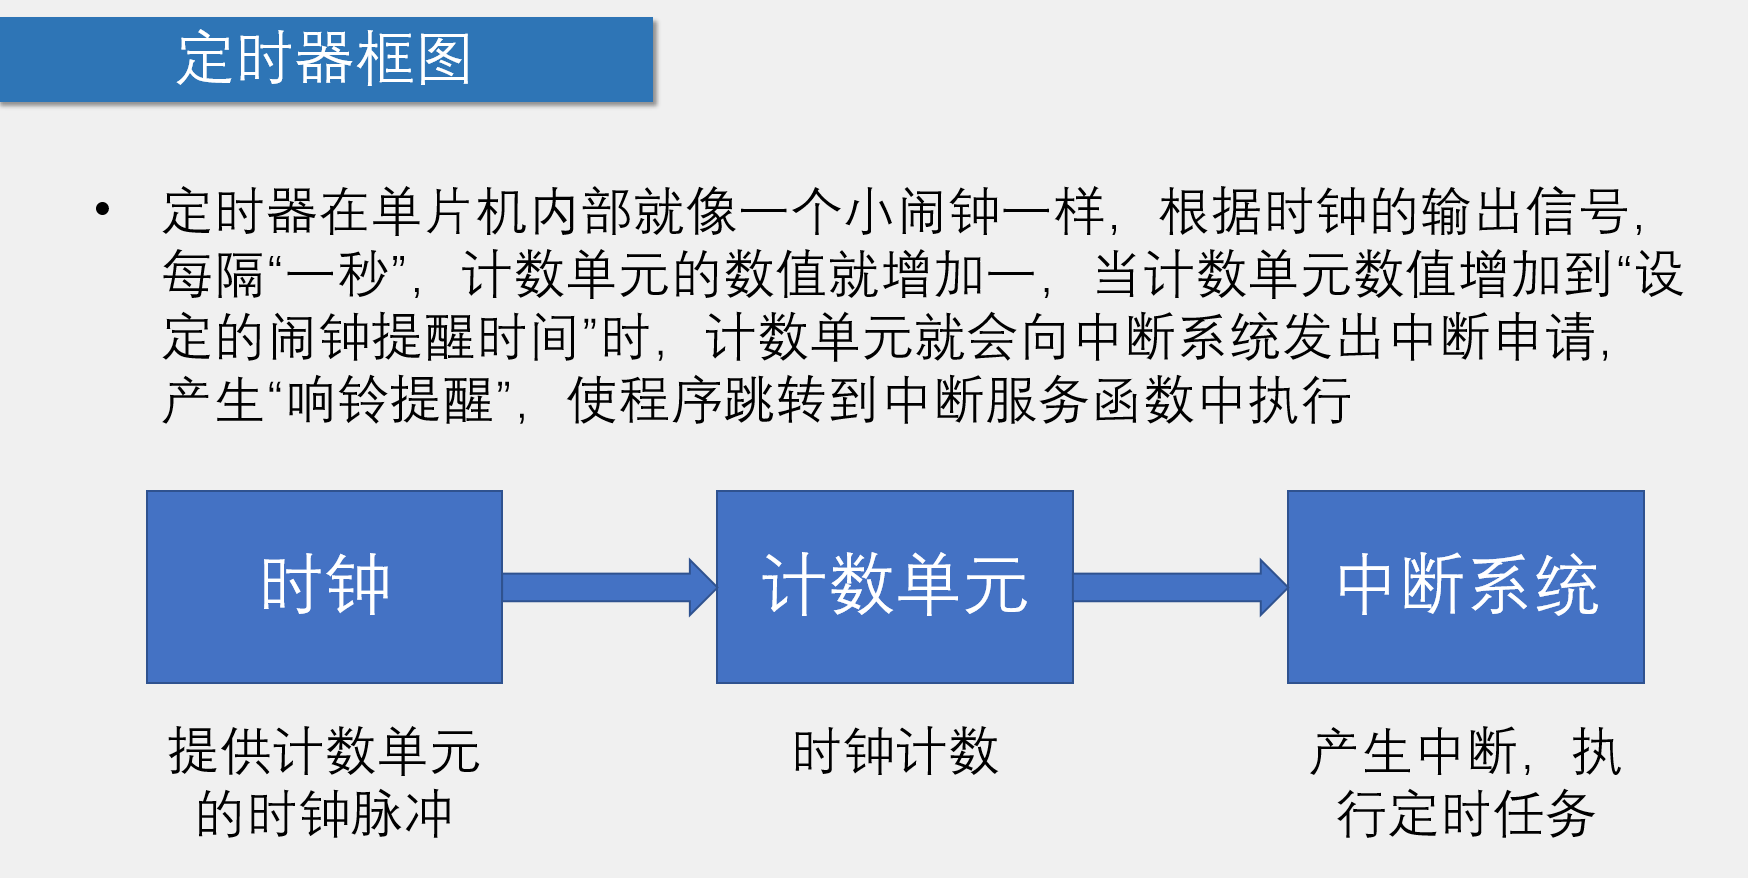
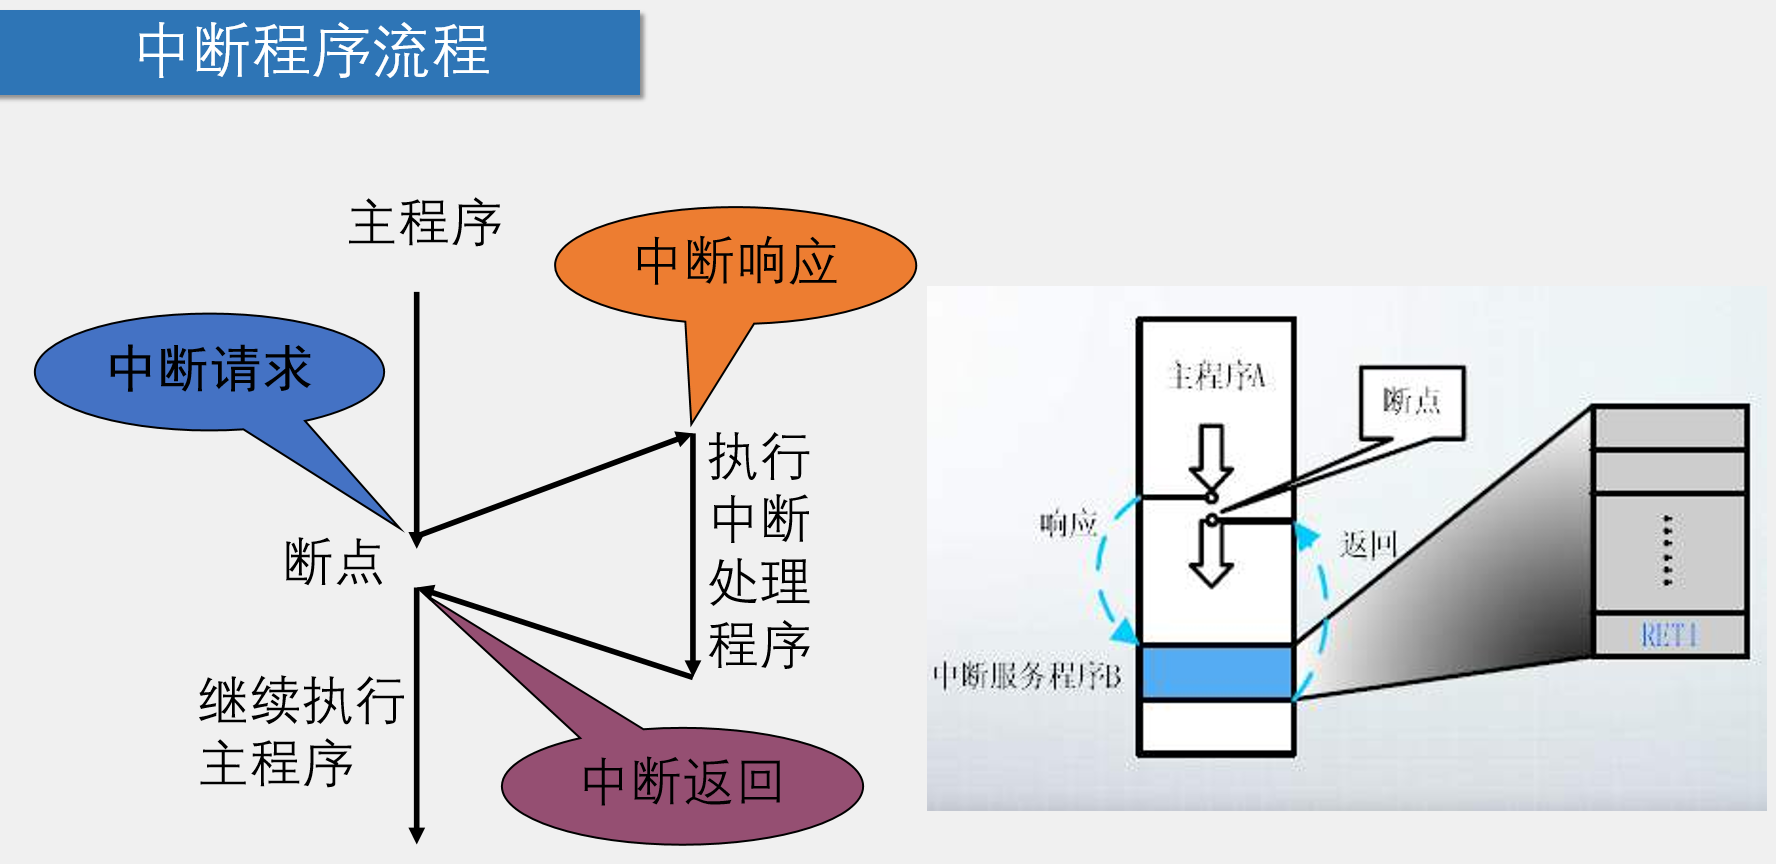
定时器与中断
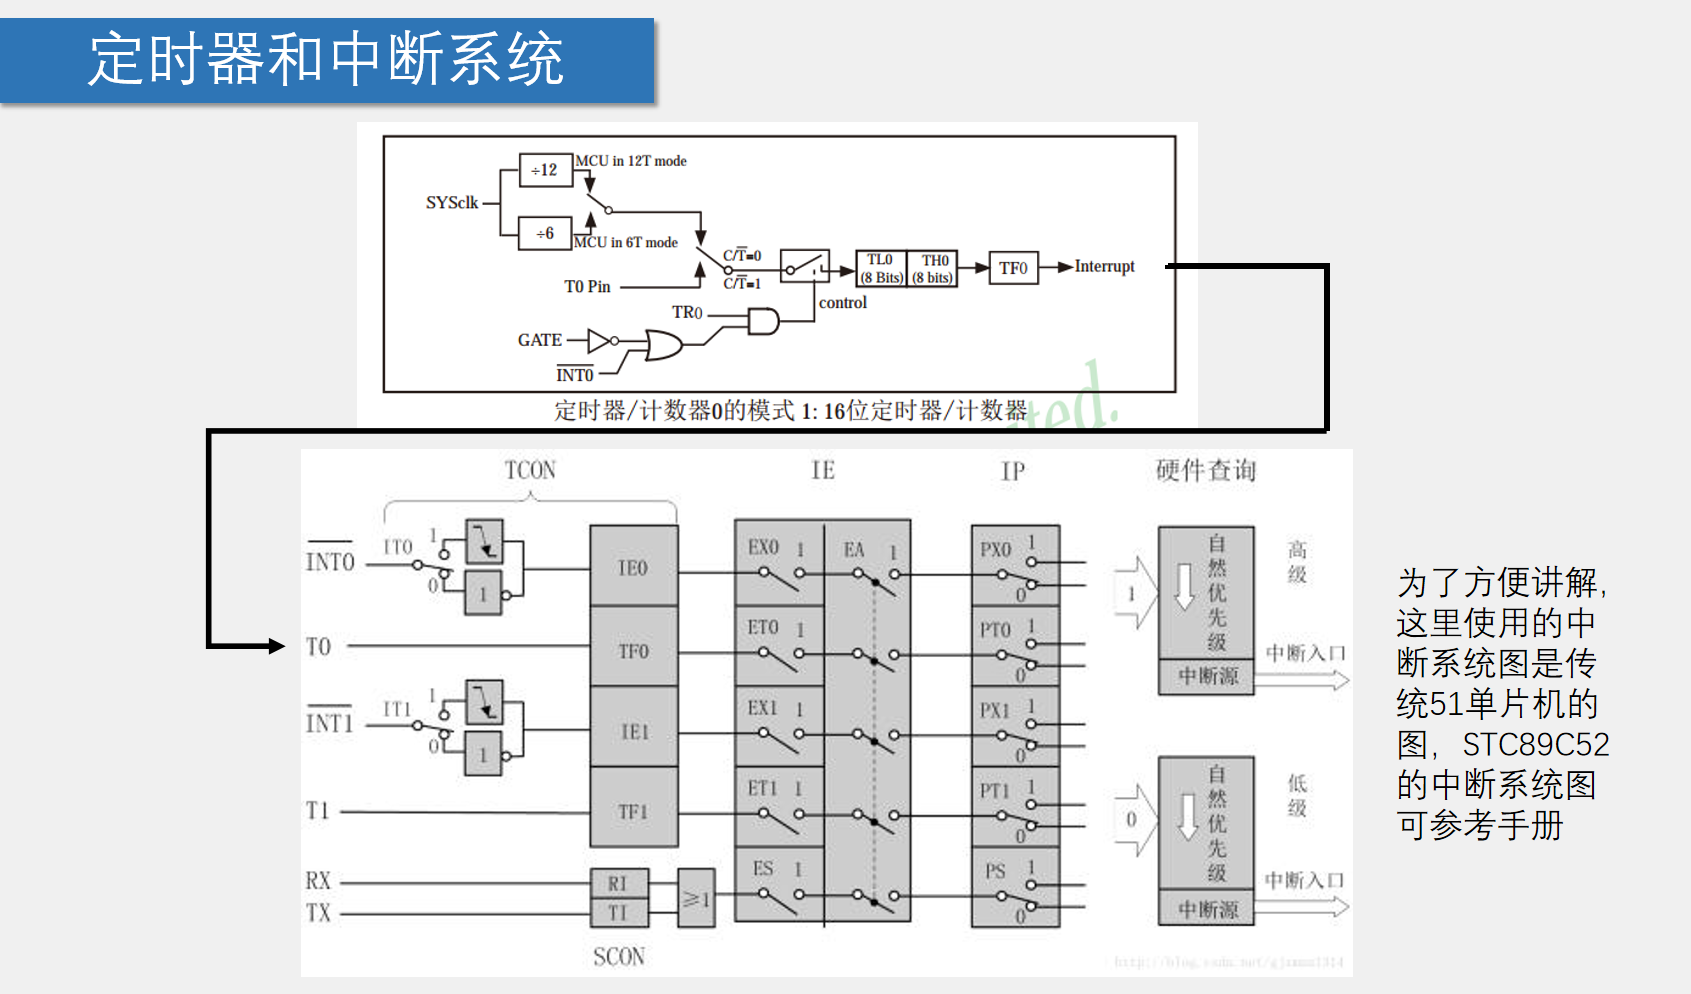
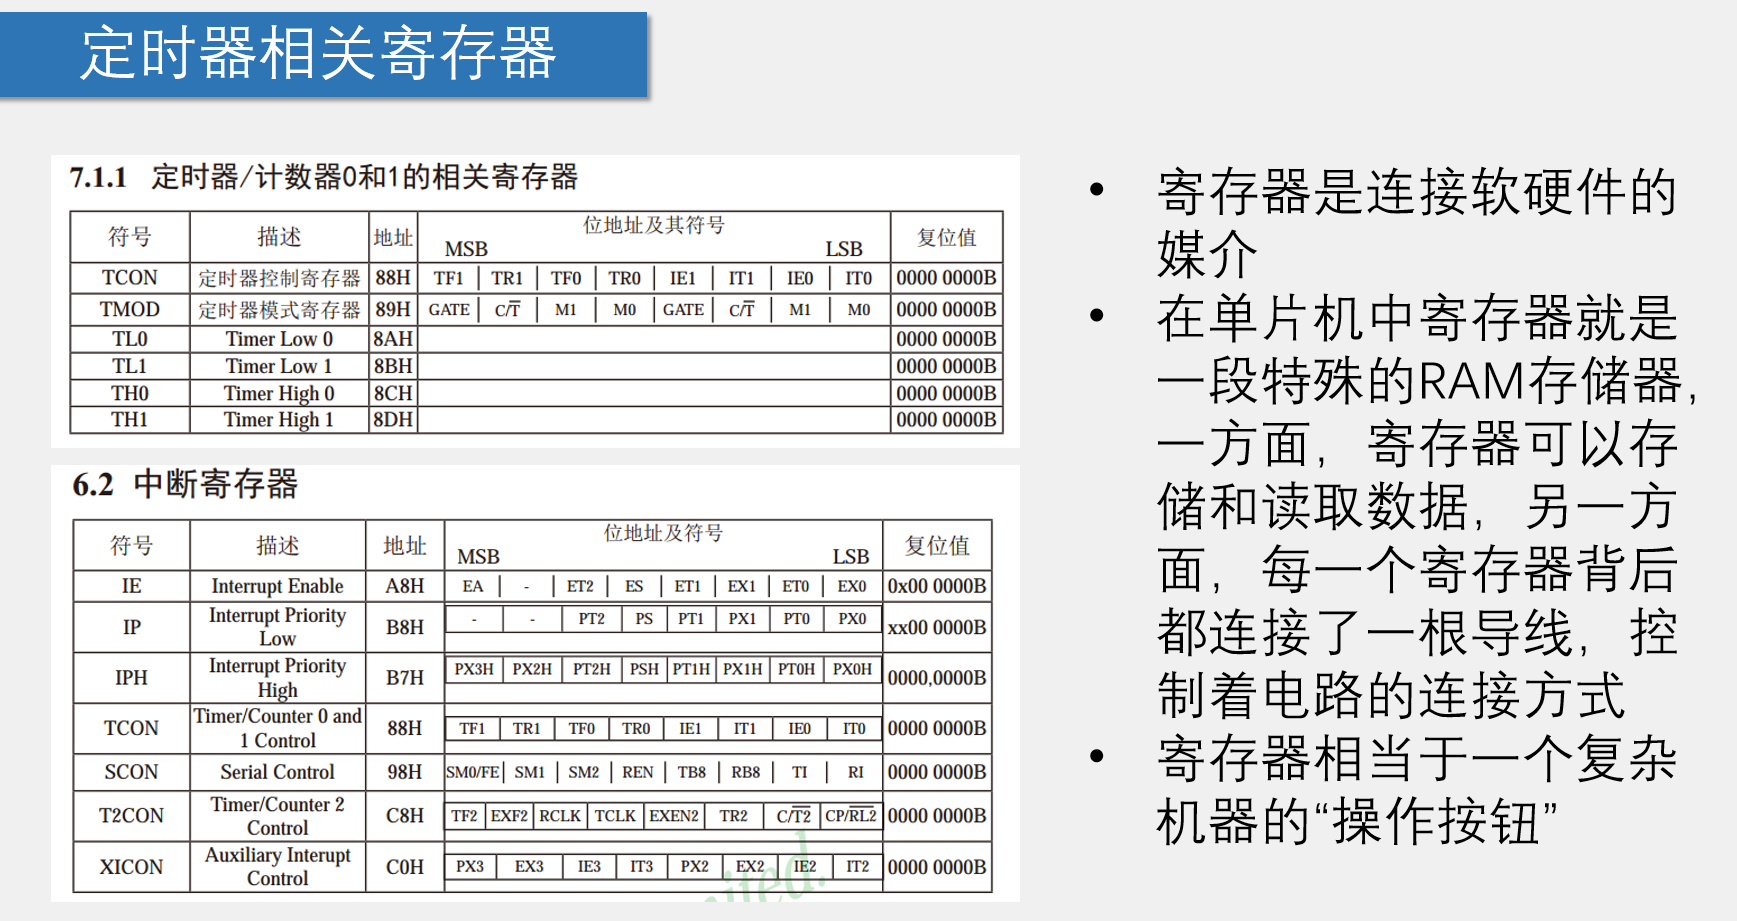
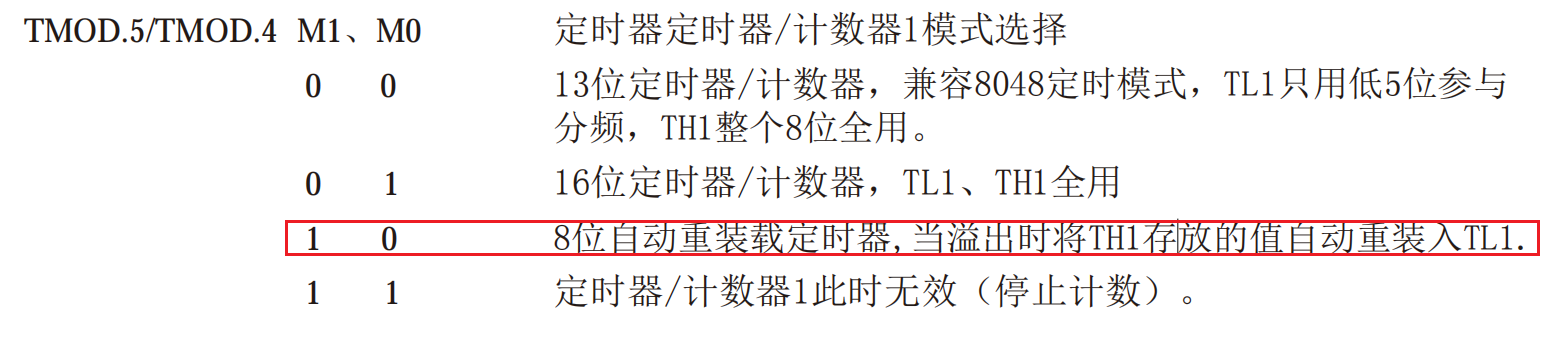
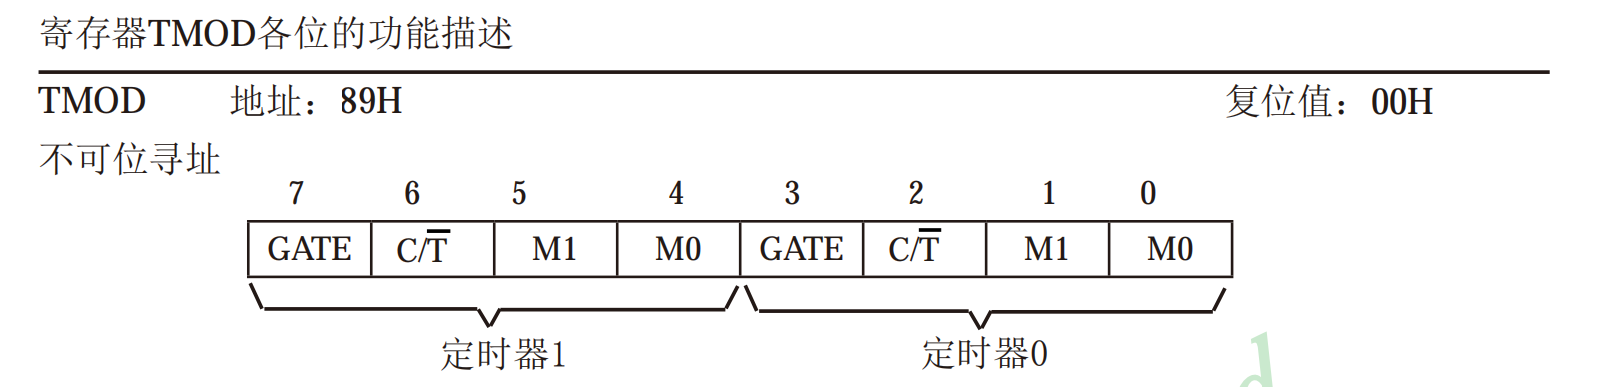
寄存器设置
TMOD: 0000 0001 【0x01】
- GATE: 0
- C/T: 0 【定时器】
- M1: 0 【01:16位定时器】
- M0: 1 【01:16位定时器】
TR0: 1 开始计数
TF0: 由硬件置1,表示中断;响应清0.
ET0=1 开关打开
EA=1 总开关打开
PT0=0 优先级低
/**
  * @brief  定时器0初始化,1毫秒@12.000MHz
  * @param  无
  * @retval 无
  */
void Timer0Init(void)
{
    TMOD &= 0xF0;        //设置定时器模式 【低8位清0】
    TMOD |= 0x01;        //设置定时器模式 【最低为置1】
    TL0 = 0x18;        //设置定时初值 【低8位 64535%256+1】
    TH0 = 0xFC;        //设置定时初值 【高8位 64535/256】
    TF0 = 0;        //清除TF0标志
    TR0 = 1;        //定时器0开始计时
    ET0=1;
    EA=1;
    PT0=0;
}
```c
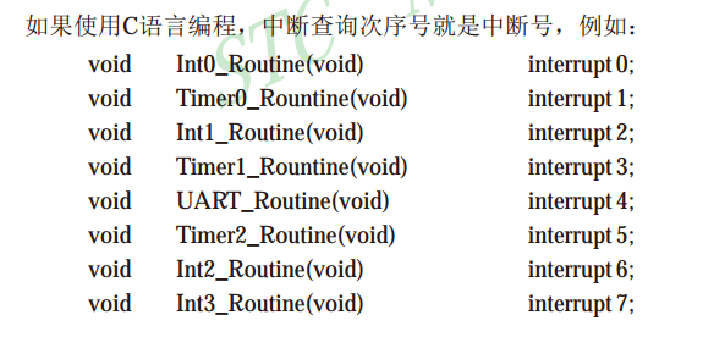
// 定时器中断函数模板
void Timer0_Routine() interrupt 1
{static unsigned int T0Count; TL0 = 0x18; //设置定时初值 TH0 = 0xFC; //设置定时初值 T0Count++; if(T0Count>=1000) { T0Count=0;<<<<<<< HEAD
=======
8368b639b4e17aeeb7e54e710b8132d86745d64b
}
}
按键控制流水灯
main.c
#include <REGX52.H>
#include "Timer0.h"
#include "Key.h"
#include <INTRINS.H>
unsigned char KeyNum,LEDMode;
void main()
{
P2=0xFE;
Timer0Init();
while(1)
{
KeyNum=Key(); //获取独立按键键码
if(KeyNum) //如果按键按下
{
if(KeyNum==1) //如果K1按键按下
{
LEDMode++; //模式切换
if(LEDMode>=2)LEDMode=0;
}
}
}
}
void Timer0_Routine() interrupt 1
{
static unsigned int T0Count;
TL0 = 0x18; //设置定时初值
TH0 = 0xFC; //设置定时初值
T0Count++; //T0Count计次,对中断频率进行分频
if(T0Count>=500)//分频500次,500ms
{
T0Count=0;
if(LEDMode==0) //模式判断
P2=_crol_(P2,1); //LED输出
if(LEDMode==1)
P2=_cror_(P2,1);
}
}
INTRINS:
_crol_循环左移_cror_循环右移
Key.c
#include <REGX52.H>
#include "Delay.h"
/**
* @brief 获取独立按键键码
* @param 无
* @retval 按下按键的键码,范围:0~4,无按键按下时返回值为0
*/
unsigned char Key()
{
unsigned char KeyNumber=0;
if(P3_1==0){Delay(20);while(P3_1==0);Delay(20);KeyNumber=1;}
if(P3_0==0){Delay(20);while(P3_0==0);Delay(20);KeyNumber=2;}
if(P3_2==0){Delay(20);while(P3_2==0);Delay(20);KeyNumber=3;}
if(P3_3==0){Delay(20);while(P3_3==0);Delay(20);KeyNumber=4;}
return KeyNumber;
}
Key.h
#ifndef __KEY_H__
#define __KEY_H__
unsigned char Key();
#endif
Timer0.c
#include <REGX52.H>
/**
* @brief 定时器0初始化,1毫秒@12.000MHz
* @param 无
* @retval 无
*/
void Timer0Init(void)
{
TMOD &= 0xF0; //设置定时器模式
TMOD |= 0x01; //设置定时器模式
TL0 = 0x18; //设置定时初值
TH0 = 0xFC; //设置定时初值
TF0 = 0; //清除TF0标志
TR0 = 1; //定时器0开始计时
ET0=1;
EA=1;
PT0=0;
}
/*定时器中断函数模板
void Timer0_Routine() interrupt 1
{
static unsigned int T0Count;
TL0 = 0x18;        //设置定时初值
TH0 = 0xFC;        //设置定时初值
T0Count++;
if(T0Count>=1000)
{
    T0Count=0;
}
}
*/
Timer0.h
#ifndef __TIMER0_H__
#define __TIMER0_H__

void Timer0Init(void);

#endif
定时器时钟
main.c
#include <REGX52.H>
#include "Delay.h"
#include "LCD1602.h"
#include "Timer0.h"

unsigned char Sec=59,Min=59,Hour=23;

void main()
{
    LCD_Init();
    Timer0Init();

    LCD_ShowString(1,1,"Clock:");    //上电显示静态字符串
    LCD_ShowString(2,1,"  :  :");

    while(1)
    {
        LCD_ShowNum(2,1,Hour,2);    //显示时分秒
        LCD_ShowNum(2,4,Min,2);
        LCD_ShowNum(2,7,Sec,2);
    }
}

void Timer0_Routine() interrupt 1
{
    static unsigned int T0Count;
    TL0 = 0x18;        //设置定时初值
    TH0 = 0xFC;        //设置定时初值
    T0Count++;
    if(T0Count>=1000)    //定时器分频,1s
    {
        T0Count=0;
        Sec++;            //1秒到,Sec自增
        if(Sec>=60)
        {
            Sec=0;        //60秒到,Sec清0,Min自增
            Min++;
            if(Min>=60)
            {
                Min=0;    //60分钟到,Min清0,Hour自增
                Hour++;
                if(Hour>=24)
                {
                    Hour=0;    //24小时到,Hour清0
                }
            }
        }
    }
}
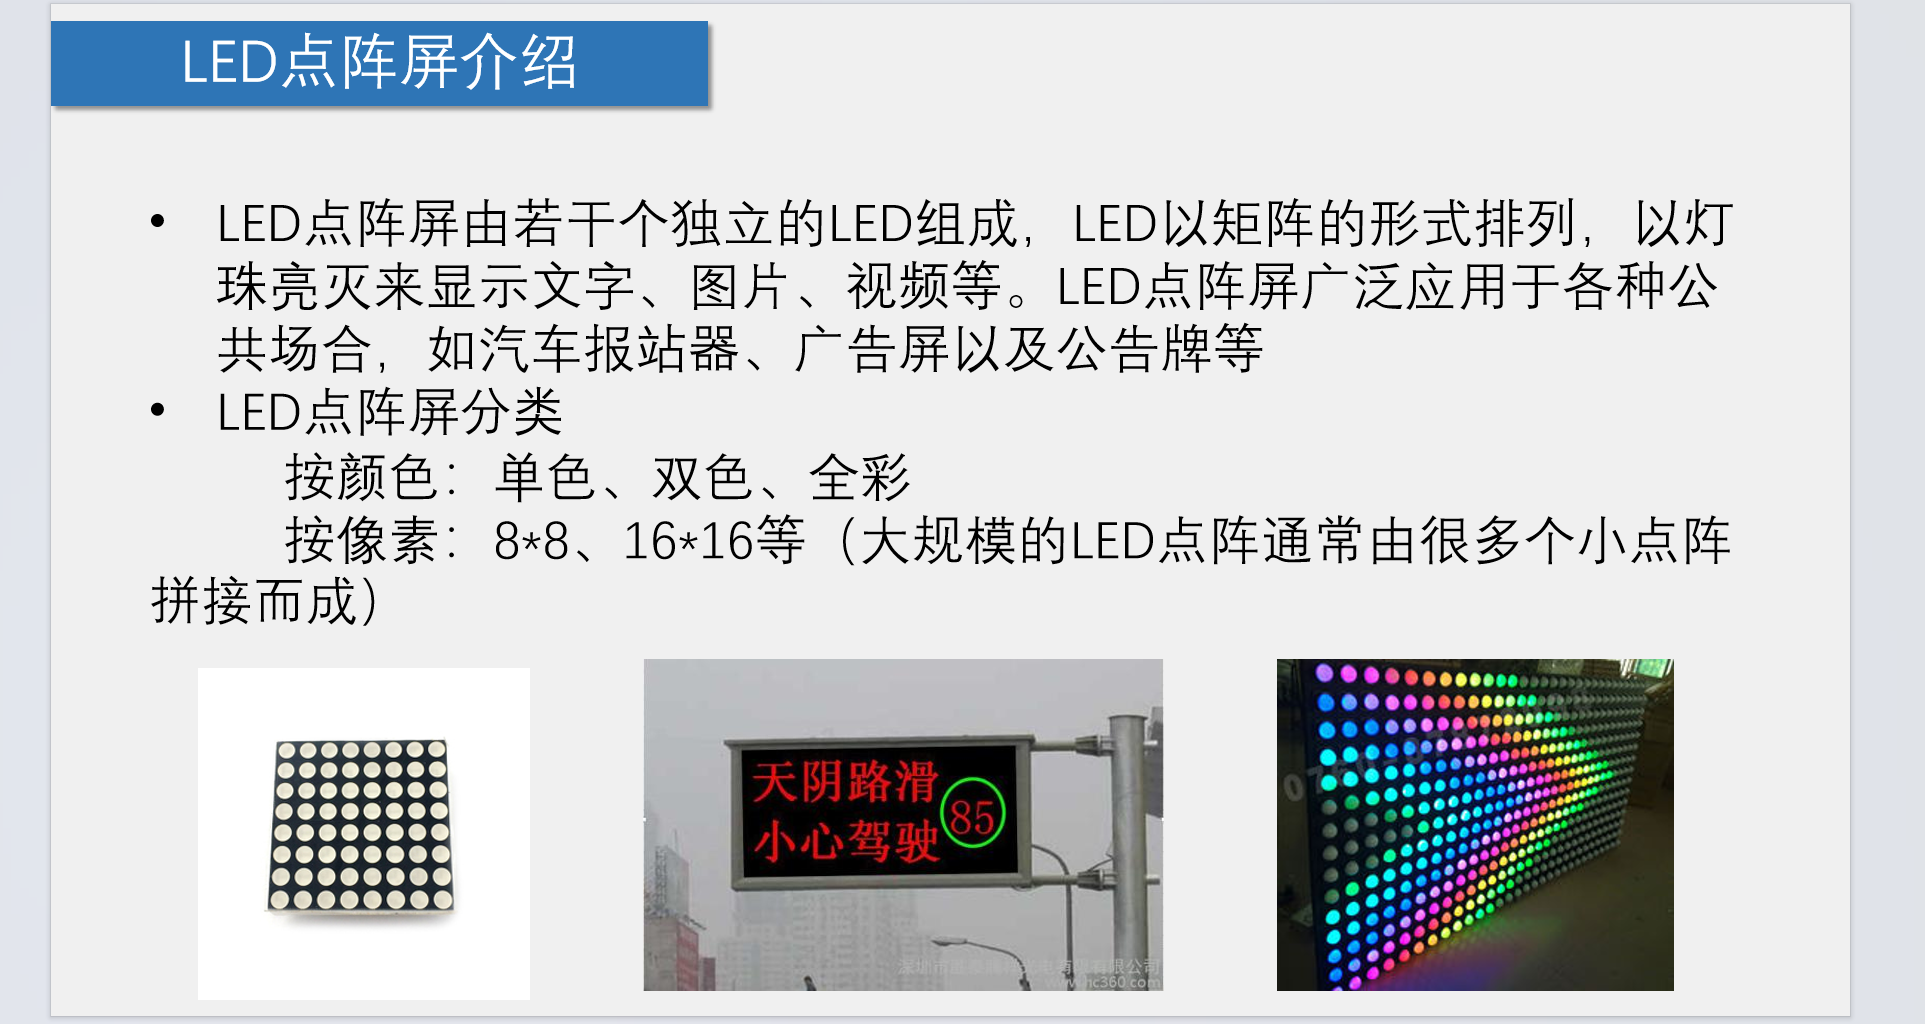
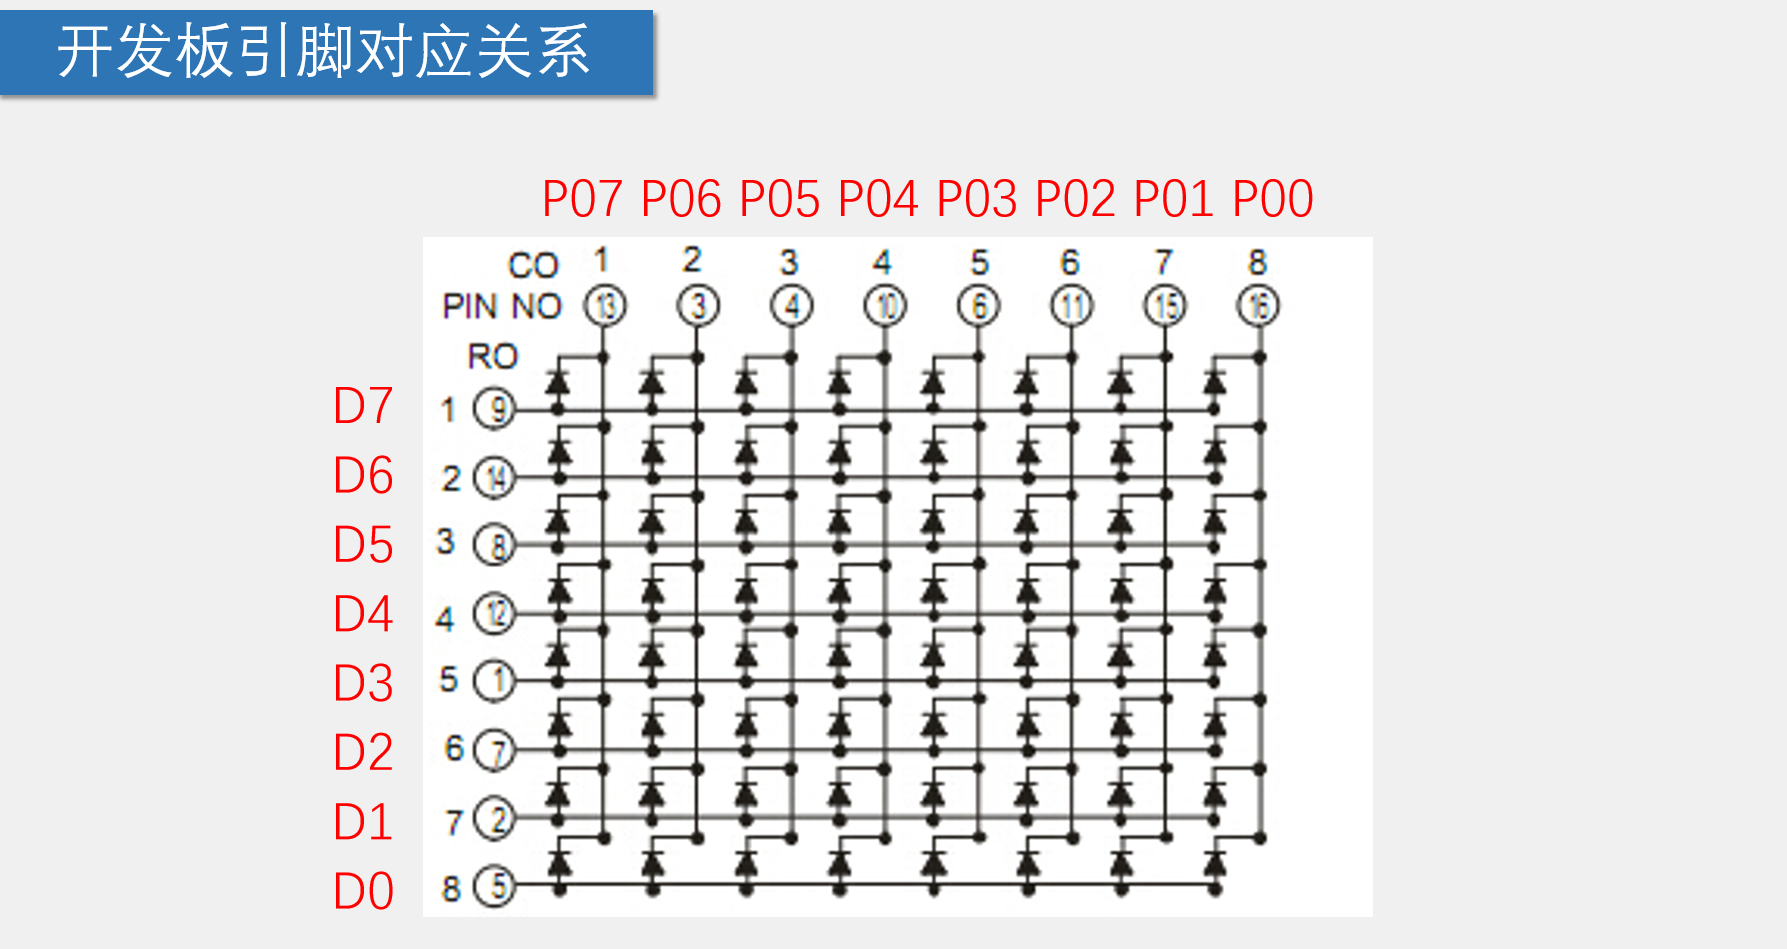
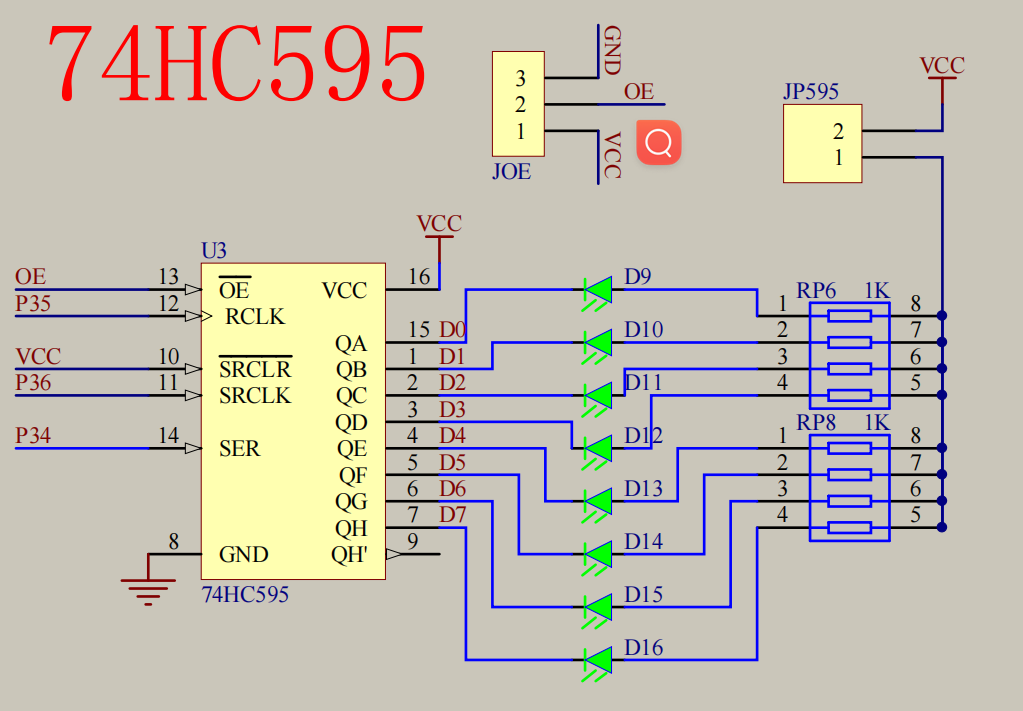
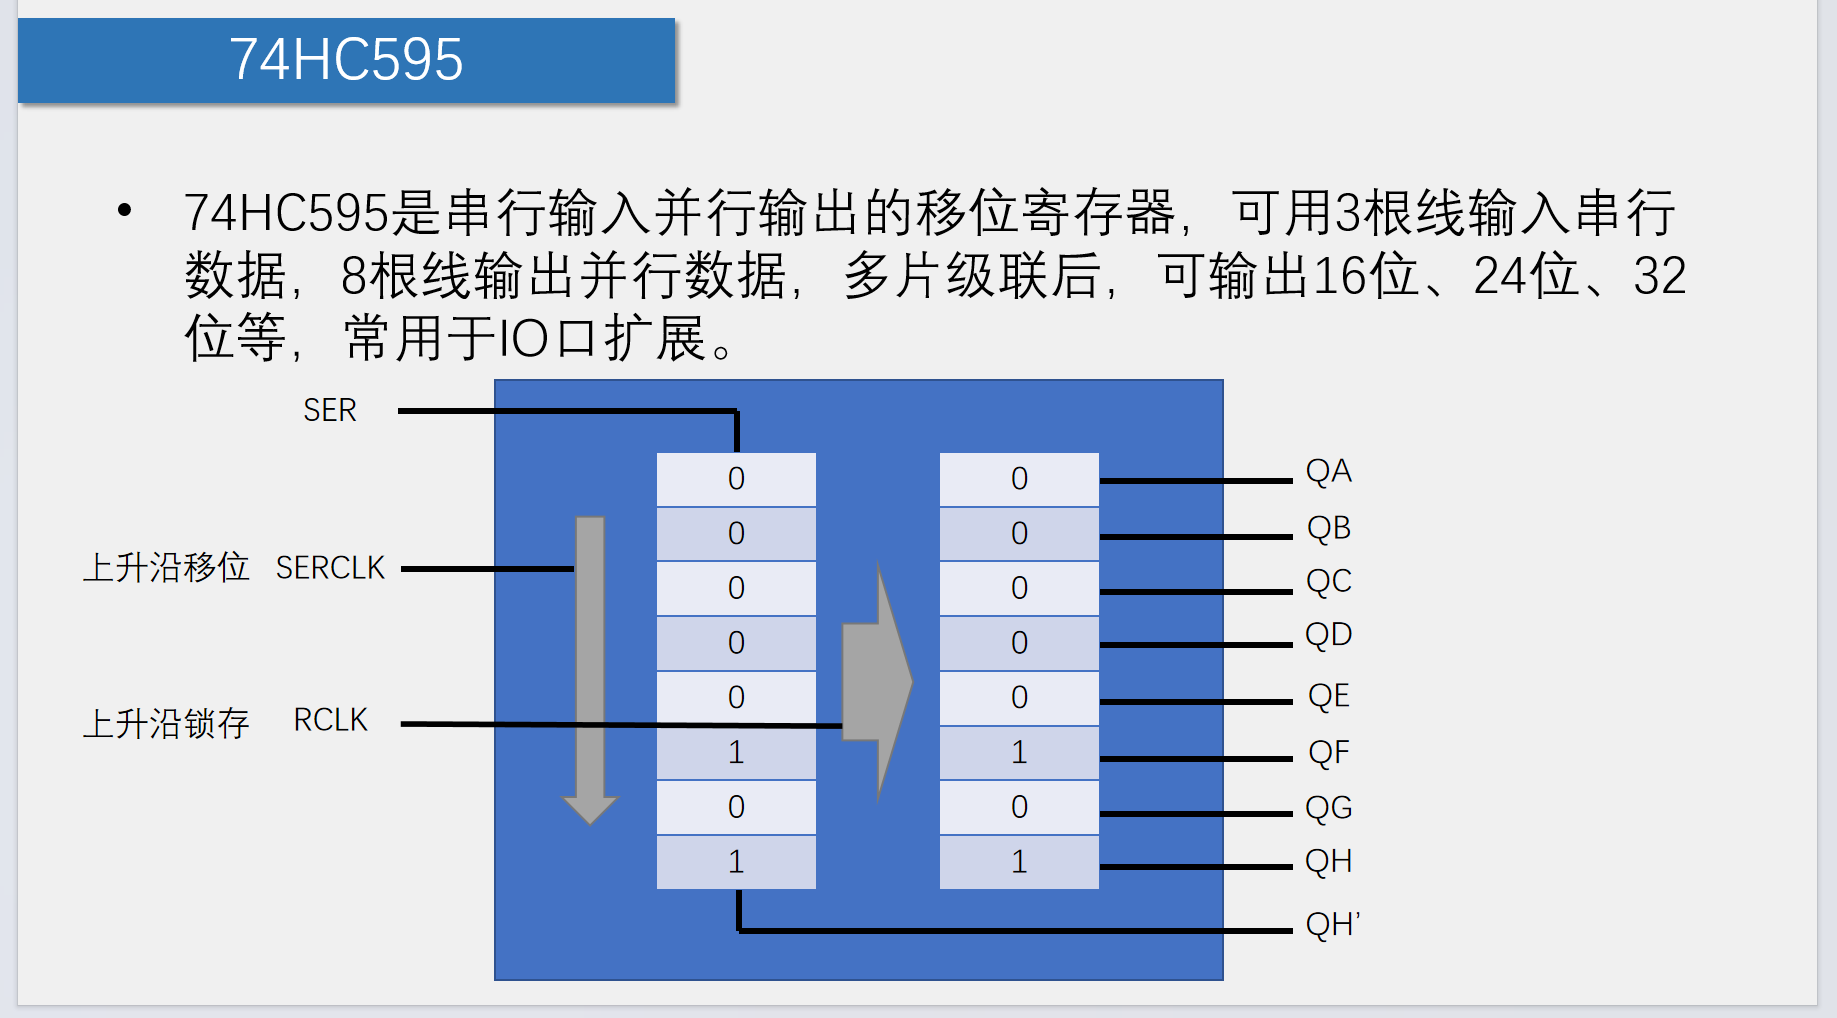
LED点阵屏
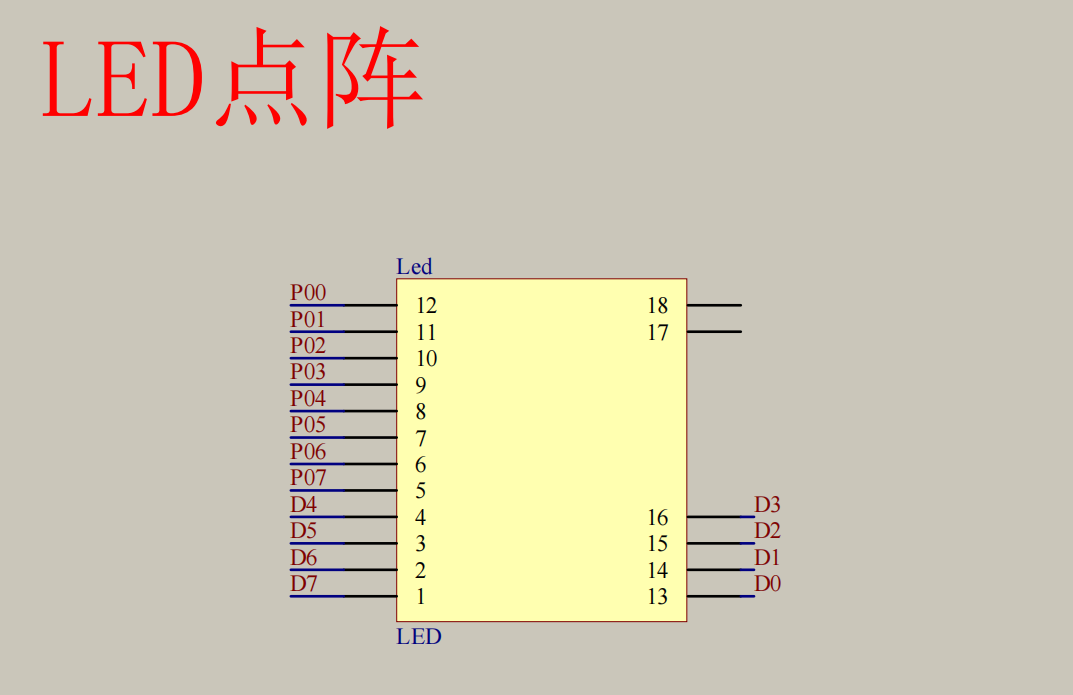
#include <REGX52.H>
#include "Delay.h"

sbit RCK=P3^5;        //RCLK 上升沿锁存
sbit SCK=P3^6;        //SRCLK 上升沿移位
sbit SER=P3^4;        //SER

#define MATRIX_LED_PORT        P0

/** D0-D7
  * @brief  74HC595写入一个字节
  * @param  Byte 要写入的字节
  * @retval 无
  */
void _74HC595_WriteByte(unsigned char Byte)
{
    unsigned char i;
    for(i=0;i<8;i++)
    {
        SER=Byte&(0x80>>i);
        SCK=1;
        SCK=0;
    }
    RCK=1;
    RCK=0;
}

/** P0-P7
  * @brief  LED点阵屏显示一列数据
  * @param  Column 要选择的列,范围:0~7,0在最左边
  * @param  Data 选择列显示的数据,高位在上,1为亮,0为灭
  * @retval 无
  */
void MatrixLED_ShowColumn(unsigned char Column,Data)
{
    _74HC595_WriteByte(Data);
    MATRIX_LED_PORT=~(0x80>>Column);
    Delay(1);
    MATRIX_LED_PORT=0xFF;
}

void main()
{
    SCK=0;
    RCK=0;
    while(1)
    {
        MatrixLED_ShowColumn(0,0x3C);
        MatrixLED_ShowColumn(1,0x42);
        MatrixLED_ShowColumn(2,0xA9);
        MatrixLED_ShowColumn(3,0x85);
        MatrixLED_ShowColumn(4,0x85);
        MatrixLED_ShowColumn(5,0xA9);
        MatrixLED_ShowColumn(6,0x42);
        MatrixLED_ShowColumn(7,0x3C);
    }
}
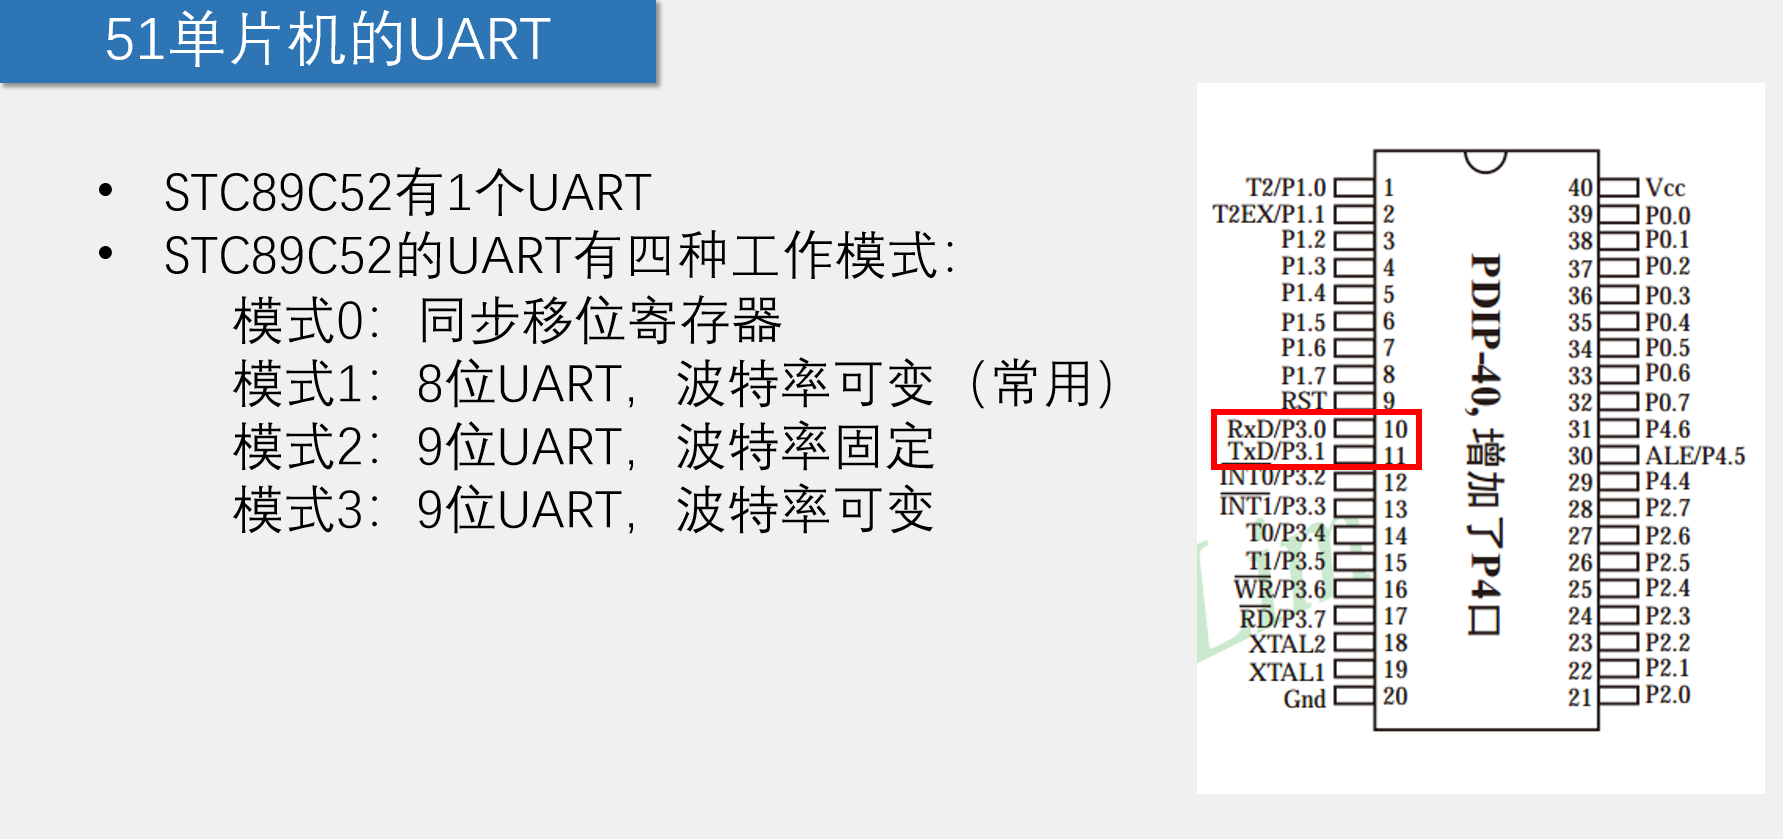
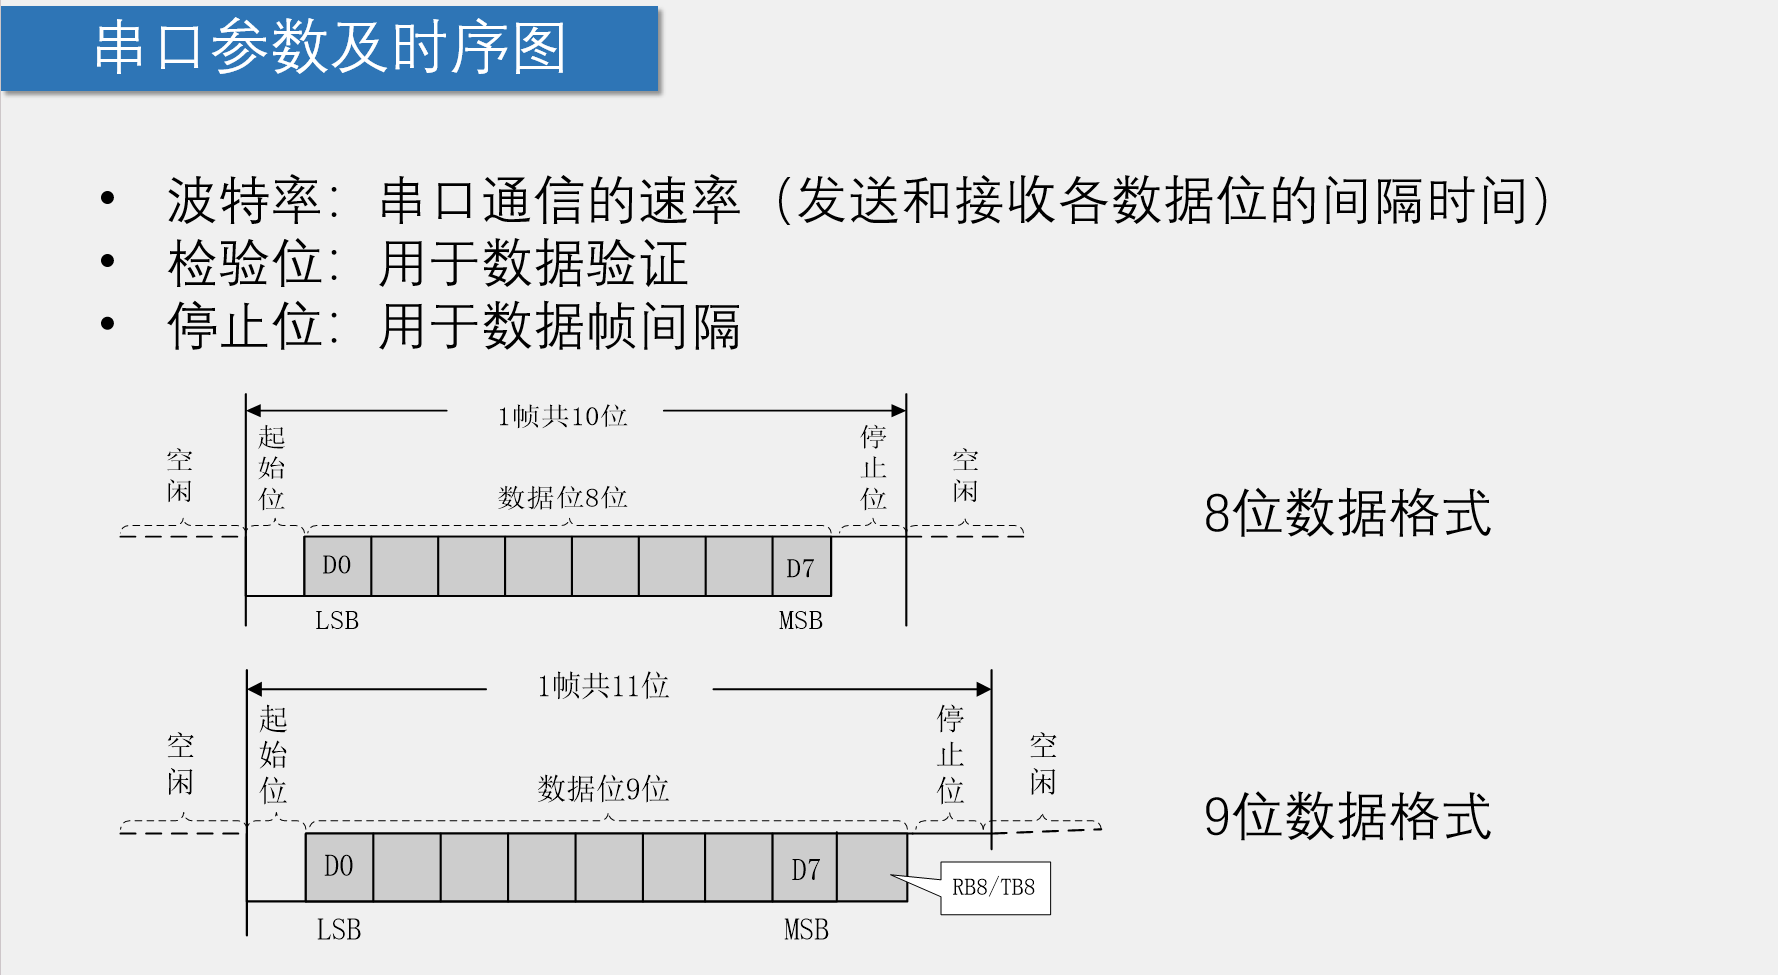
串口通信
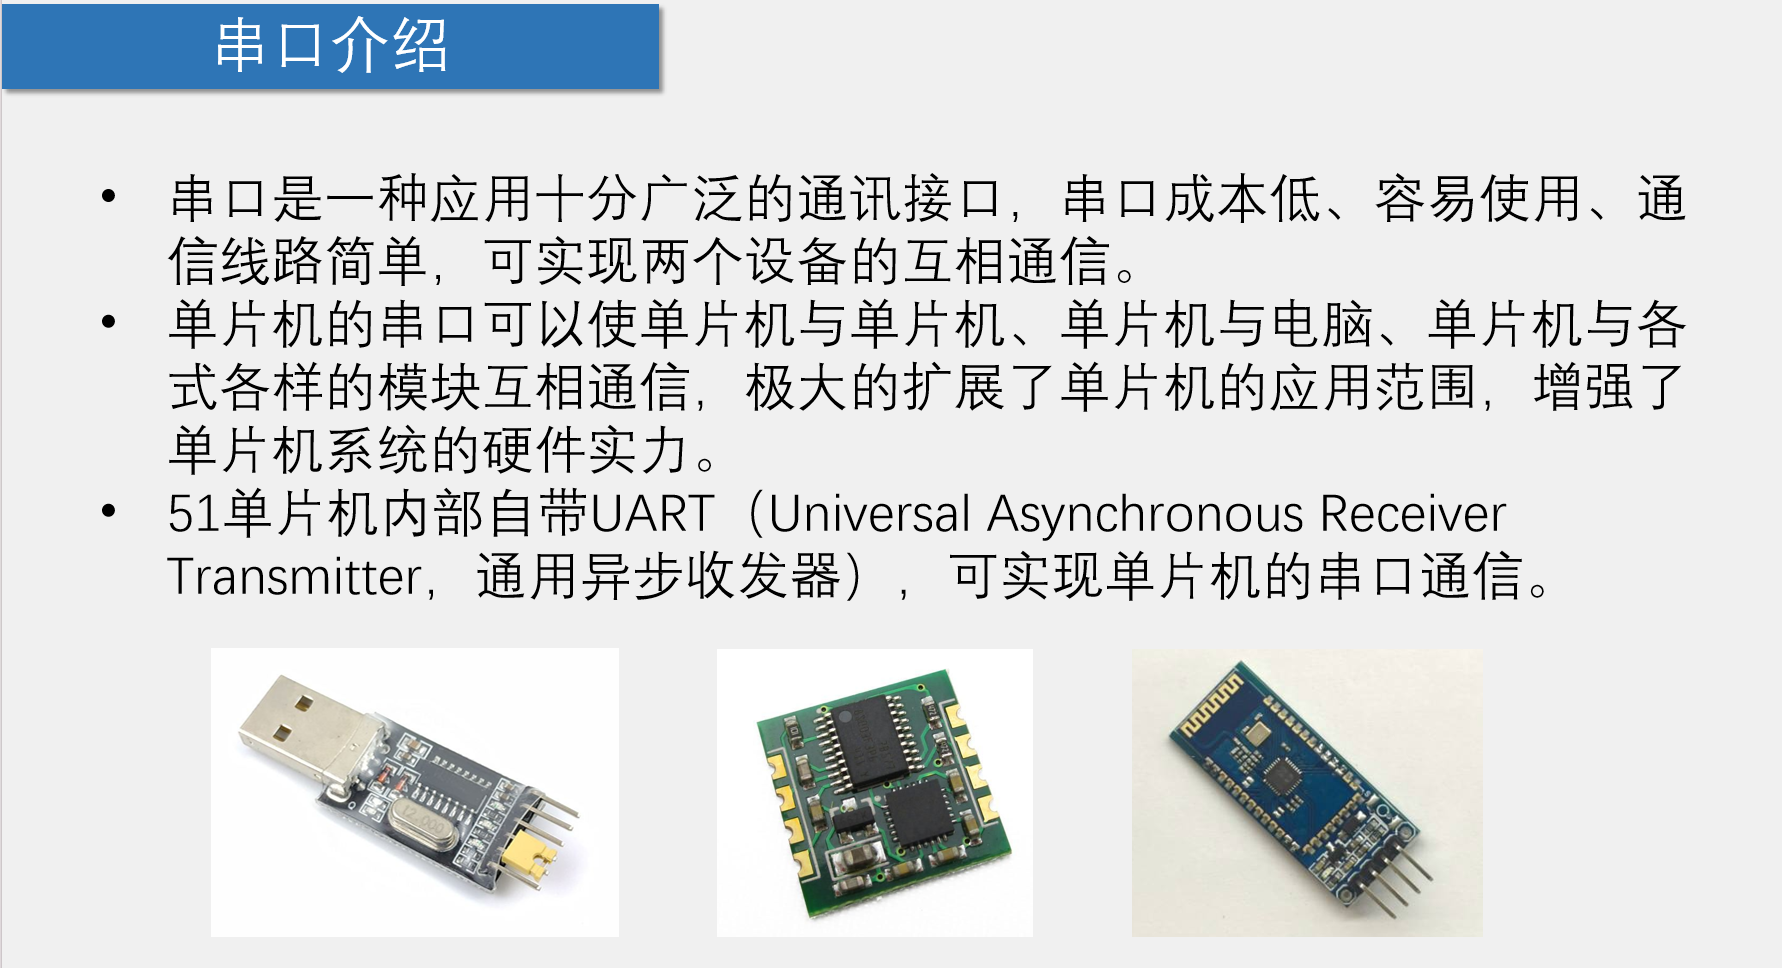
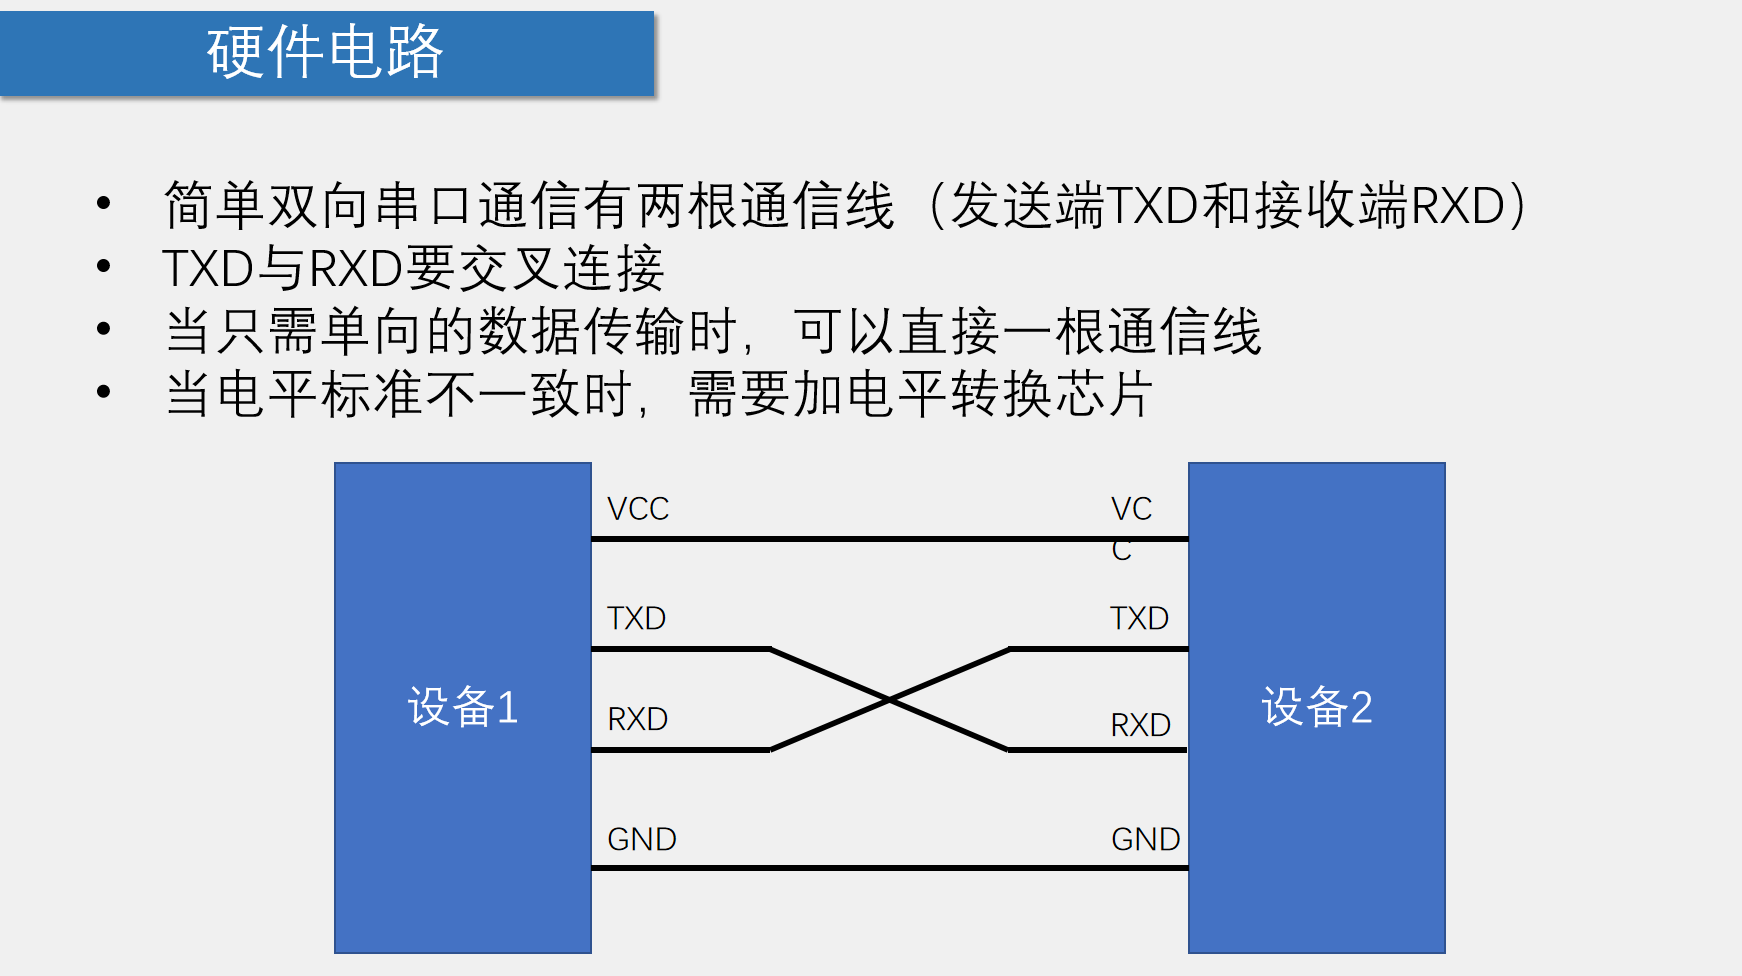
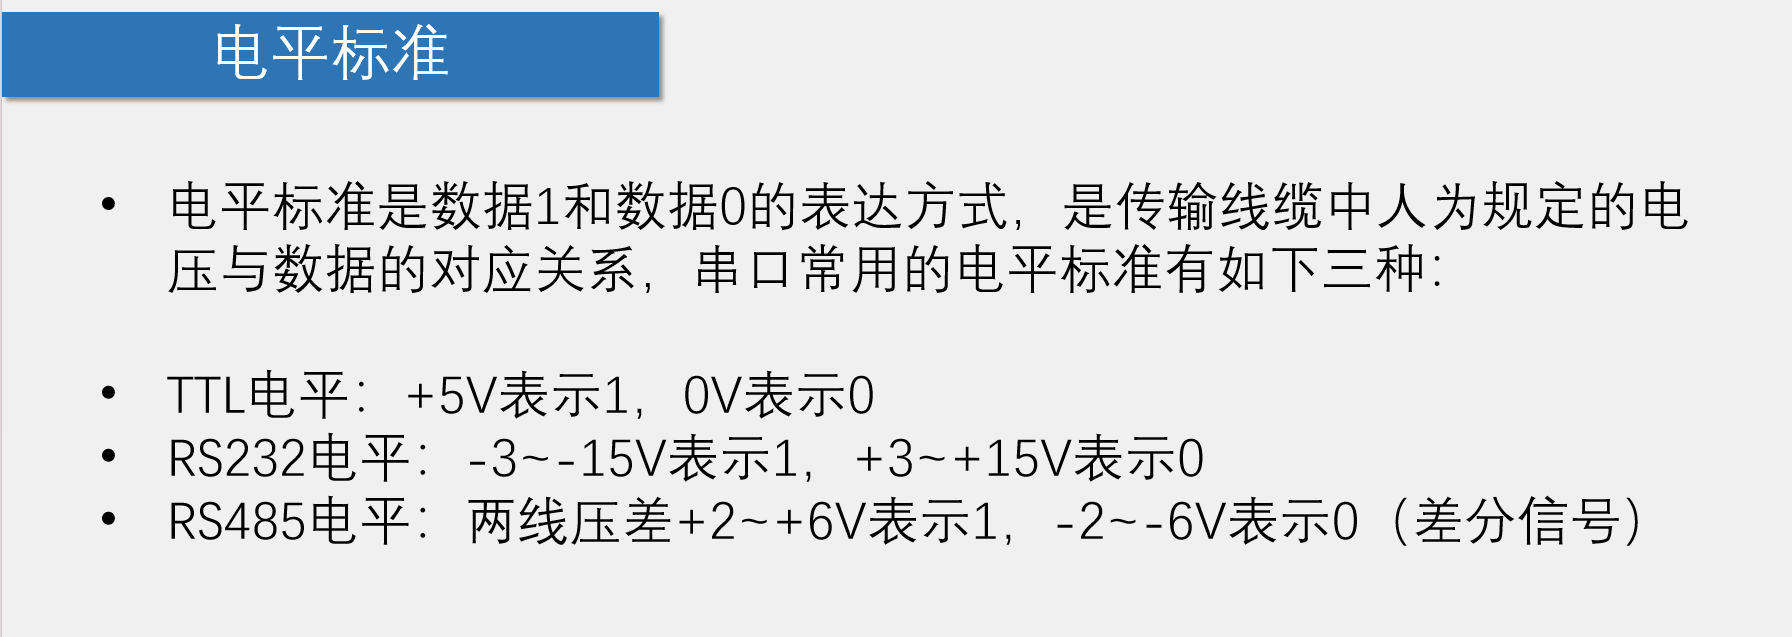
注:单片机:TTL电平
- 全双工:通信双方可以在同一时刻互相传输数据
- 半双工:通信双方可以互相传输数据,但必须分时复用一根数据线 【对讲机】
- 单工:通信只能有一方发送到另一方,不能反向传输 【遥控器】
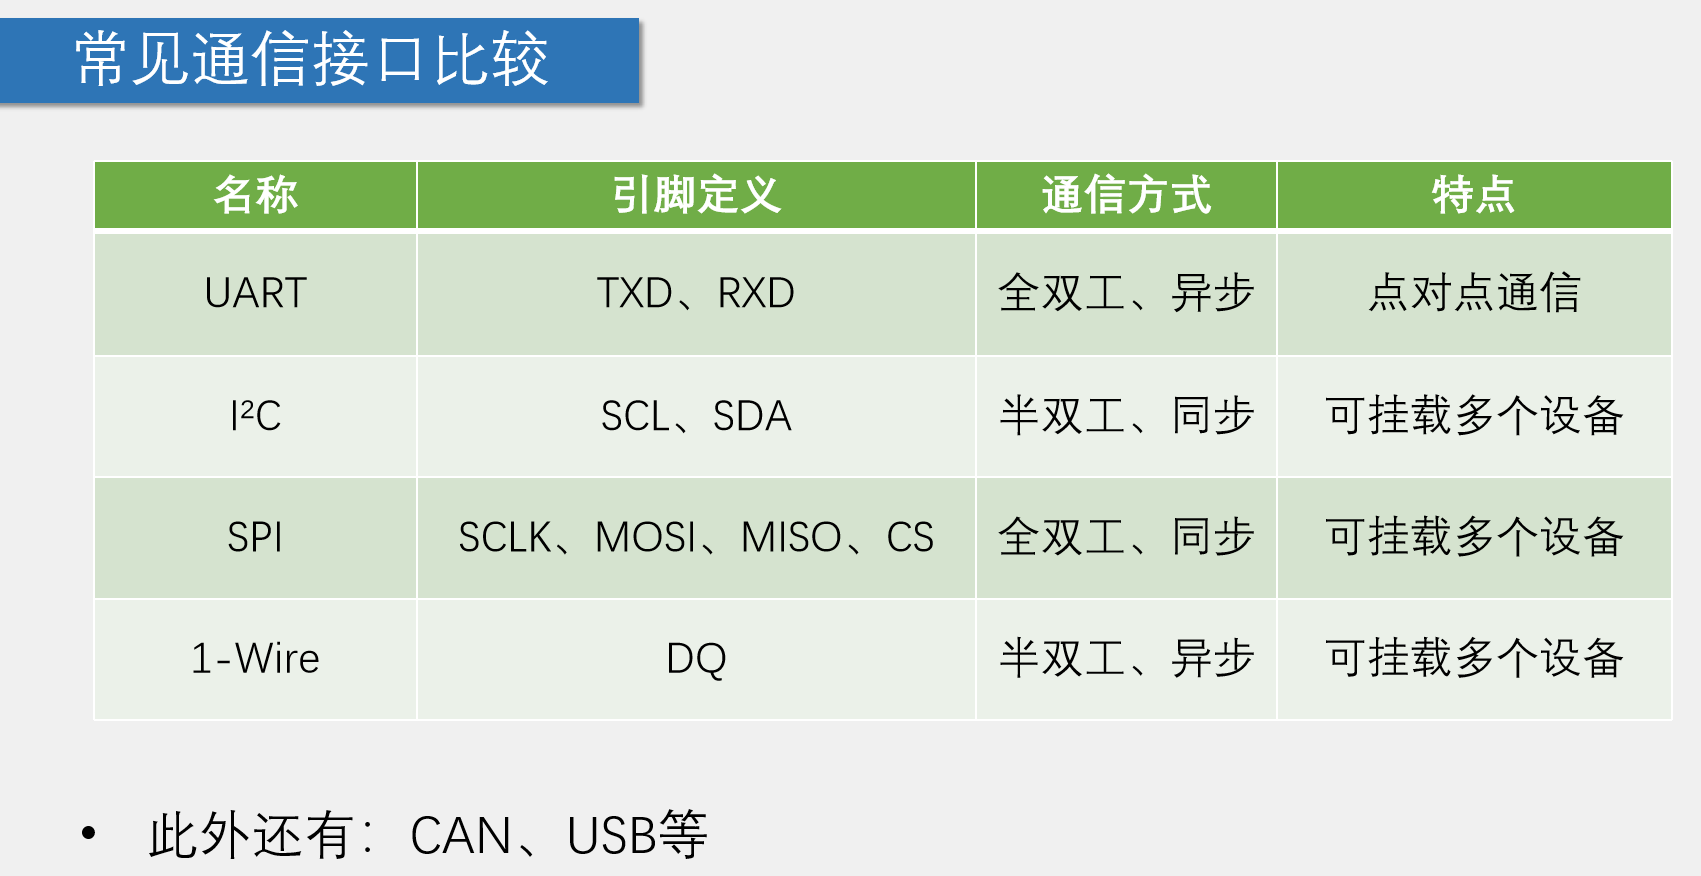
- 异步:通信双方各自约定通信速率
- 同步:通信双方靠一根时钟线来约定通信速率
- 总线:连接各个设备的数据传输线路(类似于一条马路,把路边各住户连接起来,使住户可以相互交流)
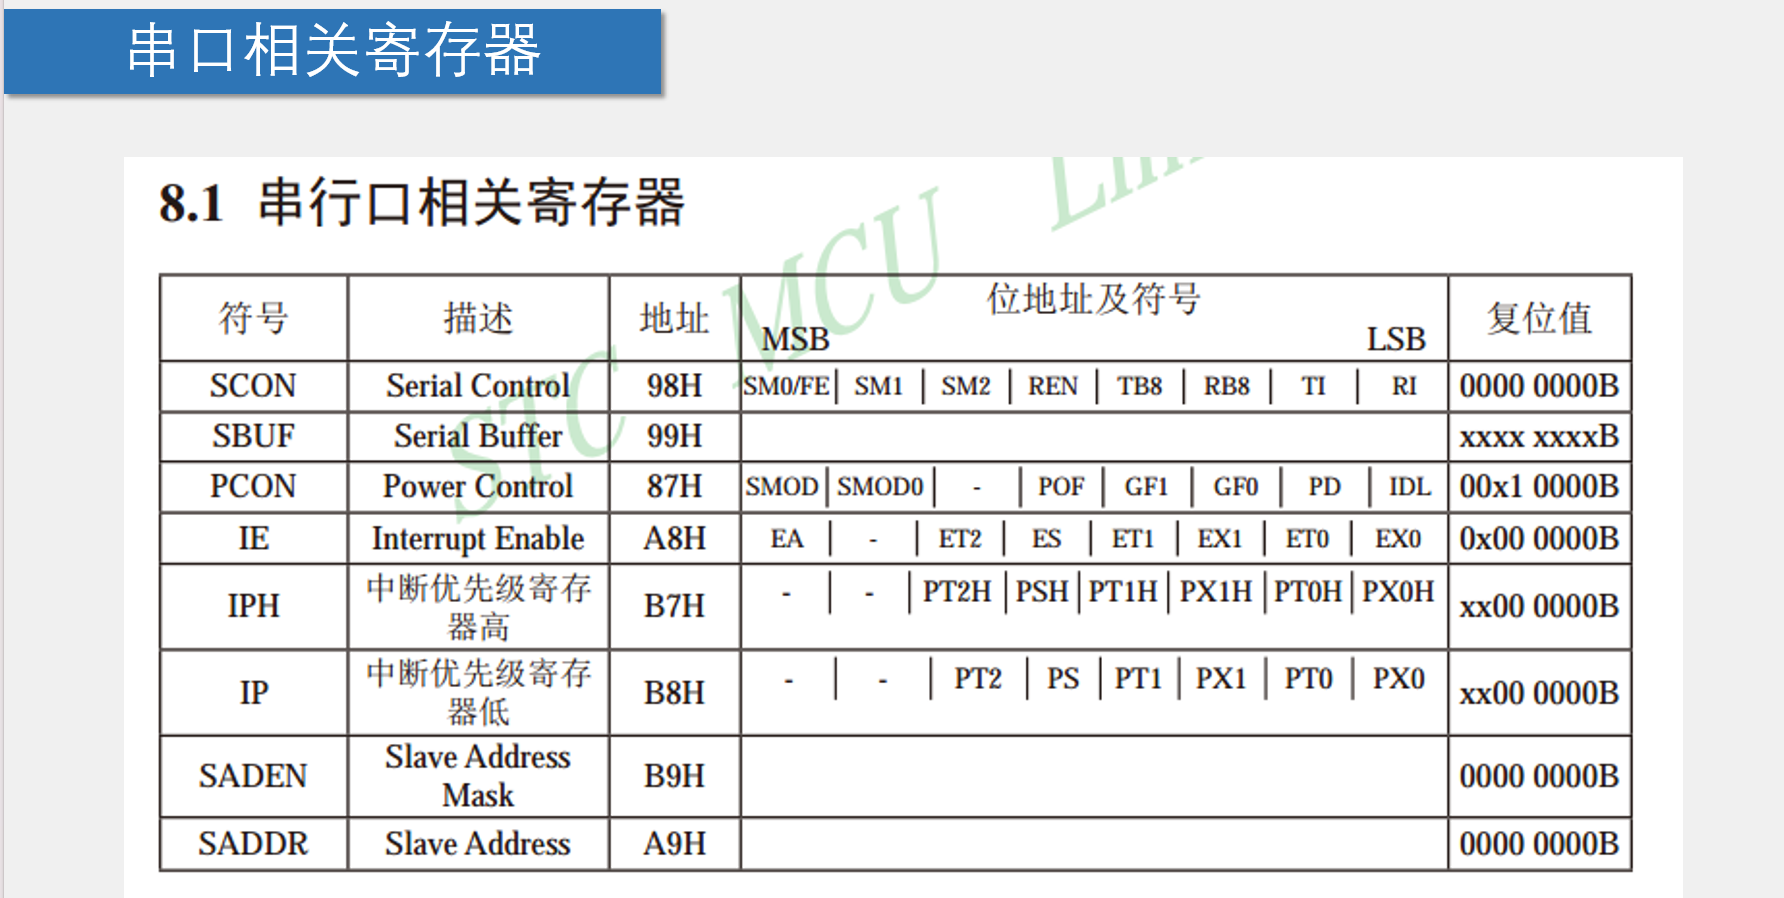
寄存器初值:
- SCON=0x40;
- B7 B6 … B1 B0
- SM0 SM1 TI RI
- 0 1 0 0
- PCON=1000 0000; 【波特率加倍:SMOD=1】
- TMOD: 0010 0000 【定时器模式:8位自动重装】
- ET1=0; //禁止定时器1中断
- TR1=1; //启动定时器1
串口向电脑端发送数据
main.c
#include <REGX52.H>
#include "Delay.h"
#include "UART.h"

unsigned char Sec;

void main()
{
    UART_Init();            //串口初始化
    while(1)
    {
        UART_SendByte(Sec);    //串口发送一个字节
        Sec++;                //Sec自增
        Delay(1000);        //延时1秒
    }
}
UART.c
#include <REGX52.H>
/**
* @brief 串口初始化,4800bps@12.000MHz
* @param 无
* @retval 无
*/
void UART_Init()
{
SCON=0x40;
PCON |= 0x80;
TMOD &= 0x0F; //设置定时器模式
TMOD |= 0x20; //设置定时器模式
TL1 = 0xF3; //设定定时初值
TH1 = 0xF3; //设定定时器重装值
ET1 = 0; //禁止定时器1中断
TR1 = 1; //启动定时器1
}
/**
* @brief 串口发送一个字节数据
* @param Byte 要发送的一个字节数据
* @retval 无
*/
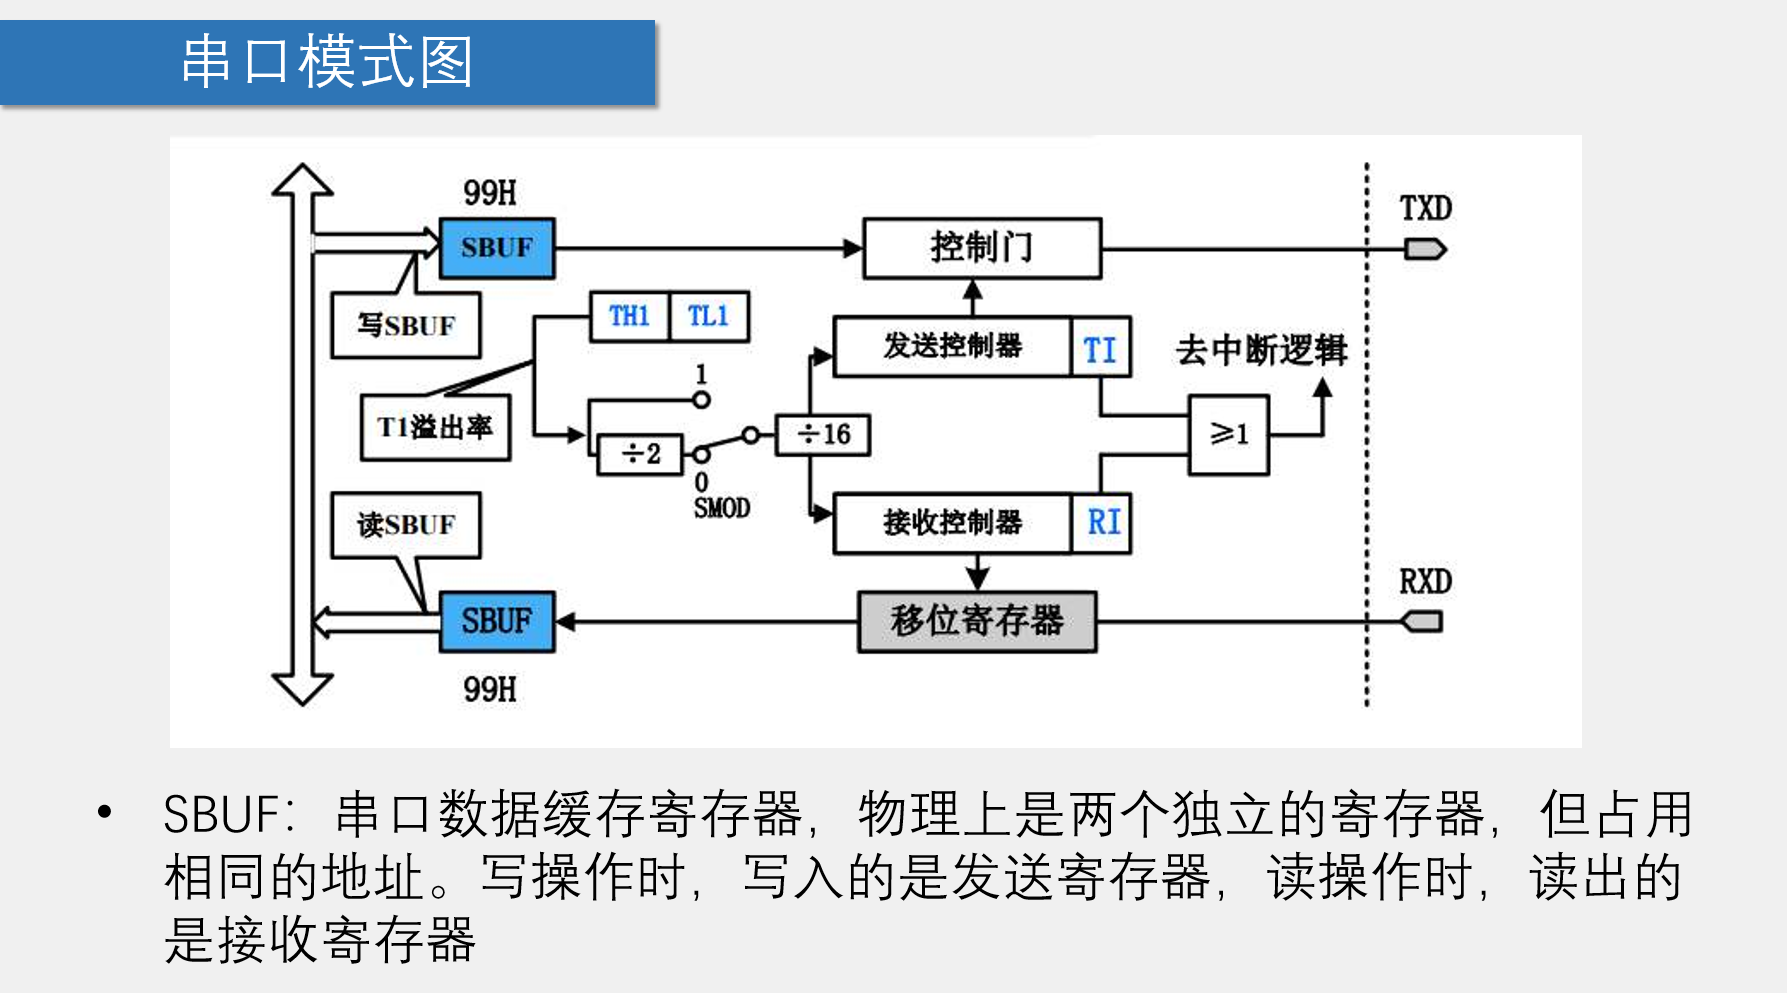
void UART_SendByte(unsigned char Byte)
{
SBUF=Byte;
while(TI==0);
TI=0;
}
UART.h
#ifndef __UART_H__
#define __UART_H__

void UART_Init();
void UART_SendByte(unsigned char Byte);

#endif
电脑端向串口发送数据
main.c
#include <REGX52.H>
#include "Delay.h"
#include "UART.h"

void main()
{
    UART_Init();        //串口初始化
    while(1)
    {

    }
}

void UART_Routine() interrupt 4
{
    if(RI==1)                    //如果接收标志位为1,接收到了数据
    {
        P2=~SBUF;                //读取数据,取反后输出到LED
        UART_SendByte(SBUF);    //将受到的数据发回串口
        RI=0;                    //接收标志位清0
    }
}
UART.c
- 允许接收: SCON=0x50;【REN=1】
- 打开中断:EA=1; ES=1;
#include <REGX52.H>

/**
  * @brief  串口初始化,4800bps@12.000MHz
  * @param  无
  * @retval 无
  */
void UART_Init()
{
    SCON=0x50;
    PCON |= 0x80;
    TMOD &= 0x0F;        //设置定时器模式
    TMOD |= 0x20;        //设置定时器模式
    TL1 = 0xF3;        //设定定时初值
    TH1 = 0xF3;        //设定定时器重装值
    ET1 = 0;        //禁止定时器1中断
    TR1 = 1;        //启动定时器1
    EA=1;
    ES=1;
}

/**
  * @brief  串口发送一个字节数据
  * @param  Byte 要发送的一个字节数据
  * @retval 无
  */
void UART_SendByte(unsigned char Byte)
{
    SBUF=Byte;
    while(TI==0);
    TI=0;
}

/*串口中断函数模板
// UART_Routine() 可以自己取名
// 但需要关键字及序号interrupt 4
// 4 代表串口
void UART_Routine() interrupt 4
{
    if(RI==1)
    {

        RI=0;
    }
}
*/
UART.h
#ifndef __UART_H__
#define __UART_H__

void UART_Init();
void UART_SendByte(unsigned char Byte);

#endif
串口测试–自发自收 【PC(发送接收都显示)-STC89C52】
main.c
#include <REGX52.H>
#include "Delay.h"
#include "UART.h"
#include "LCD1602.h"

unsigned char Sec;

void main()
{
    UART_Init();            //串口初始化
    LCD_Init();
    while(1)
    {

    }
}

void UART_Routine() interrupt 4
{
    if(RI==1)                    //如果接收标志位为1,接收到了数据
    {
        UART_SendByte(SBUF);    //将受到的数据发回串口
        LCD_ShowHexNum(1,1,SBUF,2);    //在LCD的1行1列显示Result,长度为3位
        RI=0;                    //接收标志位清0
    }
}
UART.c
此处修改为:4800bps@11.0592MHz 【这样可以避免误差】
#include <REGX52.H>

/**
  * @brief  串口初始化,4800bps@11.0592MHz
  * @param  无
  * @retval 无
  */
void UART_Init()
{
    SCON=0x50;
    PCON &= 0x7F;
    TMOD &= 0x0F;        //设置定时器模式
    TMOD |= 0x20;        //设置定时器模式
    TL1 = 0xFA;        //设定定时初值
    TH1 = 0xFA;        //设定定时器重装值
    ET1 = 0;        //禁止定时器1中断
    TR1 = 1;        //启动定时器1
    EA=1;
    ES=1;
}

/**
  * @brief  串口发送一个字节数据
  * @param  Byte 要发送的一个字节数据
  * @retval 无
  */
void UART_SendByte(unsigned char Byte)
{
    SBUF=Byte;
    while(TI==0);
    TI=0;
}

/*串口中断函数模板
// UART_Routine() 可以自己取名
// 但需要关键字及序号interrupt 4
// 4 代表串口
void UART_Routine() interrupt 4
{
    if(RI==1)
    {

        RI=0;
    }
}
*/
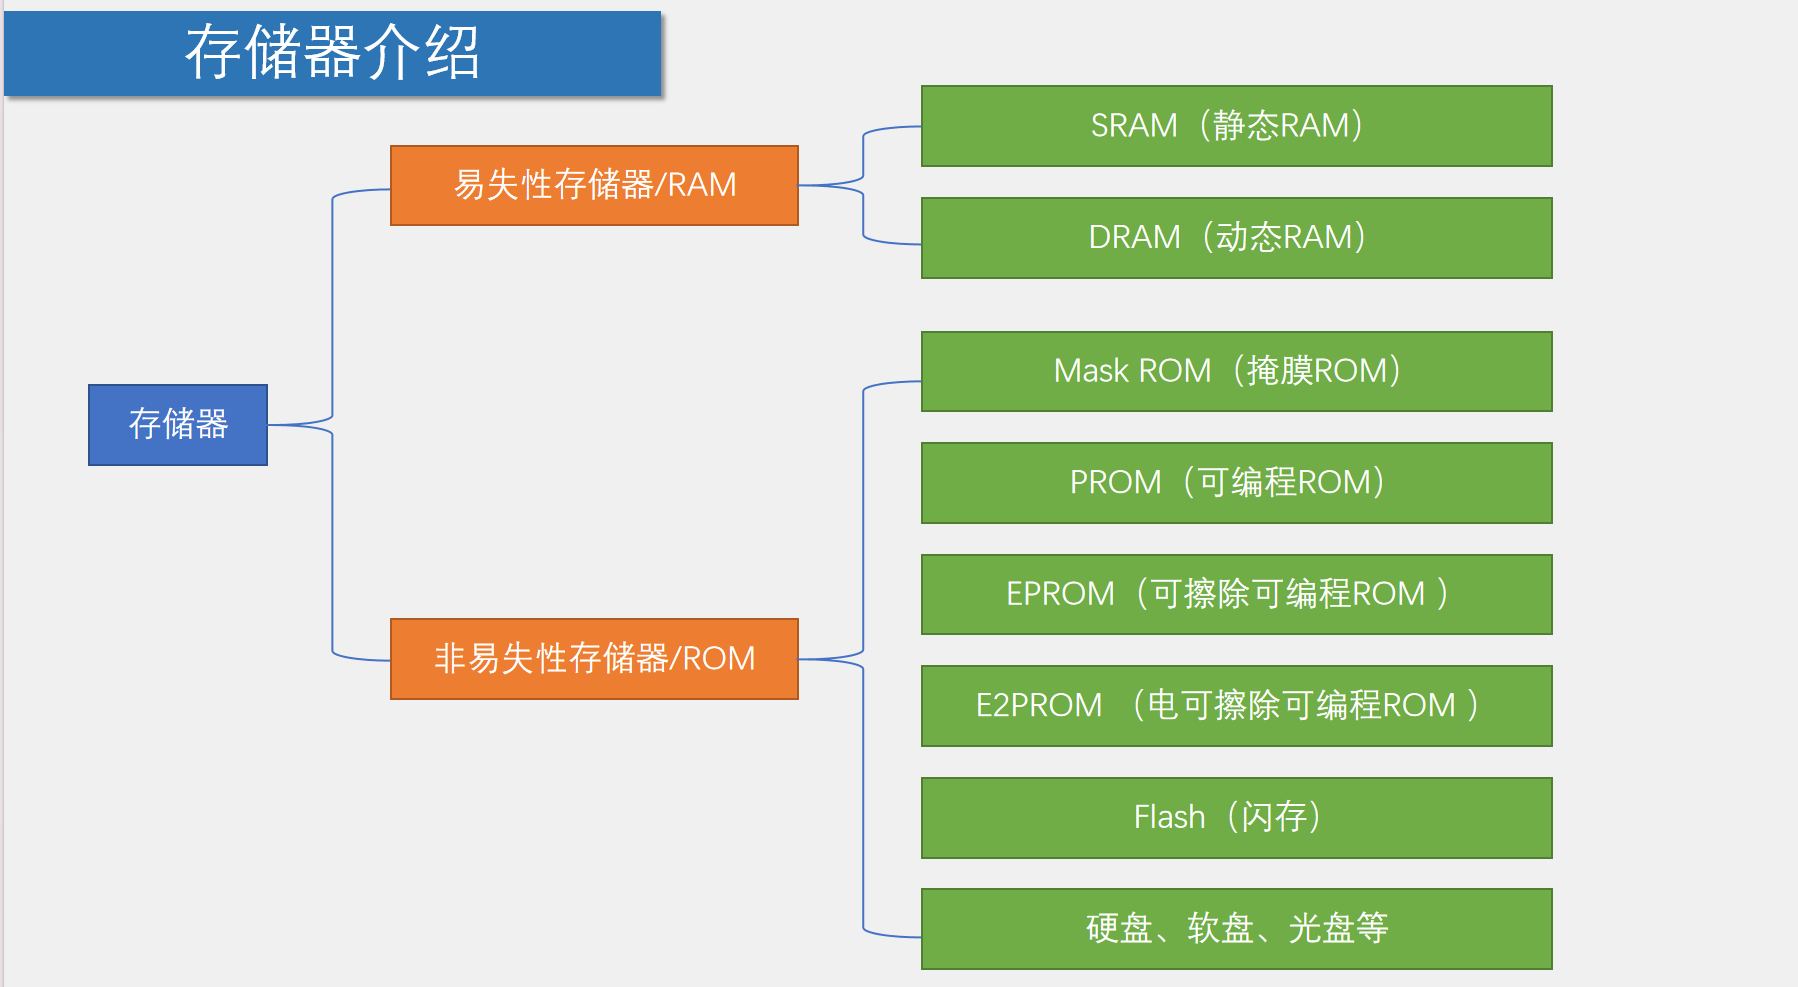
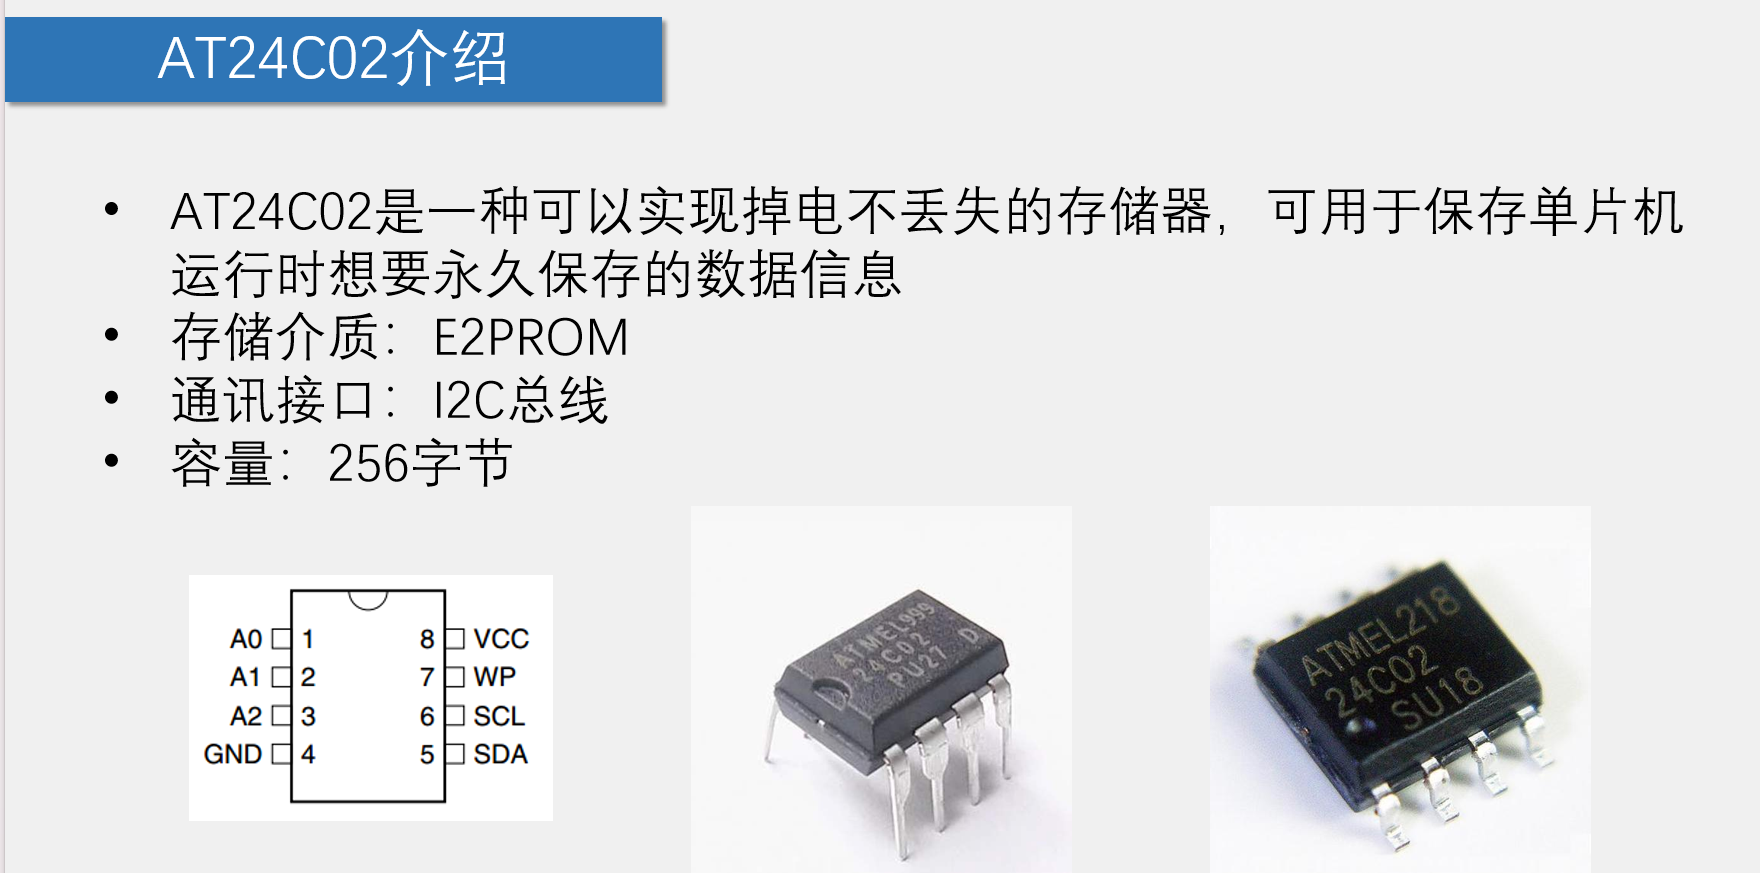
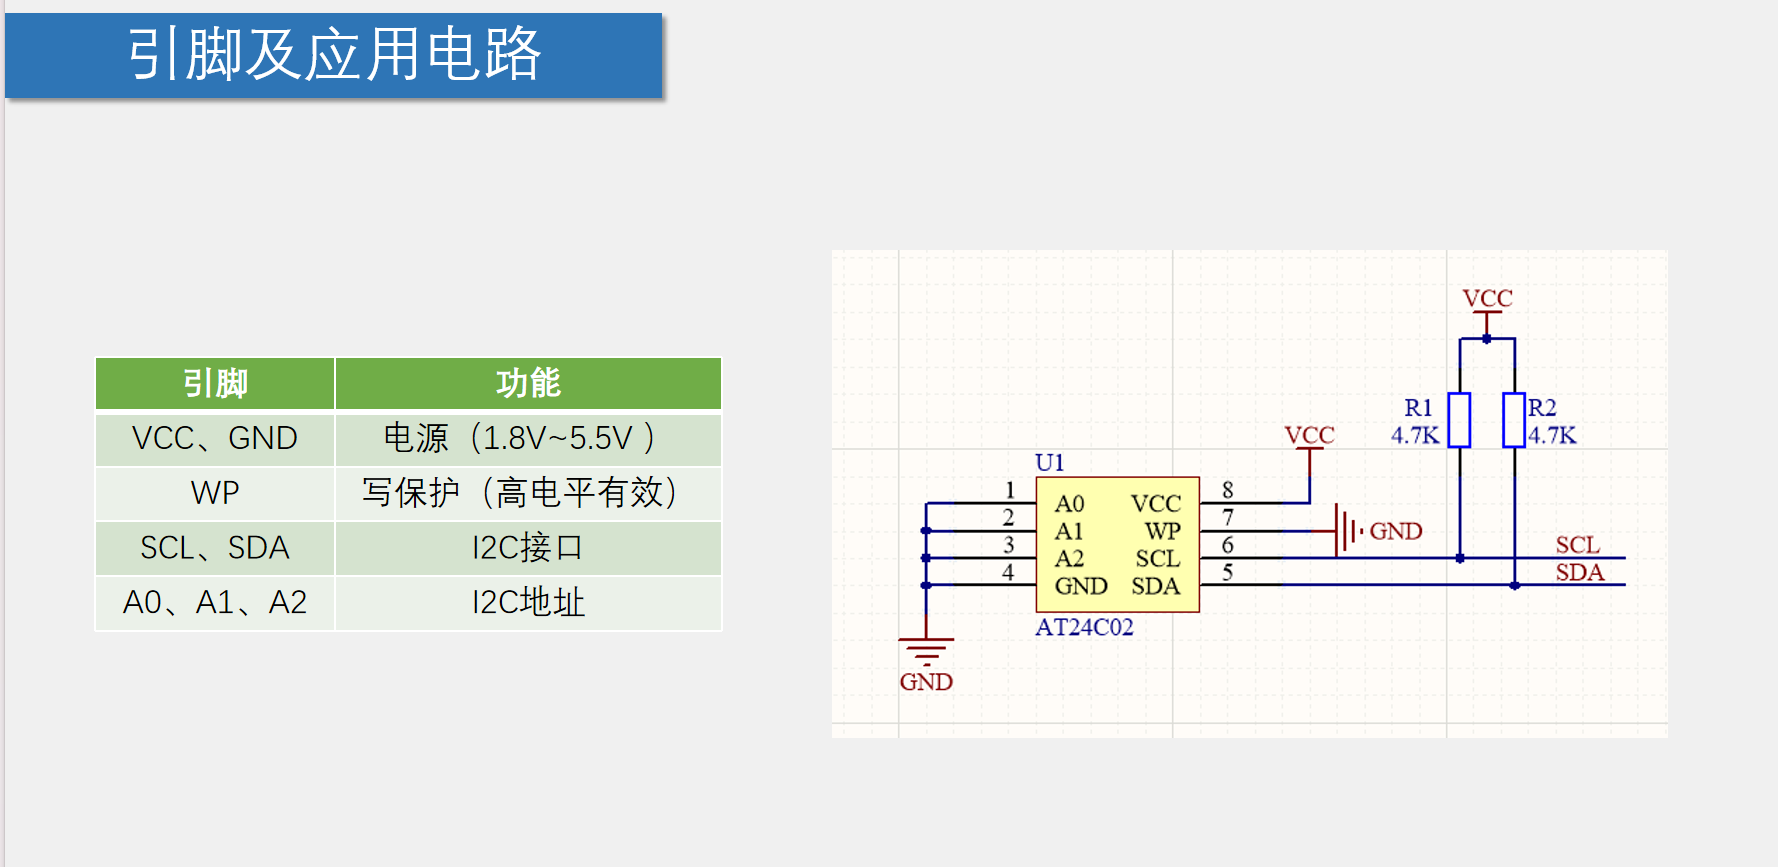
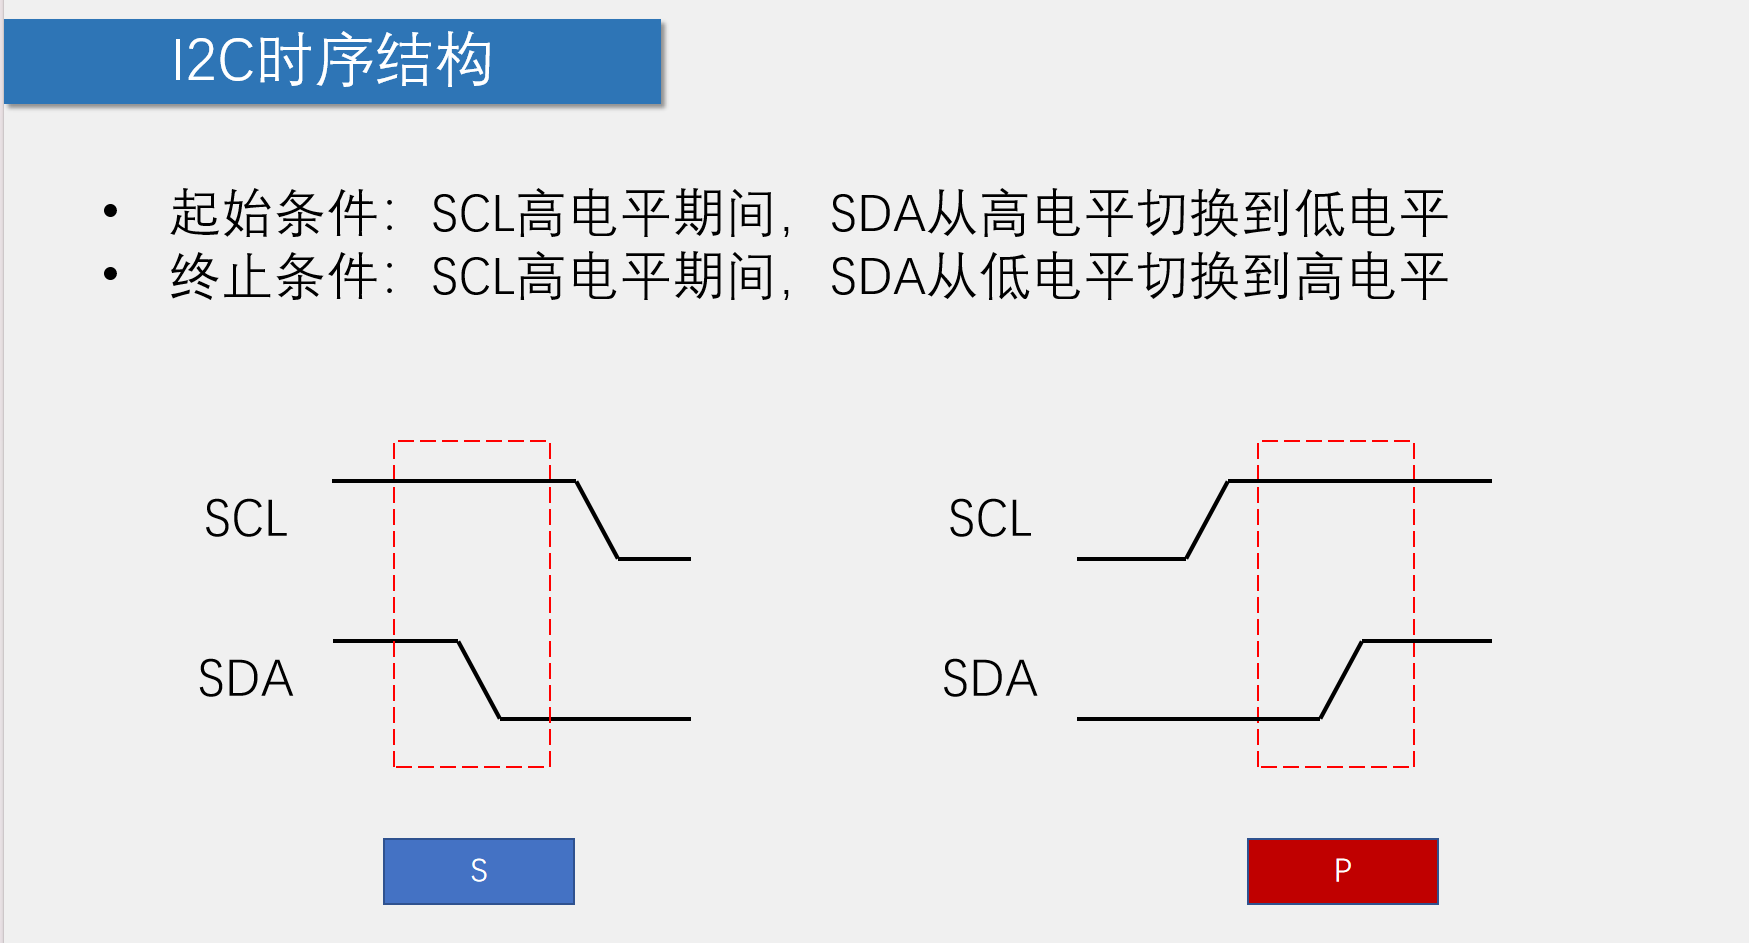
ROM & I2C

I2C.c
#include <REGX52.H>
sbit I2C_SCL=P2^1;
sbit I2C_SDA=P2^0;
/**
* @brief I2C开始
* @param 无
* @retval 无
*/
void I2C_Start(void)
{
I2C_SDA=1;
I2C_SCL=1;
I2C_SDA=0;
I2C_SCL=0;
}
/**
* @brief I2C停止
* @param 无
* @retval 无
*/
void I2C_Stop(void)
{
I2C_SDA=0;
I2C_SCL=1;
I2C_SDA=1;
}
/**
* @brief I2C发送一个字节
* @param Byte 要发送的字节
* @retval 无
*/
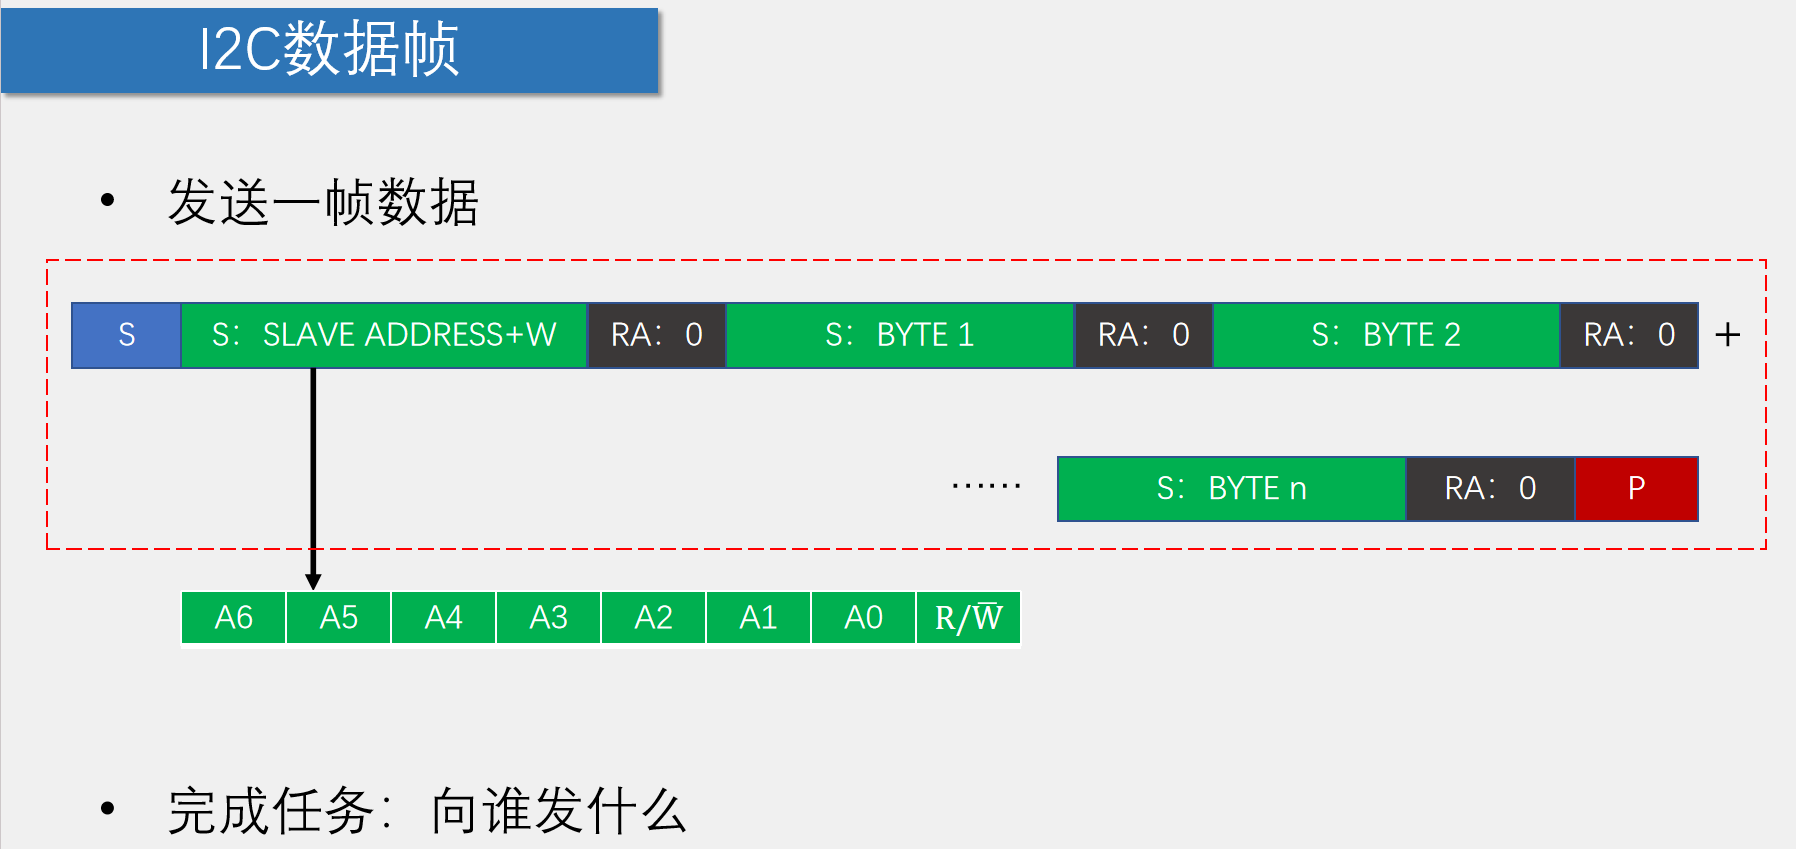
void I2C_SendByte(unsigned char Byte)
{
unsigned char i;
for(i=0;i<8;i++)
{
I2C_SDA=Byte&(0x80>>i);
I2C_SCL=1;
I2C_SCL=0;
}
}
/**
* @brief I2C接收一个字节
* @param 无
* @retval 接收到的一个字节数据
*/
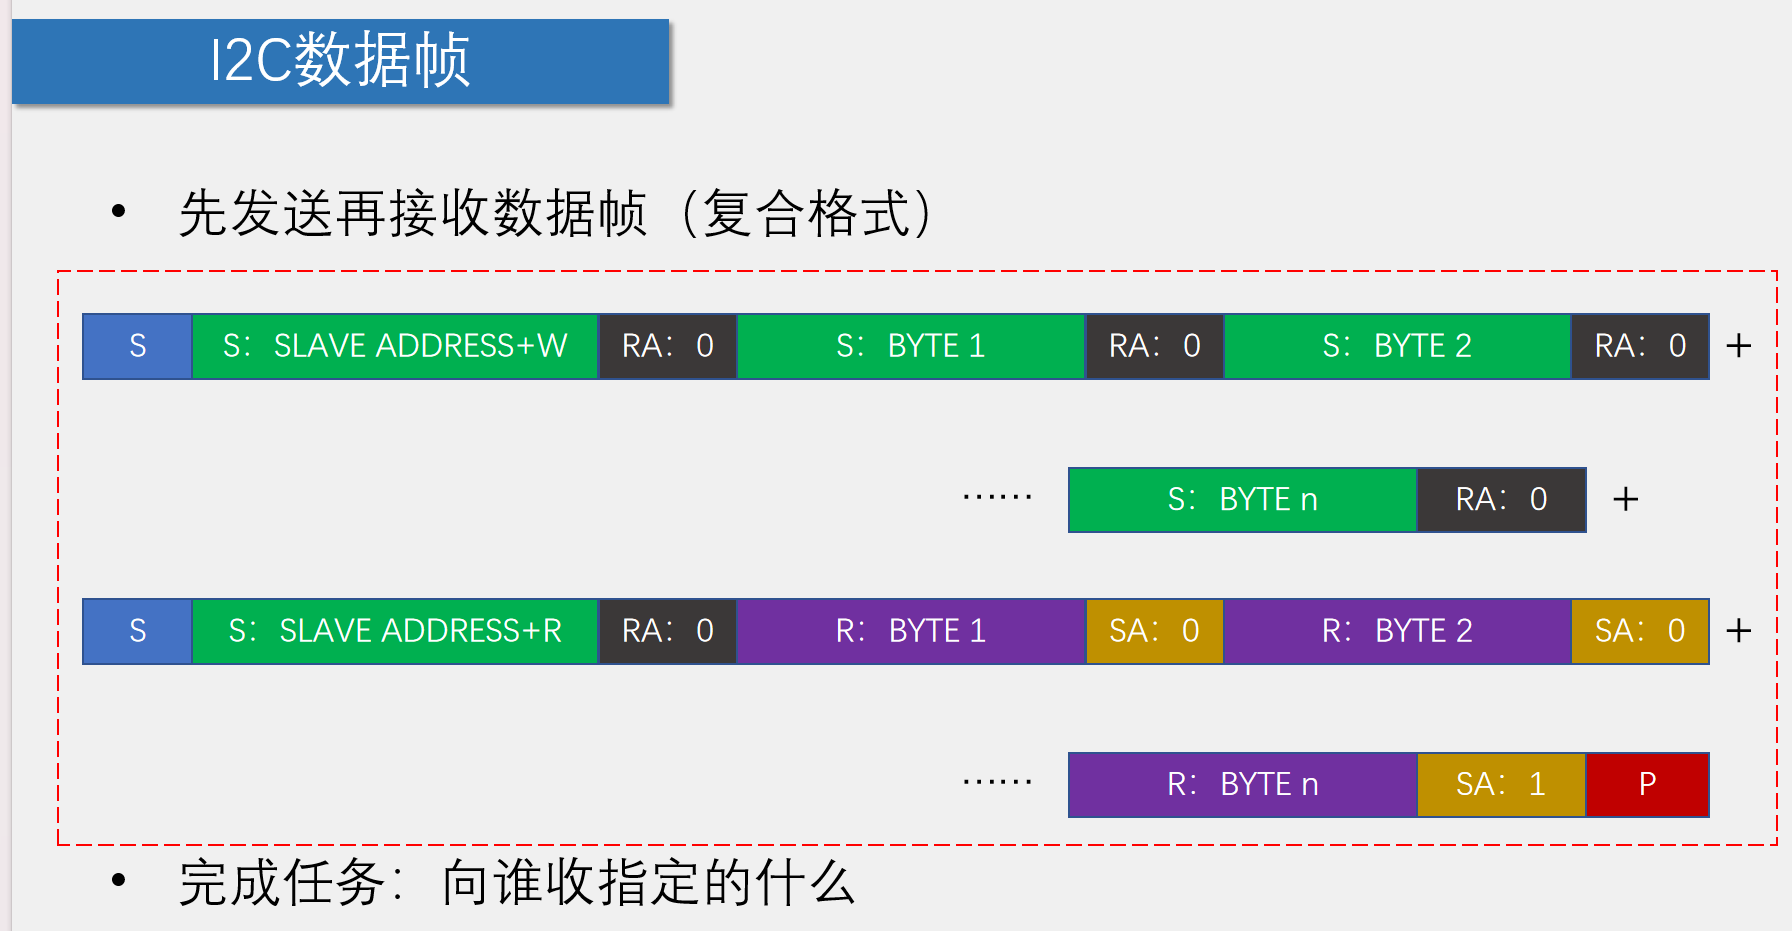
unsigned char I2C_ReceiveByte(void)
{
unsigned char i,Byte=0x00;
I2C_SDA=1;
for(i=0;i<8;i++)
{
I2C_SCL=1;
if(I2C_SDA){Byte|=(0x80>>i);}
I2C_SCL=0;
}
return Byte;
}
/**
* @brief I2C发送应答
* @param AckBit 应答位,0为应答,1为非应答
* @retval 无
*/
void I2C_SendAck(unsigned char AckBit)
{
I2C_SDA=AckBit;
I2C_SCL=1;
I2C_SCL=0;
}
/**
* @brief I2C接收应答位
* @param 无
* @retval 接收到的应答位,0为应答,1为非应答
*/
unsigned char I2C_ReceiveAck(void)
{
unsigned char AckBit;
I2C_SDA=1;
I2C_SCL=1;
AckBit=I2C_SDA;
I2C_SCL=0;
return AckBit;
}
I2C.h
#ifndef __I2C_H__
#define __I2C_H__

void I2C_Start(void);
void I2C_Stop(void);
void I2C_SendByte(unsigned char Byte);
unsigned char I2C_ReceiveByte(void);
void I2C_SendAck(unsigned char AckBit);
unsigned char I2C_ReceiveAck(void);

#endif
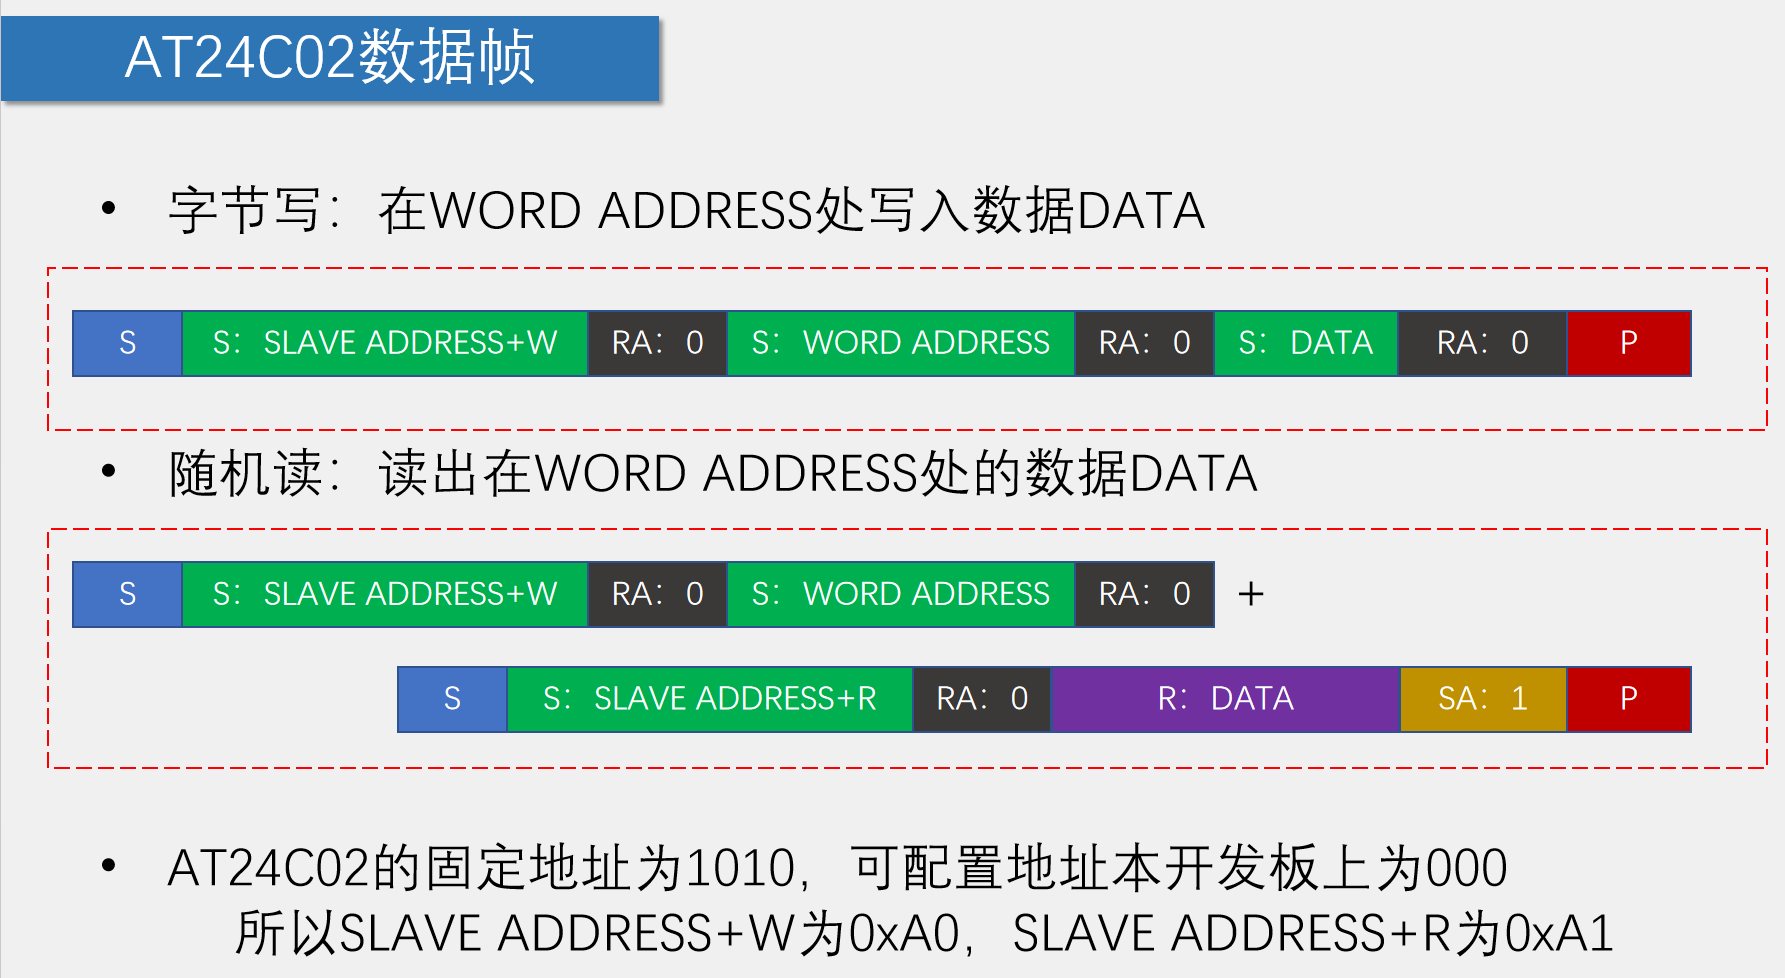
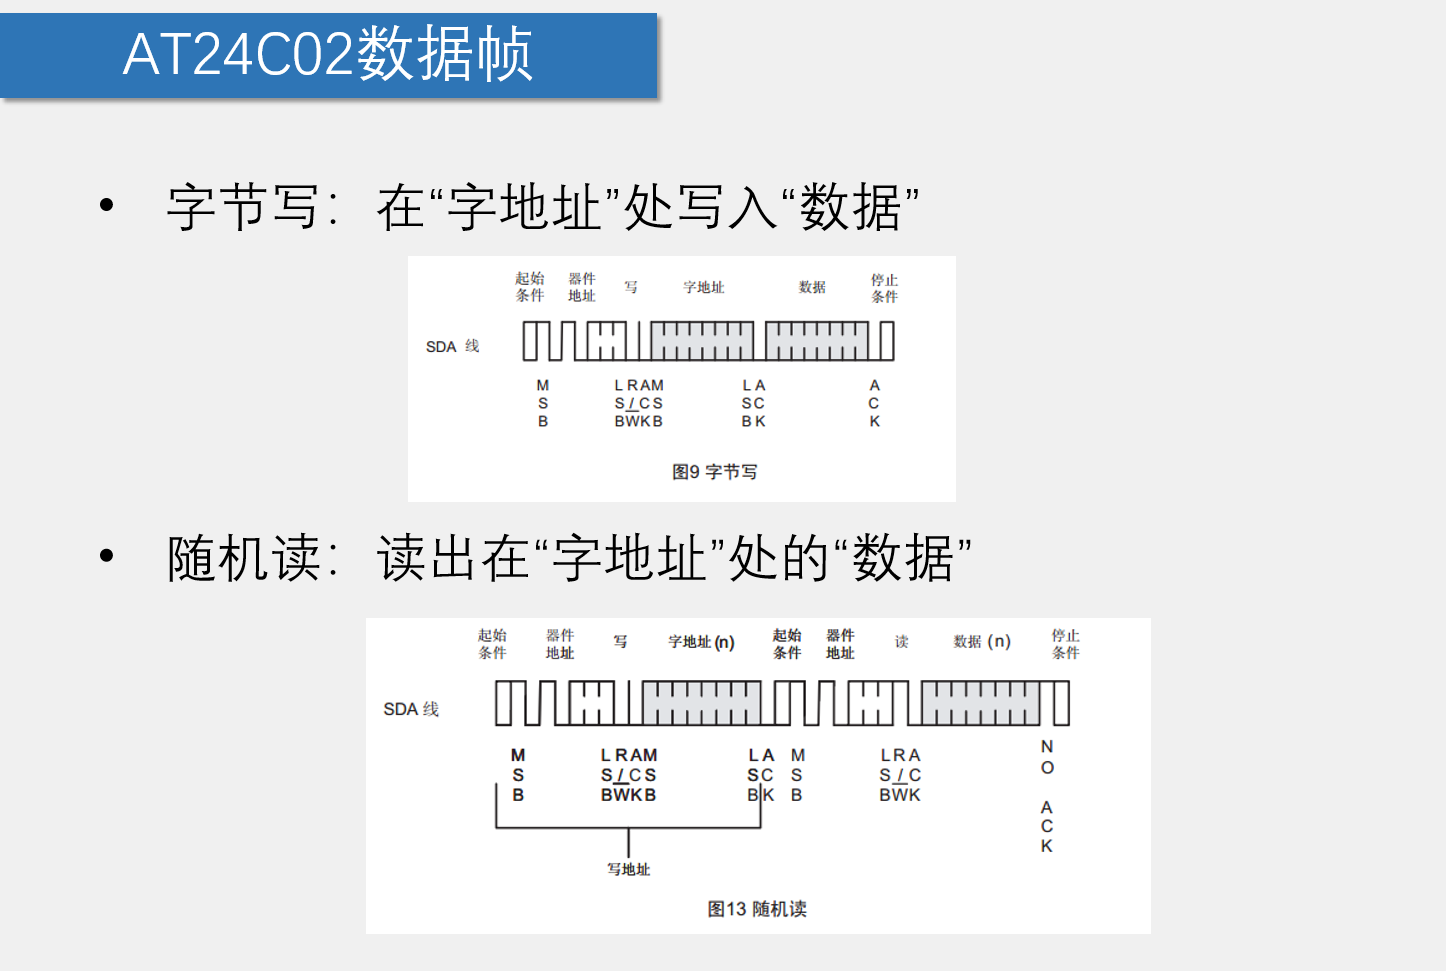
AT24C02.c
#include <REGX52.H>
#include "I2C.h"

#define AT24C02_ADDRESS        0xA0

/**
  * @brief  AT24C02写入一个字节
  * @param  WordAddress 要写入字节的地址
  * @param  Data 要写入的数据
  * @retval 无
  */
void AT24C02_WriteByte(unsigned char WordAddress,Data)
{
    I2C_Start();
    I2C_SendByte(AT24C02_ADDRESS);
    I2C_ReceiveAck();
    I2C_SendByte(WordAddress);
    I2C_ReceiveAck();
    I2C_SendByte(Data);
    I2C_ReceiveAck();
    I2C_Stop();
}

/**
  * @brief  AT24C02读取一个字节
  * @param  WordAddress 要读出字节的地址
  * @retval 读出的数据
  */
unsigned char AT24C02_ReadByte(unsigned char WordAddress)
{
    unsigned char Data;
    I2C_Start();
    I2C_SendByte(AT24C02_ADDRESS);
    I2C_ReceiveAck();
    I2C_SendByte(WordAddress);
    I2C_ReceiveAck();
    I2C_Start();
    I2C_SendByte(AT24C02_ADDRESS|0x01);
    I2C_ReceiveAck();
    Data=I2C_ReceiveByte();
    I2C_SendAck(1);
    I2C_Stop();
    return Data;
}
AT24C02.h
#ifndef __AT24C02_H__
#define __AT24C02_H__

void AT24C02_WriteByte(unsigned char WordAddress,Data);
unsigned char AT24C02_ReadByte(unsigned char WordAddress);


#endif
main.c
#include <REGX52.H>
#include "LCD1602.h"
#include "Key.h"
#include "AT24C02.h"
#include "Delay.h"

unsigned char KeyNum;
unsigned int Num; //16位

void main()
{
    LCD_Init();
    LCD_ShowNum(1,1,Num,5);
    while(1)
    {
        KeyNum=Key();
        if(KeyNum==1)    //K1按键,Num自增
        {
            Num++;
            LCD_ShowNum(1,1,Num,5);
        }
        if(KeyNum==2)    //K2按键,Num自减
        {
            Num--;
            LCD_ShowNum(1,1,Num,5);
        }
        if(KeyNum==3)    //K3按键,向AT24C02写入数据
        {
            AT24C02_WriteByte(0,Num%256);
            Delay(5);
            AT24C02_WriteByte(1,Num/256);
            Delay(5);
            LCD_ShowString(2,1,"Write OK");
            Delay(1000);
            LCD_ShowString(2,1,"        ");
        }
        if(KeyNum==4)    //K4按键,从AT24C02读取数据
        {
            Num=AT24C02_ReadByte(0);
            Num|=AT24C02_ReadByte(1)<<8;
            LCD_ShowNum(1,1,Num,5);
            LCD_ShowString(2,1,"Read OK ");
            Delay(1000);
            LCD_ShowString(2,1,"        ");
        }
    }
}
基础电路
课程:华成英 - 模拟电子技术基础 | 模拟电路 | 模电_哔哩哔哩_bilibili
目录:
二极管三极管基础234
基本放大电路5.6.7.8.9.10
场效应管及其放大电路11.12
多级放大电路13.14
差分放大电路15.16
互补输出级17.18.19
集成运放19.20
放大电路频率响应21.22.23.24
放大电路中的反馈25.26.27.28.29.30.31.32
运算电路33.34.35.36电压比较器 39.40
非正弦波震荡电路 41.42
信号转换电路 43.44
震荡电路 45.46.47.48
功率放大电路 49.50
整流电路,滤波电路 51.52
稳压电路 53.54.55.56
二极管三极管基础234
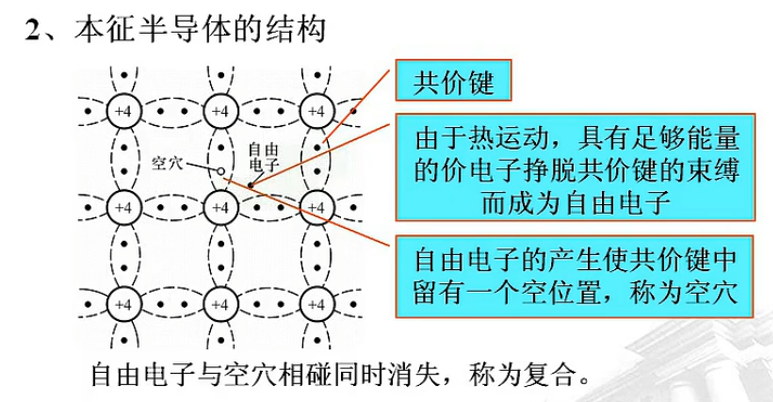
概念
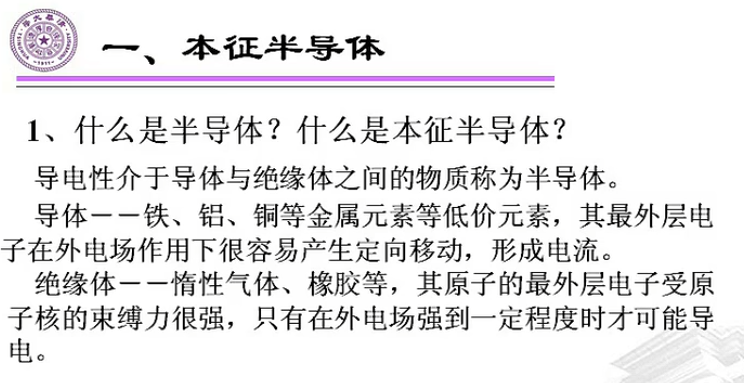
半导体:硅(Si)、锗(Ge),均为四价元素,它们原子的最外层电子受原子核的束缚力介于导体与绝缘体之间。

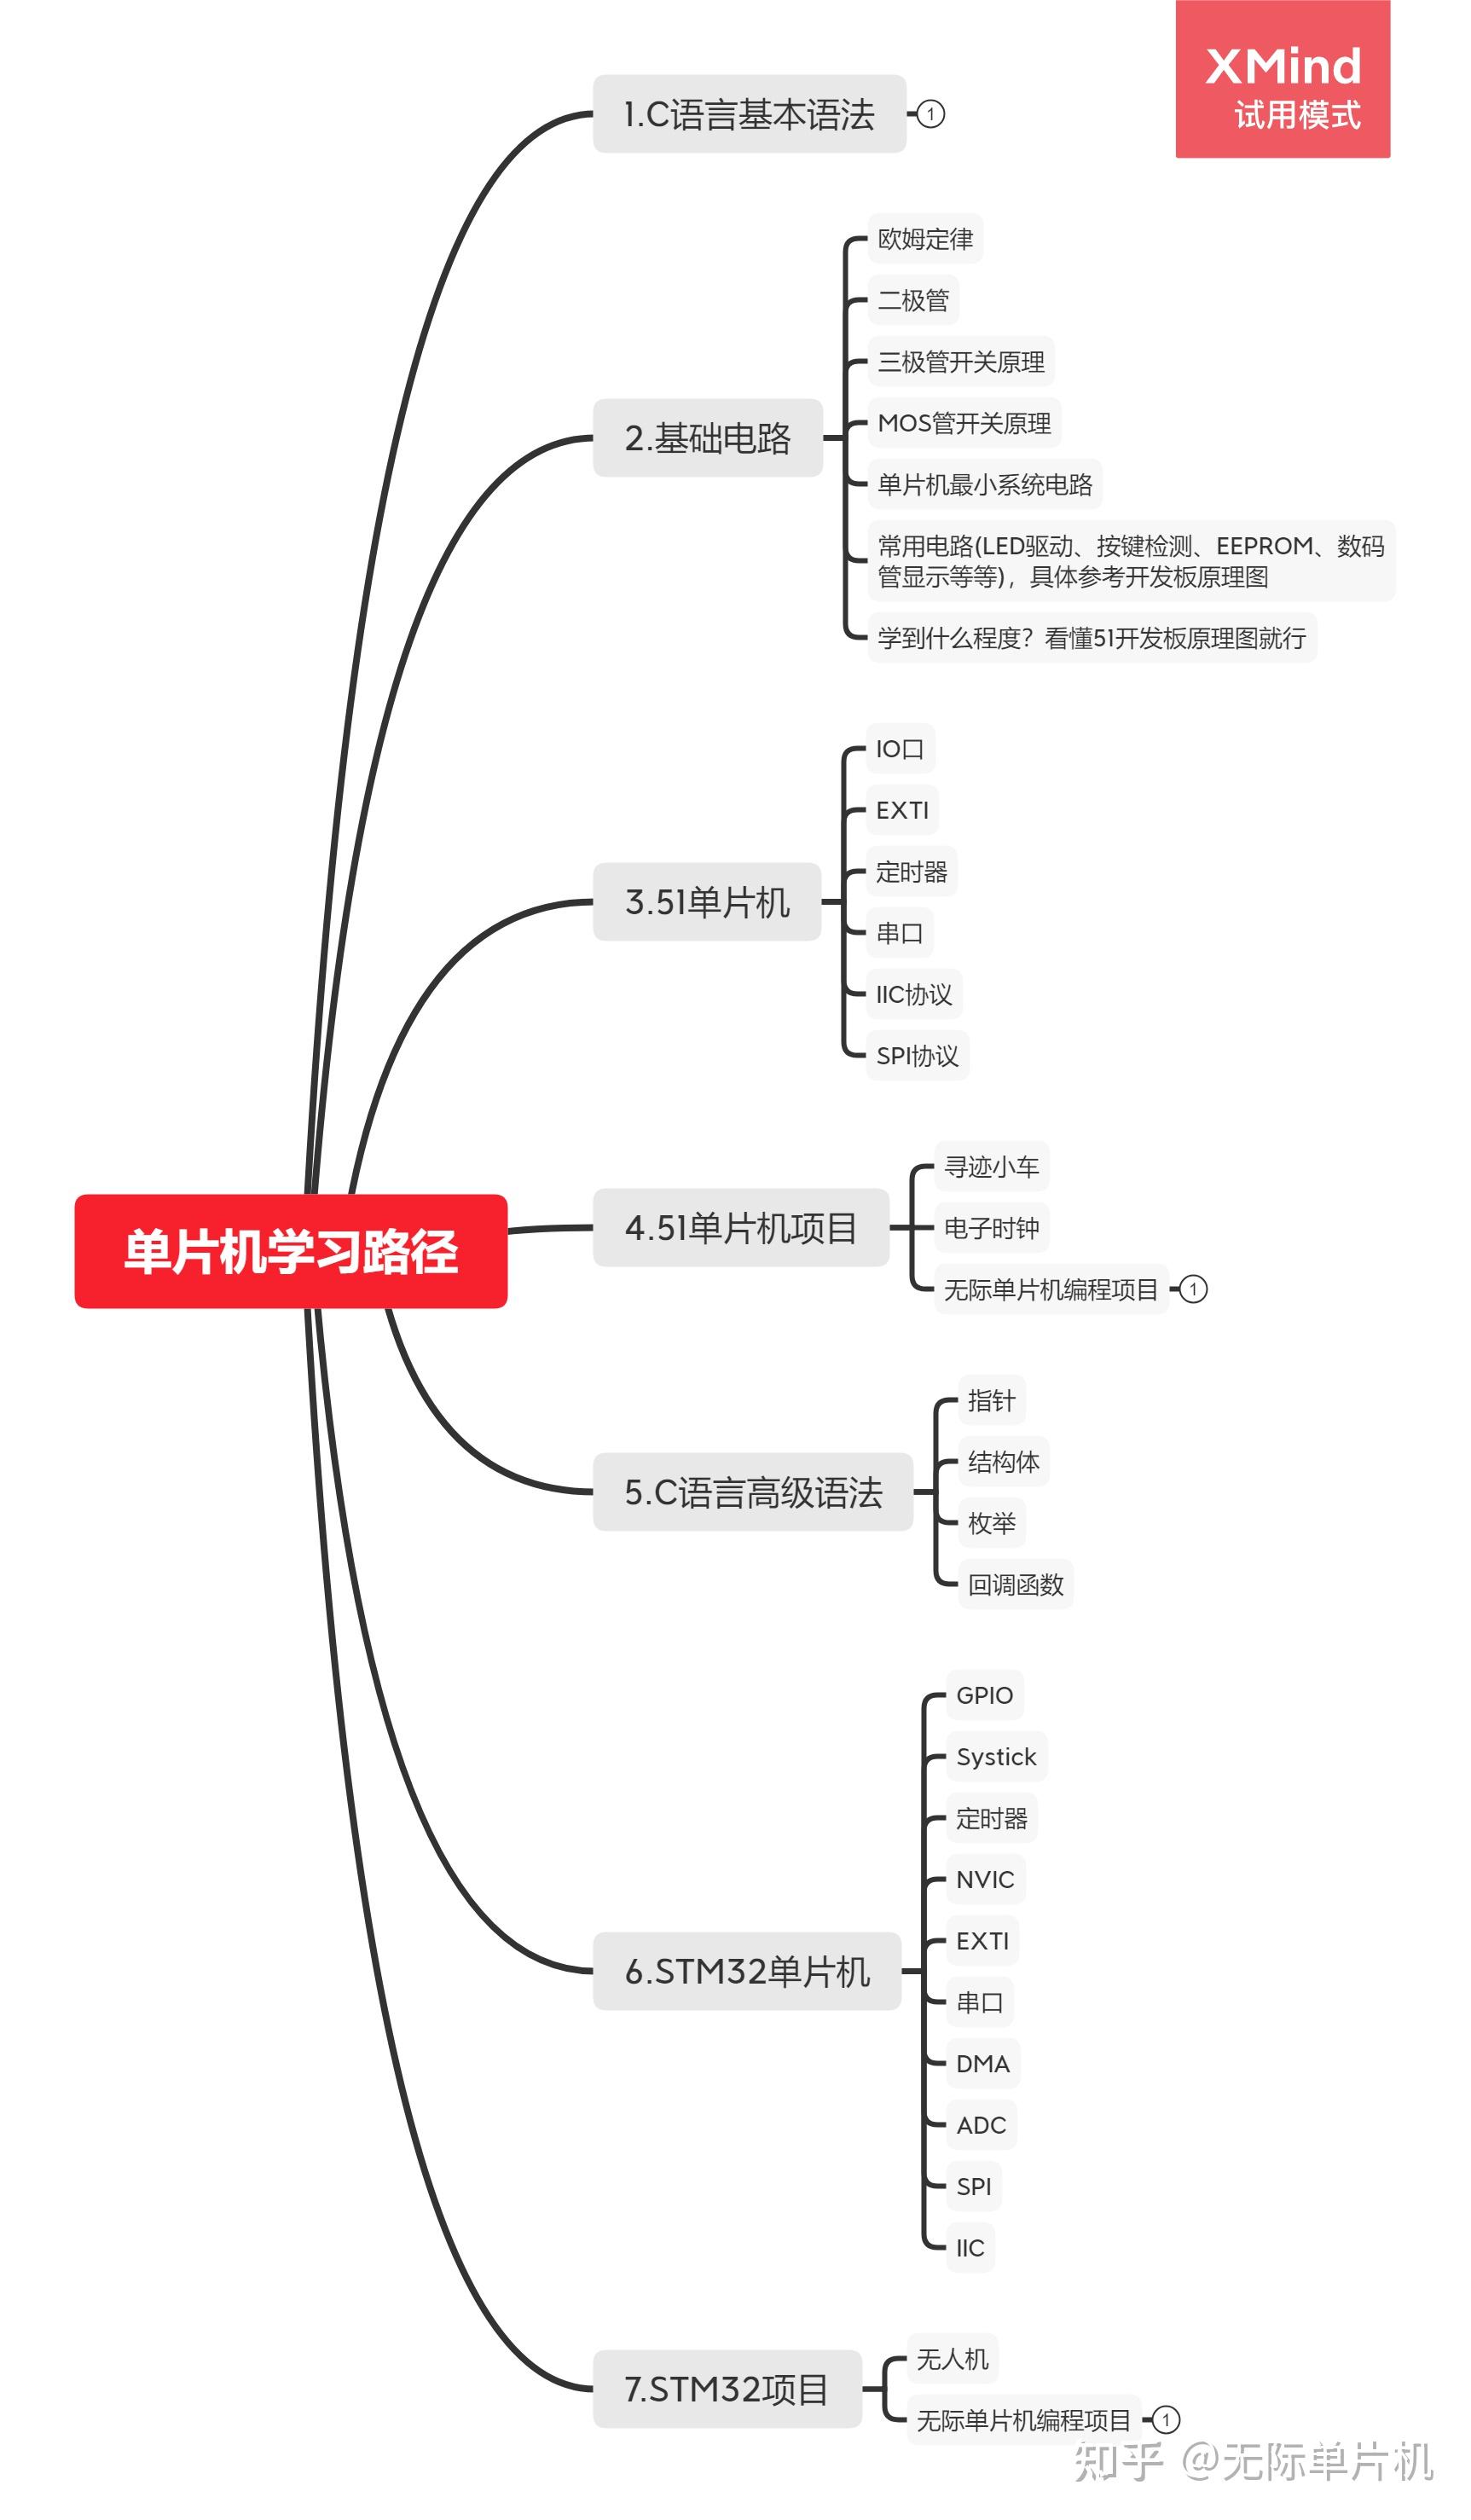
学习路线
转载请注明来源,欢迎对文章中的引用来源进行考证,欢迎指出任何有错误或不够清晰的表达。可以在下面评论区评论,也可以邮件至 jungle8884@163.com

