i.MX6ULL 学习进阶
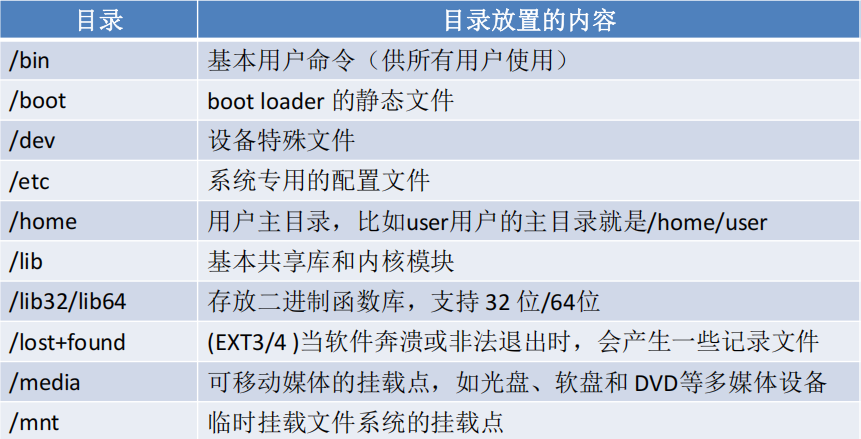
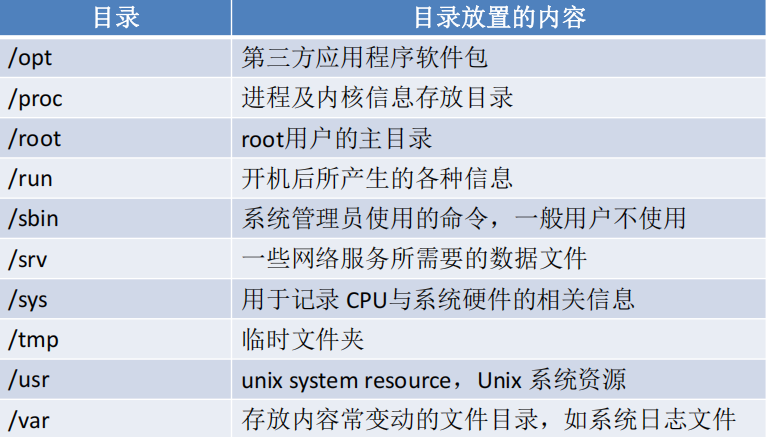
Linux文件目录
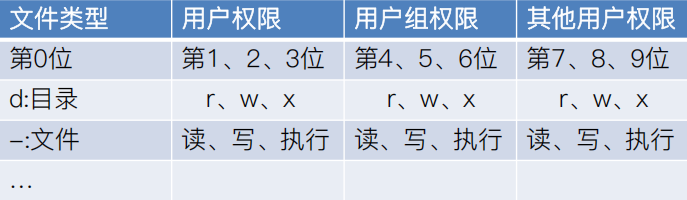
用户管理与文件权限
使用Linux命令行
对外接受用户输入的命令。
对内通过系统调用传递给内核。
呈现内核运行结果。
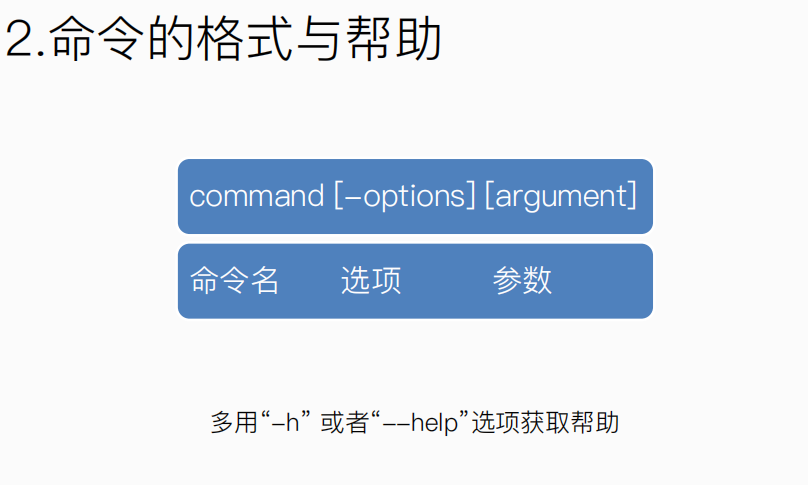
查询命令
- man
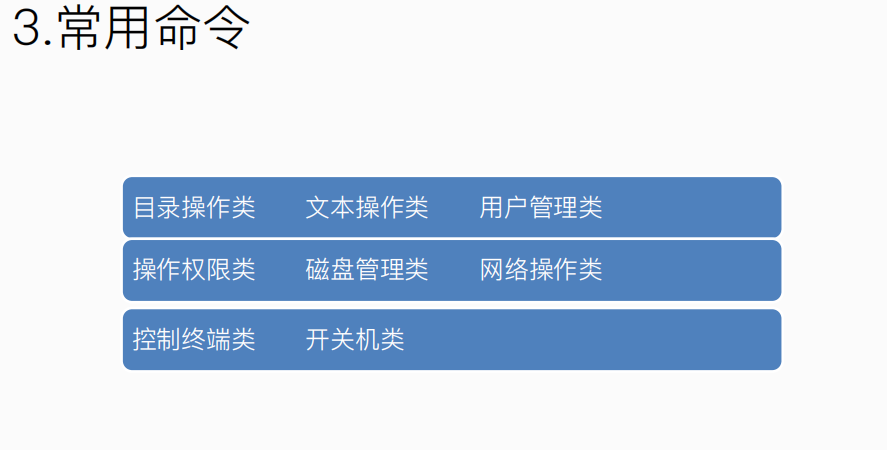
目录操作类
cd:
pwd:
mkdir:
rmdir:
mv:
文本操作类
touch:
cat:
echo:
wc:
rm:
ln:
cp:
tar:
find:
grep:
用户管理类
useradd/adduser:
usermod:
userdel/deluser:
passwd:
groupadd/addgroup:
groupdel/delgroup:
su:
操作权限类
sudo
chmod
chown
chgrp
磁盘管理类
df:
du:
mount:
umount:
网络操作类
ifconfig
ping
控制终端类
- clear:
开关机命令
reboot
poweroff
编辑器
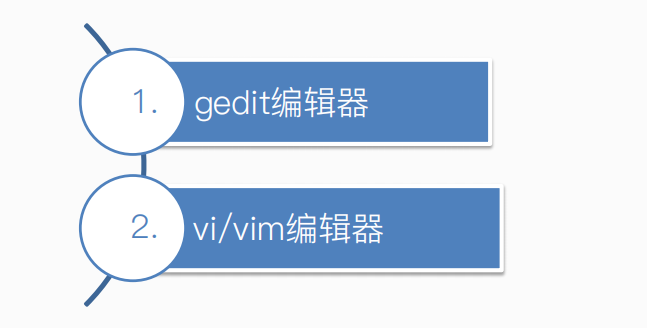
gedit编译器
简单易懂,依赖图形界面
vi/vim编辑器
为什么要学习vi/vim编辑器
vi与vim的区别:
- vim是vi的升级版本,兼容vi
- vi按 u只能撤消上次命令,而在vim里可以无限制的撤消
- vi只能运行于类unix系统中,而vim不仅可以运行于unix,windows ,mac等多操作平台
- vim可以用不同的颜色来高亮代码
- 可通过vimrc文件配置更加高级的功能
vi/vim使用
安装:
sudo apt install vim
vi/vim的三种模式
- 一般模式(默认模式)
- 插入模式(编辑模式)
- 命令行模式
打开Vi/Vim
vi 文件名
vim 文件名
进入/退出插入模式快捷键
| 快捷键 | 功能描述 |
|---|---|
| i | 在当前光标所在位置插入文本 |
| a | 在当前光标所在位置的下一个字符插入文本 |
| o | 在光标所在位置后插入新行 |
| r | 替换当前光标所在位置的字符 |
| R | 可以替换当前光标所在位置之后的字符,按下”Esc”则退出 |
| ESC | 退出插入模式 |
一般模式快捷键
| 快捷键 | 功能描述 | |
|---|---|---|
| 光标移动 | k / ↑ | 光标向上移动 |
| j / ↓ | 光标向下移动 | |
| h / ← | 光标向左移动 | |
| l / → | 光标向右移动 | |
| PageUp | 向上翻页 | |
| PageDown | 向下翻页 | |
| n+shift+g | 跳转到第n行 | |
| shift+g | 跳转到最末行 | |
| gg | 跳转到第一行 | |
| 文本查找与替换 | /word | 在文件中搜索关键字word |
| n | 查找下一个关键字 | |
| N | 查找上一个关键字 | |
| 撤销重做 | u | 撤销上一步的操作,等价于Windows的Ctrl+Z |
| Ctrl+r | 重做上一步的操作。 | |
| 删除、剪切、复制、粘贴 | dw | 删除一个单词 |
| dd | 删除当前行 | |
| ndd | 删除光标后n行 | |
| x | 剪切光标选中的字符 | |
| y | 复制光标所选的内容 | |
| yy | 复制当前行 | |
| nyy | 复制当前行后n行 | |
| p | 将复制的数据粘贴在当前行的下一行 | |
| P | 将复制的数据粘贴在当前行的上一行 | |
| 区块操作 | v | 选择多个字符 |
| V | 可以选择多行 |
命令行模式快捷键
| 快捷键 | 功能描述 |
|---|---|
| w | 保存文档 |
| w |
另存为以 |
| r |
读取文件名为filename的文档 |
| q | 直接退出软件,前提是文档未做任何修改 |
| q! | 不保存修改,直接退出软件 |
| wq | 保存文档,并退出软件。 |
| set nu | 在行首加入行号 |
| set nonu | 不显示行号 |
| set hlsearch | 搜索结果高亮显示 |
| ! command | 回到终端窗口,执行command命令,按回车键可切回vim。 |
Shell脚本编程
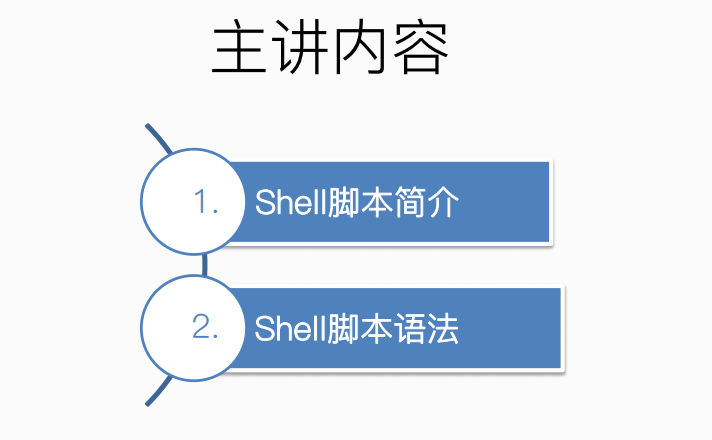
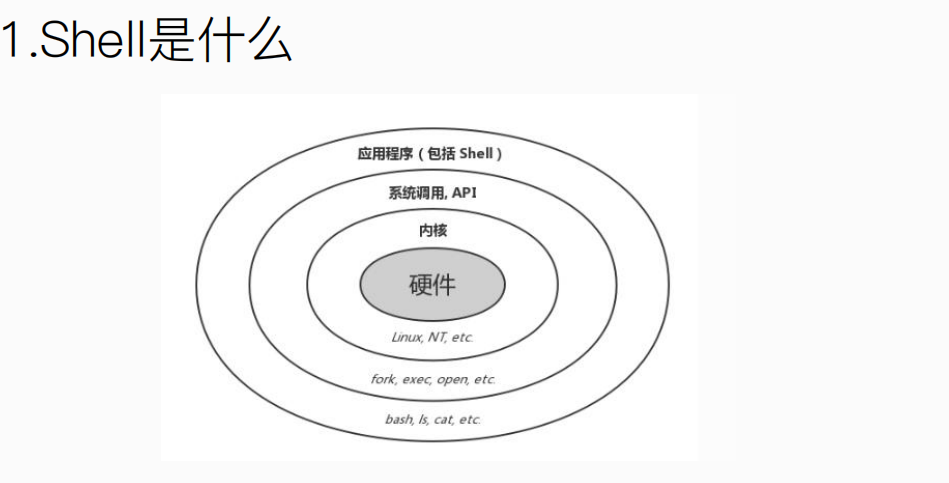
Shell脚本是什么?
- shell命令按一定语法组成的文件
Shell脚本有什么用?
批处理文件/整合命令
- 软件启动
- 性能监控
- 日志分析
…
Shell命令的本质
内置命令/外部命令
外部命令从下面的路径寻找:
debian@npi:/etc$ echo $PATH
/home/debian/bin:/usr/local/sbin:/usr/local/bin:/usr/sbin:/usr/bin:/sbin:/bin:/usr/local/games:/usr/games
Shell脚本语言和C语言一样吗?
- 编译型语言
- 解释型语言
常用的Shell解释器有哪些?
cat /etc/shells
root@R9000X-Jungle:/etc# cat shells
# /etc/shells: valid login shells
/bin/sh
/bin/bash
/usr/bin/bash
/bin/rbash
/usr/bin/rbash
/usr/bin/sh
/bin/dash
/usr/bin/dash
/usr/bin/tmux
/usr/bin/screen
第一个Shell脚本
helloworld
编辑、保存、改权限、运行/排错
Shell启动方式
当程序执行
指定解释器运行
source和.
root@npi:~# chmod 777 hello.sh
root@npi:~# ./hello.sh
hello, jungle
root@npi:~# source hello.sh
hello, jungle
root@npi:~# . hello.sh
hello, jungle
Shell脚本语法讲解
定义变量
variable=value
variable=’value’
variable=”value”
root@npi:/home/debian# cat test.sh

#!bin/bash

var=1234

echo "$var"
使用变量
$variable
${variable}
root@npi:/home/debian# cat test.sh

#!bin/bash

var=1234
echo "$var"

var1="123 456"
var2="${var1}a"
echo "${var2}bb"
将命令的结果赋值给变量
variable=`command`
variable=$(command)
debian@npi:~$ cat ./test.sh

#!bin/bash

var=1234
echo "$var"

var1="123 456"
var2="${var1}a"
echo "${var2}bb"

var3=`pwd`
echo "${var3}"

var4=$(pwd)
echo "${var4}"
debian@npi:~$ sh ./test.sh
1234
123 456abb
/home/debian
/home/debian
删除变量
- unset
特殊变量
| 变量 | 含义 |
|---|---|
| $0 | 当前脚本的文件名。 |
| $n(n≥1) | 传递给脚本或函数的参数。n 是一个数字,表示第几个参数。例如,第一个参数是 $1,第二个参数是 $2。 |
| $# | 传递给脚本或函数的参数个数。 |
| $* | 传递给脚本或函数的所有参数。 |
| $@ | 传递给脚本或函数的所有参数。当被双引号" "包含时,$@ 与 $* 稍有不同. |
| $? | 上个命令的退出状态或者获取函数返回值。 |
| $$ | 当前 Shell 进程 ID。对于 Shell 脚本,就是这些脚本所在的进程 ID。 |
读取从键盘输入的数据
read
debian@npi:~$ ./test.sh
10
20
10+20=30
debian@npi:~$ cat ./test.sh
read a
read b
c=$(echo "$a + $b" | bc)  # 支持浮点数计算

debian@npi:~$ ./test.sh
input a:12
input b:62
12+62=74
debian@npi:~$ cat ./test.sh
read -p "input a:" a
read -p "input b:" b
c=$(echo "$a + $b" | bc)  # 支持浮点数计算
echo "${a}+${b}=${c}"debian@npi:~$
注:如果需要处理浮点数(小数),$((...)) 无法支持,此时可以使用 bc 工具
退出当前进程
exit
对整数进行数学运算
(())
debian@npi:~$ ./test.sh
input a:1
input b:2
1+2=3
debian@npi:~$ cat ./test.sh
read -p "input a:" a
read -p "input b:" b
c=$(( $a+$b ))
逻辑与/或
AND
command1 为 false 则 直接 为 false
command1 && command2
OR
command1 为 true 则 直接 为 true
command1 || command2
检测某个条件是否成立
test expression和[ expression ]
| 选 项 | 作 用 |
|---|---|
| -eq | 判断数值是否相等 |
| -ne | 判断数值是否不相等 |
| -gt | 判断数值是否大于 |
| -lt | 判断数值是否小于 |
| -ge | 判断数值是否大于等于 |
| -le | 判断数值是否小于到等于 |
| -z str | 判断字符串 str 是否为空 |
| -n str | 判断字符串str是否为非空 |
| =和== | 判断字符串str是否相等 |
| -d filename | 判断文件是否存在,并且是否为目录文件。 |
| -f filename | 判断文件是否存在,井且是否为普通文件。 |
test expression
debian@npi:~$ ./test.sh
input a:1
input b:2
a!=b
a<b
a<=b
debian@npi:~$ cat ./test.sh
read -p "input a:" a
read -p "input b:" b

test ${a} -eq ${b} && echo "a==b"
test ${a} -ne ${b} && echo "a!=b"
test ${a} -lt ${b} && echo "a<b"
test ${a} -gt ${b} && echo "a>b"
test ${a} -le ${b} && echo "a<=b"
debian@npi:~$
[ expression ]
debian@npi:~$ ./test.sh
input a:2
input b:3
a!=b
a<b
a<=b
debian@npi:~$ cat ./test.sh
read -p "input a:" a
read -p "input b:" b

[ ${a} -eq ${b} ] && echo "a==b"
[ ${a} -ne ${b} ] && echo "a!=b"
[ ${a} -lt ${b} ] && echo "a<b"
[ ${a} -gt ${b} ] && echo "a>b"
[ ${a} -le ${b} ] && echo "a<=b"
str
debian@npi:~$ ./test.sh
input a string:eee
not null
debian@npi:~$ cat ./test.sh
read -p "input a string:" c

[  -z "$c" ] && echo "is null" || echo "not null"
debian@npi:~$ ./test.sh
input a string:
is null
debian@npi:~$
-d
-f
debian@npi:~$ ./test.sh
input a string:/home
/home not null
/home is dir
/home not file
debian@npi:~$ cat ./test.sh
read -p "input a string:" c

[  -z "$c" ] && echo "${c} is null" || echo "${c} not null"
[  -d "$c" ] && echo "${c} is dir" || echo "${c} not dir"
[  -f "$c" ] && echo "${c} is file" || echo "${c} not file"
管道
command1 | command2
debian@npi:~$ ls | grep test.sh
test.sh

debian@npi:~$ cat test.sh | grep "$c"
read -p "input a string:" c

[  -z "$c" ] && echo "${c} is null" || echo "${c} not null"
[  -d "$c" ] && echo "${c} is dir" || echo "${c} not dir"
[  -f "$c" ] && echo "${c} is file" || echo "${c} not file"
if语句
if condition
then
statement(s)
fi
if else 语句
if condition
then
statement1
else
statement2
fi
if elif else 语句
if condition1
then
statement1
elif condition2
then
statement2……
else
statementn
fi
debian@npi:~$ ./test.sh
input a:1
input b:2
input c:3
3 is the largest
debian@npi:~$ cat ./test.sh
read -p "input a:" a
read -p "input b:" b
read -p "input c:" c

if [ $a -gt $b ] && [ $a -gt $c ]; then
    echo "$a is the largest"
elif [ $b -gt $a ] && [ $b -gt $c ]; then
    echo "$b is the largest"
else
    echo "$c is the largest"
fi
case in语句
case expression in
pattern1)
statement1
;;
pattern2)
statement2
;;
pattern3)
statement3
;;
……
*)
statementn
esac
debian@npi:~$ cat ./test.sh
#!/bin/bash

read -p "input a:" a
read -p "input b:" b
read -p "input c:" c

case $(($a > $b && $a > $c))$(($b > $a && $b > $c)) in
    10)
        echo "$a is the largest"
        ;;
    01)
        echo "$b is the largest"
        ;;
    *)
        echo "$c is the largest"
        ;;
debian@npi:~$ ./test.sh
input a:1
input b:2
input c:3
3 is the largest
代码解释
输入部分:通过
read命令分别获取用户输入的三个值a、b和c。case in语句:
$(($a > $b && $a > $c))和$(($b > $a && $b > $c))会计算两个布尔表达式的值,结果为0或1。- 将这两个结果拼接起来作为
case语句的匹配条件。 - 如果拼接结果为
10,表示a是最大值。 - 如果拼接结果为
01,表示b是最大值。 - 其他情况(即
a和b都不是最大值),则c是最大值。
**
;;**:用于结束每个case分支。
总结
这是 Bash 中的算术扩展表达式拼接:
$(($a > $b && $a > $c))用于判断a是否同时大于b和c,成立则返回 1,否则返回 0;$(($b > $a && $b > $c))用于判断b是否同时大于a和c,成立则返回 1,否则返回 0;- 两个结果拼接成一个字符串(如
10、01或00),作为case语句的匹配条件,以此区分a、b、c谁是最大值。
for in 循环
for variable in value_list
do
statements
done
value_list
- 直接给出具体的值
- 给出一个取值范围
- 使用命令的执行结果
- 使用 Shell 通配符
- 使用特殊变量
debian@npi:~$ cat ./test.sh
#!/bin/bash

# 提示用户输入三个数字
read -p "input a:" a
read -p "input b:" b
read -p "input c:" c

# 将输入的数字存储在数组中
numbers=($a $b $c)

# 假设数组的第一个元素是最大值
max=${numbers[0]}

# 使用 for 循环遍历数组
for num in "${numbers[@]}"
do
    # 如果当前元素大于最大值,则更新最大值
    if [ $num -gt $max ]; then
        max=$num
    fi
done

# 输出最大值
echo "$max is the largest"debian@npi:~$ ./test.sh
input a:1
input b:2
input c:3
3 is the largest
debian@npi:~$
代码解释:
- 用户输入:使用
read命令提示用户输入三个数字a、b和c。 - 数组存储:将输入的三个数字存储在
numbers数组中。 - 初始化最大值:假设数组的第一个元素是最大值,将其赋值给变量
max。 for循环:使用for循环遍历数组中的每个元素。- 比较更新:在循环中,使用
if语句比较当前元素和最大值,如果当前元素大于最大值,则更新最大值。 - 输出结果:循环结束后,输出最大值。
总结
- 来源不同:
${numbers[@]}引用的是用户自定义数组中的元素,而$@引用的是传递给脚本或函数的参数。 - 用途不同:
${numbers[@]}用于处理自定义数组,而$@用于处理命令行参数或函数参数
while 循环
while condition
do
statements
done
debian@npi:~$ ./test.sh
input a:1
input b:2
input c:3
3 is the largest
debian@npi:~$ cat ./test.sh
#!/bin/bash

# 提示用户输入三个数字
read -p "input a:" a
read -p "input b:" b
read -p "input c:" c

# 将输入的数字存储在数组中
numbers=($a $b $c)

# 假设数组的第一个元素是最大值
max=${numbers[0]}

# 初始化索引
index=1

# 使用 while 循环遍历数组
while [ $index -lt ${#numbers[@]} ]; do
    if [ ${numbers[$index]} -gt $max ]; then
        max=${numbers[$index]}
    fi
    # 索引加 1
    ((index++))
done

# 输出最大值
echo "$max is the largest"debian@npi:~$
代码解释:
- 输入部分:通过
read命令提示用户输入三个数字,并将它们存储在数组numbers中。 - 初始化最大值:假设数组的第一个元素是最大值,将其赋值给变量
max。 - 初始化索引:设置一个索引变量
index为 1,因为我们已经将第一个元素作为初始最大值。 - while 循环:使用
while循环遍历数组,只要index小于数组的长度,就继续循环。 - 比较和更新最大值:在循环中,使用
if语句比较当前元素和max的大小,如果当前元素大于max,则更新max的值。 - 索引递增:每次循环结束后,将
index加 1,以便继续遍历下一个元素。 - 输出结果:循环结束后,输出最大值。
总结
${#numbers[@]}用于获取数组中元素的数量,它是针对数组变量的操作。$#用于获取传递给脚本的命令行参数的数量,它是一个特殊的脚本变量。
函数
function name() {
statements
[return value]
}
debian@npi:~$ sh ./test.sh
input a:1
input b:2
input c:3
3 is the largest
debian@npi:~$ cat ./test.sh
#!/bin/bash

# 定义函数来找出最大值
find_largest() {
    local a=$1
    local b=$2
    local c=$3

    if [ $a -gt $b ] && [ $a -gt $c ]; then
        echo "$a is the largest"
    elif [ $b -gt $a ] && [ $b -gt $c ]; then
        echo "$b is the largest"
    else
        echo "$c is the largest"
    fi
}

# 读取用户输入
read -p "input a:" a
read -p "input b:" b
read -p "input c:" c

# 调用函数
find_largest $a $b $c
代码解释:
- **定义函数
find_largest**:- 使用
local关键字声明局部变量a、b和c,这样可以避免与全局变量冲突。 - 在函数内部,使用条件判断语句找出三个数中的最大值,并输出结果。
- 使用
- 读取用户输入:
- 使用
read命令读取用户输入的三个数。
- 使用
- 调用函数:
- 将用户输入的三个数作为参数传递给
find_largest函数。
- 将用户输入的三个数作为参数传递给
Linux环境变量
全局变量VS环境变量
直接定义
export
debian@npi:~$ abc=123
debian@npi:~$ echo $abc
123
debian@npi:~$ /bin/bash
debian@npi:~$ echo $abc

debian@npi:~$ exit
exit
debian@npi:~$ echo $abc
123
debian@npi:~$ export abc
debian@npi:~$ /bin/bash
debian@npi:~$ echo $abc
123
Shell 配置文件
与 Bash Shell 有关的配置文件主要有
- /etc/profile
- ~/.bash_profile
- ~/.bash_login
- ~/.profile
- ~/.bashrc
- /etc/bashrc
- /etc/bash.bashrc
- /etc/profile.d/*.sh
Shell 执行顺序
/etc/profiles->
/.profile(/.bash_profile、~/.bash_login)
/etc/profiles
# /etc/profile: system-wide .profile file for the Bourne shell (sh(1))
# and Bourne compatible shells (bash(1), ksh(1), ash(1), ...).
#
# 此文件在用户登录时执行,为所有用户设置全局环境变量和shell配置

# 设置PATH环境变量,根据用户是否为root区分配置
# root用户PATH不包含游戏目录,减少潜在安全风险
if [ "$(id -u)" -eq 0 ]; then
  # root用户PATH: 优先使用系统管理员命令目录
  PATH="/usr/local/sbin:/usr/local/bin:/usr/sbin:/usr/bin:/sbin:/bin"
else
  # 普通用户PATH: 包含游戏目录
  PATH="/usr/local/sbin:/usr/local/bin:/usr/sbin:/usr/bin:/sbin:/bin:/usr/local/games:/usr/games"
fi
export PATH  # 导出PATH变量,使其对所有子进程可见

# 配置命令行提示符(PS1),仅针对交互式shell生效
# ${PS1-} 确保在非交互式shell中不会报错
if [ "${PS1-}" ]; then
  # 检查当前shell是否为Bash且不是以sh兼容模式运行
  if [ "${BASH-}" ] && [ "$BASH" != "/bin/sh" ]; then
    # bash.bashrc中已设置了默认的高级PS1提示符
    # 例如包含颜色、用户名、主机名等信息
    # 示例: PS1='\u@\h:\w\$ '
    if [ -f /etc/bash.bashrc ]; then
      . /etc/bash.bashrc  # 加载Bash特定的配置
    fi
  else
    # 非Bash shell或sh兼容模式,使用简化的提示符
    if [ "$(id -u)" -eq 0 ]; then
      PS1='# '  # root用户使用#作为提示符
    else
      PS1='$ '  # 普通用户使用$作为提示符
    fi
  fi
fi

# 加载/etc/profile.d目录下的所有可执行脚本
# 这允许系统或第三方软件添加自己的环境变量配置
if [ -d /etc/profile.d ]; then
  for i in /etc/profile.d/*.sh; do
    if [ -r "$i" ]; then  # 检查文件是否存在且可读
      . "$i"  # 执行脚本(注意使用双引号防止路径包含空格时出错)
    fi
  done
  unset i  # 清除循环变量,避免污染环境
fi
修改配置文件
全部用户、全部进程共享:/etc/bash.bashrc
一个用户、全部进程共享:~/.bashrc
/etc/bash.bashrc - 全部用户
# System-wide .bashrc file for interactive bash(1) shells.

# To enable the settings / commands in this file for login shells as well,
# this file has to be sourced in /etc/profile.

# If not running interactively, don't do anything
[ -z "$PS1" ] && return

# check the window size after each command and, if necessary,
# update the values of LINES and COLUMNS.
shopt -s checkwinsize

# set variable identifying the chroot you work in (used in the prompt below)
if [ -z "${debian_chroot:-}" ] && [ -r /etc/debian_chroot ]; then
    debian_chroot=$(cat /etc/debian_chroot)
fi

# set a fancy prompt (non-color, overwrite the one in /etc/profile)
# but only if not SUDOing and have SUDO_PS1 set; then assume smart user.
if ! [ -n "${SUDO_USER}" -a -n "${SUDO_PS1}" ]; then
  PS1='${debian_chroot:+($debian_chroot)}\u@\h:\w\$ '
fi

# Commented out, don't overwrite xterm -T "title" -n "icontitle" by default.
# If this is an xterm set the title to user@host:dir
#case "$TERM" in
#xterm*|rxvt*)
#    PROMPT_COMMAND='echo -ne "\033]0;${USER}@${HOSTNAME}: ${PWD}\007"'
#    ;;
#*)
#    ;;
#esac

# enable bash completion in interactive shells
#if ! shopt -oq posix; then
#  if [ -f /usr/share/bash-completion/bash_completion ]; then
#    . /usr/share/bash-completion/bash_completion
#  elif [ -f /etc/bash_completion ]; then
#    . /etc/bash_completion
#  fi
#fi

# if the command-not-found package is installed, use it
if [ -x /usr/lib/command-not-found -o -x /usr/share/command-not-found/command-not-found ]; then
    function command_not_found_handle {
            # check because c-n-f could've been removed in the meantime
                if [ -x /usr/lib/command-not-found ]; then
           /usr/lib/command-not-found -- "$1"
                   return $?
                elif [ -x /usr/share/command-not-found/command-not-found ]; then
           /usr/share/command-not-found/command-not-found -- "$1"
                   return $?
        else
           printf "%s: command not found\n" "$1" >&2
           return 127
        fi
    }
fi
~/.bashrc - 一个用户
用户:root
root@npi:~# pwd
/root
root@npi:~# echo $gg
666
root@npi:~# cat .bashrc
# ~/.bashrc: executed by bash(1) for non-login shells.

# Note: PS1 and umask are already set in /etc/profile. You should not
# need this unless you want different defaults for root.
# PS1='${debian_chroot:+($debian_chroot)}\h:\w\$ '
# umask 022

# You may uncomment the following lines if you want `ls' to be colorized:
# export LS_OPTIONS='--color=auto'
# eval "`dircolors`"
alias ls='ls $LS_OPTIONS'
alias ll='ls $LS_OPTIONS -l'
alias l='ls $LS_OPTIONS -lA'
#
# Some more alias to avoid making mistakes:
# alias rm='rm -i'
# alias cp='cp -i'
# alias mv='mv -i'

gg=666
用户:debian
debian@npi:~$ cat .bashrc
# ~/.bashrc: executed by bash(1) for non-login shells.
# see /usr/share/doc/bash/examples/startup-files (in the package bash-doc)
# for examples

# If not running interactively, don't do anything
case $- in
    *i*) ;;
      *) return;;
esac

# don't put duplicate lines or lines starting with space in the history.
# See bash(1) for more options
HISTCONTROL=ignoreboth

# append to the history file, don't overwrite it
shopt -s histappend

# for setting history length see HISTSIZE and HISTFILESIZE in bash(1)
HISTSIZE=1000
HISTFILESIZE=2000

# check the window size after each command and, if necessary,
# update the values of LINES and COLUMNS.
shopt -s checkwinsize

# If set, the pattern "**" used in a pathname expansion context will
# match all files and zero or more directories and subdirectories.
#shopt -s globstar

# make less more friendly for non-text input files, see lesspipe(1)
#[ -x /usr/bin/lesspipe ] && eval "$(SHELL=/bin/sh lesspipe)"

# set variable identifying the chroot you work in (used in the prompt below)
if [ -z "${debian_chroot:-}" ] && [ -r /etc/debian_chroot ]; then
    debian_chroot=$(cat /etc/debian_chroot)
fi

# set a fancy prompt (non-color, unless we know we "want" color)
case "$TERM" in
    xterm-color|*-256color) color_prompt=yes;;
esac

# uncomment for a colored prompt, if the terminal has the capability; turned
# off by default to not distract the user: the focus in a terminal window
# should be on the output of commands, not on the prompt
#force_color_prompt=yes

if [ -n "$force_color_prompt" ]; then
    if [ -x /usr/bin/tput ] && tput setaf 1 >&/dev/null; then
        # We have color support; assume it's compliant with Ecma-48
        # (ISO/IEC-6429). (Lack of such support is extremely rare, and such
        # a case would tend to support setf rather than setaf.)
        color_prompt=yes
    else
        color_prompt=
    fi
fi

if [ "$color_prompt" = yes ]; then
    PS1='${debian_chroot:+($debian_chroot)}\[\033[01;32m\]\u@\h\[\033[00m\]:\[\033[01;34m\]\w\[\033[00m\]\$ '
else
    PS1='${debian_chroot:+($debian_chroot)}\u@\h:\w\$ '
fi
unset color_prompt force_color_prompt

# If this is an xterm set the title to user@host:dir
case "$TERM" in
xterm*|rxvt*)
    PS1="\[\e]0;${debian_chroot:+($debian_chroot)}\u@\h: \w\a\]$PS1"
    ;;
*)
    ;;
esac

# enable color support of ls and also add handy aliases
if [ -x /usr/bin/dircolors ]; then
    test -r ~/.dircolors && eval "$(dircolors -b ~/.dircolors)" || eval "$(dircolors -b)"
    alias ls='ls --color=auto'
    #alias dir='dir --color=auto'
    #alias vdir='vdir --color=auto'

    #alias grep='grep --color=auto'
    #alias fgrep='fgrep --color=auto'
    #alias egrep='egrep --color=auto'
fi

# colored GCC warnings and errors
#export GCC_COLORS='error=01;31:warning=01;35:note=01;36:caret=01;32:locus=01:quote=01'

# some more ls aliases
#alias ll='ls -l'
#alias la='ls -A'
#alias l='ls -CF'

# Alias definitions.
# You may want to put all your additions into a separate file like
# ~/.bash_aliases, instead of adding them here directly.
# See /usr/share/doc/bash-doc/examples in the bash-doc package.

if [ -f ~/.bash_aliases ]; then
    . ~/.bash_aliases
fi

# enable programmable completion features (you don't need to enable
# this, if it's already enabled in /etc/bash.bashrc and /etc/profile
# sources /etc/bash.bashrc).
if ! shopt -oq posix; then
  if [ -f /usr/share/bash-completion/bash_completion ]; then
    . /usr/share/bash-completion/bash_completion
  elif [ -f /etc/bash_completion ]; then
    . /etc/bash_completion
  fi
fi
alias ll='ls -l --color=auto'
shell启动方式对变量的影响
debian@npi:~$ cat hello.sh
echo "hello, jungle"

a=10
b=11
c=12
子进程
子shell进程中执行:【/bin/bash和./】
debian@npi:~$ unset a b
debian@npi:~$ /bin/bash hello.sh
hello, jungle
debian@npi:~$ echo $a

debian@npi:~$ echo $b

debian@npi:~$ unset a b
debian@npi:~$ ./hello.sh
hello, jungle
debian@npi:~$ echo $a

debian@npi:~$ echo $b
当前进程
当前进程中执行:【source和.】
debian@npi:~$ source hello.sh
hello, jungle
debian@npi:~$ source hello.sh
hello, jungle
debian@npi:~$ echo $a
10
debian@npi:~$ echo $b
11
debian@npi:~$ unset a b
debian@npi:~$ echo $a

debian@npi:~$ echo $b

debian@npi:~$ . hello.sh
hello, jungle
debian@npi:~$ echo $a
10
debian@npi:~$ echo $b
11
实例
使用 sh ./hello.sh 执行脚本时,脚本会在子进程中运行,而不是当前进程(父进程)。
具体解释:
sh 是一个独立的命令,用于启动一个新的 sh(Bourne shell)解释器实例。
当执行 sh ./hello.sh 时,系统会创建一个新的子 shell 进程(由当前 shell 进程派生),并在这个子进程中执行 hello.sh 脚本。
脚本中定义的环境变量、函数等仅在子进程中生效,不会影响父进程(即你当前正在操作的 shell)的环境。
对比:与 . ./hello.sh 或 source ./hello.sh 的区别
如果使用 . ./hello.sh 或 source ./hello.sh 执行脚本:
脚本会在当前进程中直接运行,不会创建子进程。
脚本中定义的环境变量、函数等会直接影响当前 shell 环境。
这也是为什么系统配置脚本(如 /etc/profile.d 下的脚本)通常用 . 或 source 执行 —— 为了让配置在当前环境生效
构建deb软件安装包
Linux软件包的组成
| 文件类型 | 保存目录 |
|---|---|
| 普通程序 | /usr/bin |
| root权限程序 | /usr/sbin |
| 程序配置文件 | /etc |
| 日志文件 | /var/log |
| 文档文件 | /usr/share/doc |
Linux软件包
源码包
优点:
开源免费
自由裁剪功能
修改源代码
缺点:
- 安装步骤繁琐
- 编译时间长
- 新手无法解决编译问题
二进制包
优点:
- 简单易用
- 安装速度快
缺点:
- 无法阅读修改源码
- 无法裁剪功能
- 依赖性强
deb包
概念
Debian、Ubuntu、Deepin等Linux发行版的软件安装包。
rpm包
概念
RedHat,Fedora,Centos等Linux发行版的软件安装包。
dpkg工具
概念
底层的包管理工具,主要用于对已下载到本地和已经安装的deb包进行管理
常用命令
安装软件:dpkg -i xxxx.deb
查看安装目录:dpkg -L xxxx
显示版本:dpkg -l xxxx
详细信息:dpkg -s xxxx
罗列内容:dpkg -c xxxx.deb
卸载软件:dpkg -r xxxx
deb包文件结构分析
DEBIAN目录:
control文件:
Package:软件名称
Version:版本
Section:软件类别
Priority:对系统的重要性
Architecture:支持的硬件平台
Maintainer:软件包的维护者
Description:对软件的描述
preinst文件 : 安装之前执行的shell脚本
postinst文件 : 安装之后执行的shell脚本
prerm文件:卸载之前执行的shell脚本
postrm文件: 卸载之后执行的shell脚本
copyright文件:版权声明
changlog文件: 修改记录
软件具体安装目录:
视实际需求
构建一个helloworld的deb包
演示:dpkg -b
#!/bin/bash

# 确保提供了两个参数
if [ $# -ne 2 ]; then
    echo "用法: $0 <临时目录名> <输出包名>"
    exit 1
fi

# 获取当前系统架构
arch=""
if command -v dpkg >/dev/null 2>&1; then
    arch=$(dpkg --print-architecture)
else
    arch=$(uname -m)
    case "$arch" in
        armv7l) arch="armhf" ;;
        aarch64) arch="arm64" ;;
        x86_64) arch="amd64" ;;
        i386|i686) arch="i386" ;;
        *) echo "未知架构: $arch"; exit 1 ;;
    esac
fi

echo "当前系统架构: $arch"

# 定义版本号等信息
version="0.1.2"
author="Emdebfire"
package_name="$2"
package_dir="$1"

# 创建DEBIAN控制目录
mkdir -p "./$package_dir/DEBIAN/" || { echo "创建目录失败"; exit 1; }

cat <<EOF > ./$package_dir/DEBIAN/changelog
AUTHOR:$author
VERSION:$version
DATE:$(date -R)
EOF


cat <<EOF > ./$package_dir/DEBIAN/copyright
******************************************************************
  * @attention
  *
  * 实验平台:野火  i.MX6ULL开发板
  * 公司    :http://www.embedfire.com
  * 论坛    :http://www.firebbs.cn
  * 淘宝    :https://fire-stm32.taobao.com
  *
* * ******************************************************************
EOF

cat <<EOF > ./$package_dir/DEBIAN/control
Source:embedfire
Package:${package_name%.*}
Version:$version
Section: debug
Priority: optional
Architecture: $arch
Maintainer:$author
Description: Embedfire Tools
EOF

cat <<EOF > ./$package_dir/DEBIAN/postinst
#!/bin/sh
echo "******************************************************************"
echo "welcome to use $package_name!"
echo "******************************************************************"
EOF

# 设置正确的权限
sudo chmod 755 ./$package_dir/DEBIAN/postinst

dpkg -b $package_dir $package_name

echo "成功创建deb包: $package_name"
构建脚本:sudo ./build_deb.sh helloworld helloworld.deb
# 过程如下
# 先创建脚本
debian@npi:~$ sudo mkdir -p usr/bin
debian@npi:~$ cd ./helloworld/
debian@npi:~/helloworld$ sudo vim usr/bin/helloworld.sh
debian@npi:~$ cat ./helloworld/usr/bin/helloworld.sh
#!/bin/bash

echo "hello,world!!!"

# 赋权限
debian@npi:~/helloworld$ sudo chmod 777 usr/bin/helloworld.sh

debian@npi:~/helloworld$ cd ../
debian@npi:~$ sudo ./build_deb.sh helloworld helloworld.deb
当前系统架构: armhf
dpkg-deb: building package 'helloworld' in 'helloworld.deb'.
成功创建deb包: helloworld.deb
debian@npi:~$ sudo dpkg -i helloworld.deb
Selecting previously unselected package helloworld.
(Reading database ... 20236 files and directories currently installed.)
Preparing to unpack helloworld.deb ...
Unpacking helloworld (0.1.2) ...
Setting up helloworld (0.1.2) ...
******************************************************************
welcome to use helloworld.deb!
******************************************************************

# 罗列内容
debian@npi:~$ dpkg -c helloworld.deb
drwxr-xr-x root/root         0 2025-07-25 15:15 ./
drwxr-xr-x root/root         0 2025-07-25 15:10 ./usr/
drwxr-xr-x root/root         0 2025-07-25 15:12 ./usr/bin/
-rwxrwxrwx root/root        36 2025-07-25 15:12
./usr/bin/helloworld.sh

# 直接运行
debian@npi:~$ helloworld.sh
hello,world!!!
debian@npi:~$ ls /usr/bin | grep hello
hello
helloworld.sh
apt命令和apt-get命令
- apt是新版的包管理工具
- 解决apt-get命令过于分散的问题
- apt默认属性对用户友好(进度条、提示升级包数)
转载请注明来源,欢迎对文章中的引用来源进行考证,欢迎指出任何有错误或不够清晰的表达。可以在下面评论区评论,也可以邮件至 jungle8884@163.com

